Tzippy Respler
February 8, 2016
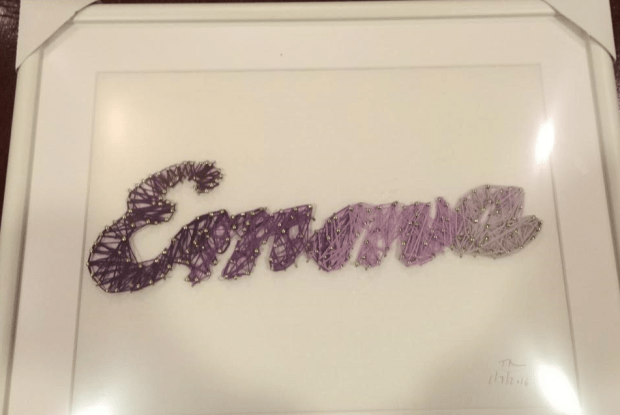
My wonderful niece, Emma, is turning 12. I wanted to create something for her in honor of her Bat Mitzvah. I decided to wow her by creating a personalized string art design for her bedroom.
I remember creating string art cards with a needle and thread as a young girl in the seventies. This new piece was to be an ode to those memories with the simplified bonus of never having to thread (and rethread) a single needle. The design would use the letters of her name (thankfully only four) and would be done in purple ombre hues in tribute to her favorite color.
To keep things simple (and not have to change thread more than absolutely necessary), I decided to string each letter in a different shade of the purple spectrum. Since I was using an uppercase E to begin her name, I wanted that to stand out so I opted to run the ombre purple from dark to light.
TIME
1-3 hours
SUPPLIES
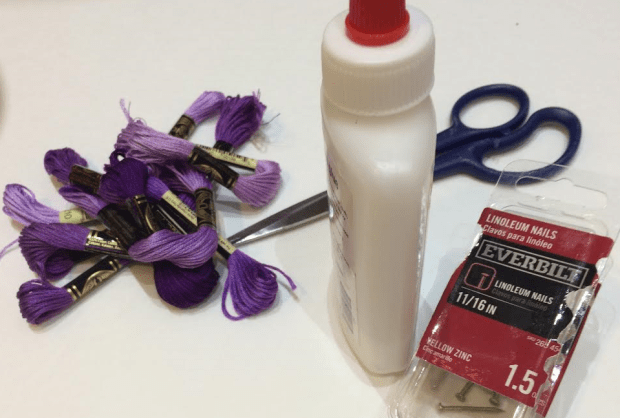
2-3 foam boards (available at an office supplies or dollar store)
2-3 packages of 5/8″ or 11/16″ nails (I used 11/16″ brass linoleum nails from Home Depot)
picture frame or shadow box (I used a white 16×20″ frame from IKEA)
1-2 packages of DMC floss per letter (from a craft store)
school glue or double stick tape
foam brush or craft stick
scissors
pencil for tracing
SIMPLE INSTRUCTIONS
- Select frame or shadow box
- Trim, stack and tape/glue foam board layers
- Draw or print name
- Outline name in nails
- Remove name
- String away!
- Frame your finished creation
DETAILED INSTRUCTIONS
Decide on a picture frame or shadow box that you like and will accommodate the size of your final string art design. Make sure that the back of the frame will accommodate 2-3 layers of the foam board.
I chose a white frame from Ikea with enough depth for three stacked layers of foam board. If you have a shallower frame, you can try using two layers of foam board. The foam board will form the basis for the string art design and will allow a cushioned background for the nails, so make sure that the stacked foam board thickness will allow for the nails to be pushed through without protruding from the back and will still fit the depth of your frame.
I used the outside border of the paper mat from the frame to trace the size of my foam board base and cut three pieces of foam board. Stack the foam board pieces, placing the nicest looking one on top, as that piece will be the background of your string art. Check once again that the stacked foam board layers fit into your frame and trim, if necessary. Lightly glue or use double-sided tape to keep layers from separating.
Create a printed version of the name that you would like to use. For Emma’s name, I used a script font (Angel Tears font size 750) because I wanted my letters to be connected. I produced another string art creation for my granddaughter, Avigail, with separate block letters (Aharoni font size 700) that also looks great. You can use any thick font or you can write the name by hand. Just make sure that the letters are thick enough to create enough width for stringing each letter and that the letters with an empty middle (a, e, o, p, etc) have a large gap for the empty middle.


Most likely, your name will print on more than one piece of paper. Cut out the name and if they are letters that have an empty middle (like a, e, o, p, etc), carefully cut that out of your name. If you have used a script font and it has printed on multiple pages, tape the paper together. This name will be the layout of your string art piece.
Place the name on the top layer of your foam board and set into the frame to test that everything looks right. At this point, decide if you will be using a framing mat. I used a mat for the Emma design, but not for the Avigail piece. Make sure that you like the way the name sets up in the frame and that you like the amount of margin space between your name and the mat and sides of the frame. If not, make adjustments to the size, font, etc. I found that my name was a bit too thick for my taste, so I trimmed the width of the letters ever so slightly.
I did not choose to tape the name to the foam board, but if you want to be extra careful, you can lightly tape the name to the top layer of the foam board using double-sided tape. This will make sure that the name doesn’t budge, but it will also make it more difficult to remove the name. Once you find the perfect position on the foam board, you are ready to start nailing.
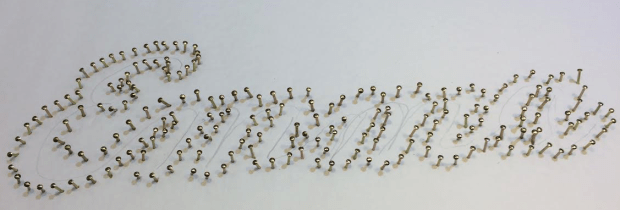
Find a seat and start outlining your name in nails. For me, this part was the most laborious. Push the nails into the foam board tracing around the letters of the name. You can use a small hammer, but it most likely will not be necessary. The nails should be spaced about 1/4″ to 2/3″ apart. They do not need to be spaced exactly evenly. I find that I use more nails around the curvy parts of the letters and fewer nails on the sides of the letters.
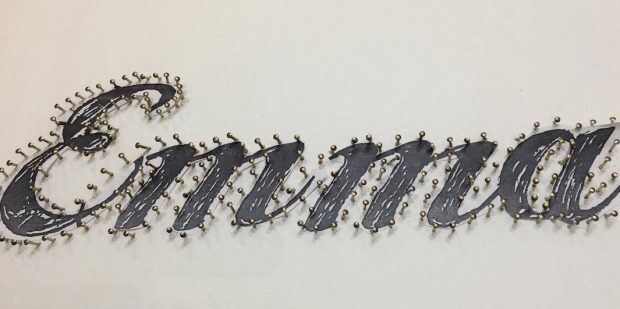
Once all the nails have been placed, gently remove the name from the foam board. Carefully replace any nails that come out when you remove the name using the same nail holes.
Once I removed the name, I found it slightly difficult to read the name, Emma, in nails (probably because of the two consecutive m’s). I, therefore, gently traced the name on the foam board with a pencil to help guide me for the stringing.
Starting with my darkest purple thread, I tied a loop at the top of the E and I ready to string the design. This was the part that I enjoyed the most because it was fun and forgiving. I wove the dark purple thread back and forth, sometimes around one nail, sometimes around several nails. Don’t overthink this, just string back and forth until you have achieved the look that you like. You can leave it more sparse or more dense. It is completely up to you.

At the end of the E, I continued using the darkest purple tone slightly into the first M for blending. I then tied a loop over a nail head and cut the string off. I started the next lighter hue of purple at the end of E and continued stringing the first M, finishing slightly into the second M. I then tied a loop over a nail head or two and cut the string off.
I continued until I had strung the entire name. For blending, I continued each color slightly into the next letter. For each new color, I began using the hue of the next letter at the end of the previous letter.
Once complete, I set the string art into the matted frame. I was able to fit everything in with the glass, but if the depth of your piece is too large for the frame, just remove the glass to fit the string art.

I am very pleased with the way this design turned out. Now, I hope Emma will love it, too.
Happy birthday, Emma!
