Passover

Kosher for Passover recipes

Peach Velvet Salmon

peach velvet salmon

I’ll share a little secret with you.

Last week’s leftover homemade dip or dressing becomes this week’s favorite marinade.  The reason is simple.  Dips have all the components needed in a marinade.  They have an oil base for moisture,  a flavor profile for taste and usually some acid for tenderizing.

I also like to use whatever seasonal items are on hand.  This week, peaches are plentiful and flavorful at the market and my planters are bursting with fresh chives.  These early summer flavors inspired this dish and my hungry family and friends approved it for publishing on the blog.

I used leftover Simple and Creamy Lemon Vinaigrette to coat the salmon fillets, but any dip, sauce or dressing will work.  I pressed freshly ripened peach slices and torn chives on top.

The salmon is simple and delicious with a taste of summer.  Enjoy!

INGREDIENTS

salmon fillets
Simple and Creamy Lemon Vinaigrette
1 ripe peach, scrubbed and sliced thin
Chives, torn for garnish

DIRECTIONS

Line cooking sheet with parchment paper or foil.

Brush salmon fillets generously with Simple and Creamy Lemon Vinaigrette or your favorite dressing or dip.   Press thin peaches slices and a few torn chives into salmon.

Bake at 350 degrees F for 45-55 minutes, until fish flakes easily with fork. Sprinkle some more fresh chives over salmon.

Perfect Strawberry Smoothie

perfect strawberry smoothie.png

INGREDIENTS

1 cup frozen strawberries
1 cup milk
2 tablespoons honey or strawberry daquiri mix
whipped cream (optional)

SUPPLIES

blender
straws

DIRECTIONS
Add strawberries, milk and honey to blender jar. Blend until smooth. Carefully pour into tall glass and garnish with whipped cream.  Add a thick straw.

Enjoy!

Please Note: This post contains affiliate links from Amazon, which means I earn a small commission if you click and make a purchase.


Broccoli Encrusted Baked Chicken Cutlets: A Basic Lesson in Sharing

broccoli encrusted chicken cutlets.jpg

I am on a forever quest to produce great meals with minimal effort.  In that endeavor, I have found many shortcuts.  One of my favorites is to prepare one starter and use it in multiple recipes and in different ways.  I convince myself that it is just another form of sharing, true collaboration between recipes.   I vehemently deny that it has anything to do with laziness.

On the most basic level, I use this sharing shortcut for sauteed onions and/or garlic.  Sauteed vegetables add an important depth of flavor to most recipes but can be time-consuming.  Therefore, I saute one large batch and then split the sauteed batch between the soup, side dishes and main dish within the same menu.   Any leftover sauteed vegetables are then moved to a zipper bag and placed in the freezer for future sharing.

This recipe is the next step in batter-sharing.  This recipe began as the batter for my Broccoli Kugel.  I was planning to prepare Baked Chicken Cutlets later on in the day.  While I was pulsing the Broccoli Kugel batter in my food processor, I thought, “why not use this batter to coat the baked chicken cutlets?”  After all, the batter incorporated so many of the ingredients necessary for moist baked chicken.  And, the addition of broccoli would add a moist barrier to the chicken while adding a new color and flavor profile!

And, so I applied the batter-sharing concept to my broccoli batter.  In a moment of boldness, I split off  some of the kugel batter for the coating of these chicken cutlets.

Wow!  Sharing can be daring, and oh, so delicious!

SUPPLIES
food processor
parchment paper

INGREDIENTS
4-6 boneless skinless chicken breasts, pounded or cut thin
1 cup cooked or thawed frozen broccoli (see kosher notes)
1 sauteed onion or 1/4 cup French Fried Onions
1 egg, beaten or 1/2 cup of your favorite dressing
1/2 teaspoon salt
dash pepper
Spicy Mayo (optional)

DIRECTIONS
Preheat oven to 400 degrees F.  Line a baking sheet with parchment paper or spray with cooking spray.

Pulse French Fried Onions soft broccoli, egg, salt and pepper.

Coat the thin chicken breasts in broccoli mixture.

Place chicken on parchment on prepared baking sheet.  Optionally, drizzle with Spicy Mayo

Bake chicken for 20-30 minutes or until chicken is fully cooked.

KOSHER NOTES
Kosher laws disallow the eating of any whole insects and therefore broccoli requires a process of soaking, rinsing and in some cases, pureeing, unless purchased with a reputable kosher hashgacha (certification). Kashrut authorities differ on the proper checking of broccoli. This blog was not designed to be your kosher authority, so please consult your local rabbinic authority regarding using and preparing broccoli.

Enjoy!


Please Note: This post contains affiliate links from Amazon, which means I earn a small commission if you click and make a purchase.

Passover Red Wine Chicken Marsala


pesach chicken marsala.JPG

This perfect for Pesach (Passover) recipe stars a red wine sauce and potato flour dredging for the chicken.   Although Marsala wine and flour are typically used in this recipe, I have adjusted the recipe to use red wine and Pesach gluten-free ingredients that pair so well with the flavors and themes of the Pesach seder experience.

Traditionally, we do not eat roasted meats at the seder, since the Karban Pesach (Passover sacrifice offering) was a roasted meat that was eaten at the time of the Holy Temple.  Since we no longer have the Holy Temple, it is customary not to eat roasted meat  on the evening of the seder.  This recipe is perfect for the seder.

We have a tradition of drinking four cups of wine at our Pesach (Passover) Seder.  After all, the majestic Seder venue commemorates our miraculous exodus from Egypt and the transformation of the Jewish nation from slavery to freedom.  What better drink than wine to celebrate freedom on a night replete with regal traditions?

We make a separate blessing on each of the four cups of wine at different parts of the seder.    The first cup of wine fills the role of kiddush (wine benediction) to sanctify the holiday of Pesach.   The second cup is associated with the lengthy telling of the story of the Exodus.  The third cup is associated with the Birkas Hamazon (Grace after Meals) and the fourth cup of wine is associated with the Hallel (songs of praise) that we sing toward the end of the seder.

Each of the four cups of wine symbolize one of the national exiles experienced by the Jewish nation and relate to one of the four expressions of redemption by G-d in the Exodus.

והוצאתי V’ho-tzaisi (and He took us out)
This expression of redemption symbolizes the Babylonian exile.

והצלתי  V’he-tzalti (and He saved us)
This expression of redemption symbolizes our oppression by Persia (further commemorated by Purim)

וגָּאלתי  V’ga-alti (and He redeemed us) This expression of redemption symbolizes our oppression by the Greeks (further commemorated by Chanukah)

ולקחתי  V’la-kachti (and He took us) This expression of redemption symbolizes the Roman exile.

This recipe tastes as good as the orginal and will wow your seder guests.  Enjoy!

INGREDIENTS

2 pounds boneless chicken breasts, cut or pounded thin
1/3 cup potato starch
salt and pepper to taste
6 tablespoons olive oil
2 packages mushrooms, sliced or 2 large cans mushrooms, drained
Juice of half a lemon or 2 tablespoons lemon juice
3/4 cup red wine
1/4 cup pareve milk (optional)

parsley (optional, for garnish)

DIRECTIONS

Place 1/3 cup of potato starch in a pie dish or a shallow bowl and season with salt and pepper.  Coat each piece of chicken with potato starch mixture.

Over medium-high heat, heat oil in a large frying pan or saute pan. Add the coated chicken. Cook each piece of coated chicken for 3-4 minutes on each side.  Work in batches, if necessary, making sure not to crowd the pan.

Slice mushrooms and cook for a few minutes in same pan, until mushrooms are soft and fragrant.

Add the wine and lemon juice, deglazing the pan with a wooden spoon by stirring in any brown bits left over from the cooking of the coated chicken.   Cook until the mushroom sauce is reduced to half.

Lower the heat to medium and add the pareve milk.  With a wooden spoon, stir well until the sauce is well-combined. Reduce heat to a simmer and simmer the sauce until the sauce is thick and glossy.

Return the cooked chicken to the pan and cook for 10-15 minutes more, until chicken is fragrant, soft, succulent and cooked through.

Add additional salt and pepper to taste, if necessary.  Optionally, garnish with chopped parsley.

Enjoy!


pesach chicken marsala on a plate


Pesach Onion Kugel

pesach onion kugel

I absolutely love a challenge!  In a comment on my Simply Amazing Onion Kugel, Pearl asked about adjusting this simple and delicious recipe to Pesach (Passover) cooking.  I worked on making this recipe suitable for Pesach and my family contends that this recipe is even better than the original.

I agree.

Our custom on Pesach is not to bruck (use matzo products with liquid), so it was not possible to merely substitute soaked matzo for the soaked bread in the original recipe.  I played with the recipe until I came up with this Pesach variation.

We all licked our plates clean.  It is a winner and it will be on our seder menu this year.

Have a Chag Kasher V’Samaech (Happy and Kosher Passover)!

SUPPLIES

food processor
pyrex pie plate


INGREDIENTS

4-5 onions

3 eggs
2/3 cup potato starch
1/4 cup oil
1/3 cup seltzer
1 teaspoon salt
pinch black pepper


DIRECTIONS

Preheat oven to 425 degrees F.

Coat a pyrex pie plate lightly with oil and place in oven.

While the oil is heating up, cut the onions into large chunks. Using the metal s-blade of the food processor, pulse the onions until they are shredded but not liquidy.  Add eggs, oil, seltzer,  salt and pepper. Pulse a few times to combine.

Carefully remove the sizzling pyrex pie plate from the oven. Pour the mixture directly from the food processor bowl into the pyrex pie plate and bake uncovered for one hour and ten minutes. When done, the onion kugel should be caramelized on top and bottom and soft and creamy on the inside.


TIPS

Because sulphuric gas released from the onion during cutting reacts with tear ducts, eyes feel irritated and release tears when cutting onions.  Heating the onion before cutting  breaks apart the enzymes that emit sulphuric gas to reduce and/or eliminate the tears.   The easiest way to heat the onions for this kugel is to microwave them on high for several minutes  in 30 second increments.  For best results, cool the microwaved onions before cutting into chunks.

Please Note: This post contains affiliate links from Amazon, which means I earn a small commission if you click and make a purchase.

Simple Cranberry Sorbet

cranberry sorbet

I’ll share a secret with you.

My Purim seuda (feast) menu is designed around the chametz (leavened products) that I must use up before Pesach (Passover).

This year, I found myself with lots of frozen challah, hence the stuffed chicken breasts and meatballs.  I found that I had three bags of fine egg noodles, and thus yerushalmi kugel was added to the menu. I found myself with way too many boxes of brownie mix, even after giving so many boxes away to the fastest respondents on our Cousins WhatsApp chat.  I created stunning pecan truffle cookies and made delicious Strawberry and Brownie Mini Trifles to use up the remaining boxes of brownie mix.

As I was sorting through the freezer, I found a few bags of frozen cranberries.  According to halacha (Jewish law),  cranberries are not chametz.  Therefore, they did not need to be consumed or discarded before Pesach, but after doing the math, I realized that they probably were already several months old.  After all, I usually buy fresh cranberries around Thanksgiving and then wash and freeze them in late November or early December.

I set a handful of cranberries aside to prepare Frosted Sugar-Coated Cranberries to be used as a garnish, but decided to prepare cranberry sorbet with the rest of the frozen cranberries.  I remember seeing a Cranberry Ice recipe posted by one of my favorite kosher bloggers, CookingfortheTimeChallenged and I used that as my inspiration for this recipe.

This recipe uses sweet soda or juice as the liquid base.  I found some flat soda left over from a Sheva Brochos that I recently hosted.  This is the perfect recipe to use up that leftover grape juice, orange juice or flat soda.

I love the sweet and savory flavor combination.  I garnished these ices with chives for a surprising bite, but other herbs like mint or basil may be blended right in for that stunning palate sensation.

INGREDIENTS

one can cranberry sauce, whole or jellied
1 cup soda or juice
1 bag frozen berries or 2 cups frozen grapes

herb garnish, such as basil, mint or chives (optional)

DIRECTIONS

Using the s-blade of the food processor, puree cranberry sauce, berries and liquid.

Freeze until solid or overnight.

Once frozen, remove from freezer and defrost just enough to scoop back into the food processor fitted with the s-blade.

Pulse sorbet in food processor just until smooth.  Refreeze.

To allow for simple entertaining, I usually defrost for 20-30 minutes before scooping.

Garnish with mint leaves and Frosted Sugar-Coated Cranberries

SUBSTITUTIONS

Any canned fruit may be substituted for the canned cranberry sauce.

Any frozen fruit may be substituted for the frozen berries.  Just make sure to taste puree and blend with enough soda or juice for optimal sweetness.  Honey may be added as well to sweeten the sorbet.

Blend your choice of fresh herbs like mint, basil or chives for that unusual sweet and savory flavor sensation.

TIPS

I scoop the sorbet into small cups in advance and freeze in the cups until ready to serve. That speeds up the serving of a frozen dessert and keeps everything tidy.    I add the garnish at the end so that the leaves stay fresh and green.

Roasted Confetti Vegetables with Cashews

This is the perfect side dish for a weeknight.   It uses wholesome ingredients, takes minutes to prepare and requires only 20 minutes to roast. The meatiness of the cashews paired with the tender shreds of zucchini and rainbow carrots make this dish hearty, flavorful and satisfying.

confetti roasted vegetables.jpg

 INGREDIENTS

1-2 zucchini, shredded
1 package rainbow carrots, peeled and shredded
1 onion, shredded
handful of whole cashews

2 teaspoons kosher salt
flavored oil or olive oil

DIRECTIONS

Preheat oven to 450 degrees F. Line a baking sheet with foil or parchment paper.  Using the shredding blade of the food processor, shred onion, carrots and zucchini.

Spread vegetables atop the lined baking sheet. Drizzle with a scant amount of oil and sprinkle with salt. Sprinkle a handful of cashews over vegetables.

Roast for 15-20 minutes.

Toss and enjoy!

Pistachio Encrusted Cajun Tilapia

pistachio-encrusted tilapia-ready to cook

My two sisters-in-law, Yael and Chaya, share the same birthday.  Interestingly, it was the same birthday shared by my father-in-law a’H, too.  Last year, we went out for a woman’s-only dinner in celebration of the birthdays.   We enjoyed our time together so much that this year, in the ice and snow,  we once again trekked to a dairy restaurant in Brooklyn to celebrate the two birthdays.

My sisters-in-law ordered menu items that they knew and trusted: salmon, salad and Eggplant Parmesan.  Always looking for something new, I was entranced by the pistachio-encrusted salmon on the menu and was not disappointed when it was presented and devoured by me and my sisters-in-law.

So, I started thinking… Salmon is so flavorful and distinctive on its own.   Why don’t I try this encrusting technique on a blander fish like tilapia?  Tilapia is one of  those inexpensive fish ingredients that is always available at my local fish counter.  Its meaty flesh and mild taste make it suitable for kick-start cajun seasoning and nutty pistachio encrusting.

And so, for dinner the night after the birthday celebration, I prepared this dish.  And, both Don and Leah confirmed that it was blog-worthy.  Here it is!

INGREDIENTS
4 large tilapia filets
2 tablespoons Cajun seasoning
1 egg
1/2 cup chopped pistachios

oil or cooking spray

HONEY DIJON SAUCE (optional)
1/3 cup Dijon mustard
1 tablespoon wine vinegar
2 tablespoons oil
2 tablespoons honey

OPTIONAL SUPPLIES
food processor
pyrex pie plate

DIRECTIONS
Preheat oven to 400 degrees F.

Place cajun seasoning on a plate or pyrex pie plate.  Blend egg with fork in a separate plate or pyrex pie plate.   Place chopped pistachios on a third plate or pyrex pie plate.

pistachio-encrusted tilapia-prep plates

Lightly coat both sides of tilapia with Cajun seasoning and then dip into egg, coating both sides. Finally, coat each tilapia fillet with chopped pistachios.

Cover a baking sheet with foil or parchment paper.  If using foil, drizzle with a bit of oil or spray with cooking spray.  Place the encrusted tilapia fillets in a single layer, making sure not to crowd the dish.

pistachio-encrusted tilapia-ready to cook

Bake for 15-20 minutes or until the tilapia easily flakes with a fork.

In a food processor or with a whisk in a bowl, combine honey Dijon ingredients until smooth and creamy.

honey dijon sauce.jpg

Drizzle over fish before serving.

pistachio-encrusted tilapia-serving suggestion.jpg

Enjoy!

Please Note: This post contains affiliate links from Amazon, which means I earn a small commission if you click and make a purchase.

Simply Magical London Broil

There are some dishes that need garnishing and extra sauces once cooked.  This is not one of them.   This London Broil roast is ready to serve and self-garnished with baked onions and scallions.  It is simple enough for a weekday dinner and “wow” enough for Shabbos or that special celebration.  It uses the simplest of ingredients, technique and presentation and yet, it is delicious, succulent and beautiful.

Magical baked london broil with Celery on cutting board.png

INGREDIENTS
1 small (2-3 pound) London Broil
1 red onion, diced small
1-2 bunches scallions, cut small
handful of french fried onions (optional)
juice of one lemon or lime
4 stalks celery
salt
pepper
1/3 cup water

DIRECTIONS

Let London Broil come to room temperature.

Slice celery into thick chunks.

In a roasting pan or pyrex dish, place celery chunks and then place London Broil fattier side up.  Squeeze citrus on both sides of London broil and season with salt and pepper.

Pour 1/3 cup of water around London Broil and then top London Broil with diced onion and scallions.

Magical baked london broil with Celery-raw.png

Cover pan tightly with foil.

Bake at 300 degrees F for 3 hours. London Broil should be fork tender when done.   Allow meat to rest for at least 10 minutes before slicing on the bias.

Magical baked london broil with Celery.png

Out of the Bowl Tiered Salad

Who says that salad must be served in a salad bowl and tossed?

out of the bowl salad-side view.png

One of the most exciting things about salad is its versatility.  A beautiful and delicious salad can incorporate so many disparate ingredients and the contrast of colors, textures and flavors makes each salad unique.

Today’s salad is about layering a gorgeous vessel with different vegetables and toppings.  Its effortless simplicity achieves an elegance that highlights the colorful and flavorful vegetables themselves.

This salad is prepared on a rose gold hammered elongated platter with the ingredients placed in long tiers.  The vibrant colors of the romaine lettuce, shredded fresh beets, rainbow peppers and heirloom tomatoes speak for themselves.

SUPPLIES

hammered elongated bowl (different than bowl pictured on blog post)

INGREDIENTS

romaine lettuce, shredded
raw red beets, peeled and shredded
rainbow peppers, cut into small pieces
heirloom tomatoes
parsley and scallions, cut into tiny pieces

Balsamic Vinaigrette

DIRECTIONS

Place a layer of shredded romaine lettuce.  Top that with a layer of shredded red beets, overlapping the bottom layer so that the romaine lettuce can be viewed from the sides.

out of the bowl salad-layers 1 and 2.png

Top that with small pieces of rainbow peppers and small colorful tomatoes.

rainbow peppers

Garnish with shredded or sliced parsley and scallions.  Drizzle Balsamic Vinaigrette over the salad and serve.

out of the bowl salad partial view.png


This salad is truly simple to wow!

out of the bowl salad.png

Please Note: This post contains affiliate links from Amazon, which means I earn a small commission if you click and make a purchase.

Abracadabra Potato Kugel

My grandson, Judah, has learned a new word this summer.  Abracadabra.

Abracadabra is quite a mouthful for a two year old.    And, when Judah uses the word, he uses it with such flair.  He must have learned it from one of the many shows he enjoyed in summer camp.

I have been preparing potato kugel for as long as I remember and most kugels share similar ingredients.  I have two potato kugel recipes on this blog (Davida’s Awesome Potato Kugel,  Simply the Best Potato Kugel Ever and ) and they are both delicious, but rather similar.

There just doesn’t seem to be much new in potato kugel.

Until now.


abracadabra potato kugel

After I published Davida’s famous potato kugel recipe (Davida’s Awesome Potato Kugel), my aunt shared a secret tip to her fluffy and creamy potato kugel that proved to be wonderful.

It is a very simple and effective secret.  And, it is well-deserving of the simple to wow seal of approval and Judah’s favorite word, Abracadabra.

Wait for it….

Tante Sari adds seltzer to her potato kugel batter.  The effervescence of the seltzer  adds lightness and creaminess to the potato kugel.  I adapted my potato kugel recipe to accommodate the seltzer and after some tweaking (with plenty of happy taste-testers around), here is the simple to wow recipe.  It has received rave reviews from family and friends alike.

SUPPLIES

food processor
pyrex pie plates

INGREDIENTS

1 onion, quartered

1/3 cup of seltzer
1/3 cup oil
3 large eggs

1 teaspoon salt
1/4 teaspoon black pepper

4 medium to large potatoes, peeled and cut into chunks

DIRECTIONS

Set oven to 450°F degrees.

Coat a pyrex pie plate lightly with oil and place in oven (no preheating necessary).

While the oil is heating up, using the metal s-blade of the food processor, shred the onion.  Once the onion is shredded,  add oil, eggs, seltzer, salt and pepper.  Pulse a couple of times to combine.

Remove the s-blade and add the shredding blade to the food processor.  Shred the potatoes.  Pour everything into a large mixing bowl and stir to combine.   I like to use the stainless steel mixing bowl of my Kitchen Aid mixer, since it is a large, sturdy bowl with a handle for pouring,

Carefully remove the sizzling pyrex pie plate from the oven.  Pour the mixture into the pyrex pie plate and bake uncovered for one hour.

Please Note: This post contains affiliate links from Amazon, which means I earn a small commission if you click and make a purchase.

Perfect Lean and Moist Brisket

low-carb brisket up close.JPG

This Shabbos, we were expecting a houseful of company. Our guests were a motley assortment of meat eaters and lean eaters. That left me in a quandary as to how to prepare a menu to satisfy all tastes.

I prepared a vast assortment of simple Rainbow Roasted Vegetables including cabbage, cauliflower, rainbow carrots, eggplant and zucchini.  As the main dishes for Friday night, I prepared lemon zinger chicken and this lean and moist brisket.

This recipe doesn’t require marination.  It also doesn’t call for any oil. What it needs, though, is time.  Plenty of time.  Three hours of cooking time.  Oh, and onions.  Plenty of onions to keep it moist.

The low and slow cooking keeps the flavor and moistness.  The sliced onions create a flavorful and tender blanket of moisture that replaces the fat and protects the tender beef.

This is a gluten-free and low-carb recipe that is suitable for Pesach (Passover), too.

Simple and moist onion-covered brisket

INGREDIENTS

3-4 pound top of the rib beef roast or lean brisket

2-3 onions, sliced thin

lemon juice
1/2 teaspoon salt
pepper
minced garlic or garlic powder
paprika
powdered ginger
onion powder

dash of cayenne pepper (optional)

1 cup zinger tea


DIRECTIONS

Make a cup of zinger tea, squeezing out the tea bag to release as much flavor as possible. Add half of the tea to the bottom of the pan. Place roast in pan. Pour rest of tea over roast and generously sprinkle seasonings on top of the roast.

Place fattier side of the brisket up so that fat keeps the meat tender during cooking. Smother the roast with a layer of very thinly sliced onions, pressing into the roast. Cover tightly with foil.

Let brisket come to room temperature or place in oven on delayed cook mode.

Set oven to cook for 3 hours on 300 degrees F. Let roast stay in oven until the oven cools down, at least for a half hour.

Remove from oven and allow to cool completely.   Refrigerate before slicing.

Simple Superstar Roasted Onions

roasted onions up close

Onions are the ultimate team player.   They are used to start soups and sautes, taking very little credit for the impactful favor that they impart.  They are sprinkled atop salads or roasts, adding spiciness and satisfying juiciness wherever they are used.

They are the utility player that can be used here or there, always making the other ingredients taste a little better without taking credit themselves.  Fried or sauteed onions become the basis for great flavorful dishes.  Onions have the ability to make so many different types of recipes heartier, fuller and more delicious.

Onions are the unsung stars of so many dishes.

But, do onions not deserve to be superstars in their own right?

After all, there is nothing like a caramelized onion.  The decadent smell.  The charred sweet outside and the creamy soft inside is one of those texture combinations that is like no other.

This side dish is so simple.  So perfect.  And, so delicious.  And, it finally highlights the onion as the star of the game.

After preparing these roasted onions and certainly after tasting their distinctive creamy sweet flavor, you’ll be cheering for the onion to be your new favorite player, too!

roasted onions on plate


INGREDIENTS

3-4 large onions

oil spray
salt
pepper
minced or granulated garlic


DIRECTIONS

Line baking sheet with parchment paper. Cut onions crosswise into 1/2 inch sections. Line onions on pan and spray lightly with oil spray. Sprinkle with salt, pepper and garlic.

Roast at 400 degrees F for 45-55 minutes or until onions are golden brown on outside and soft and creamy on the inside.

roasted onions on baking sheet

Cheesy Cabbage Steaks

This week, I decided to prepare a delicious, colorful and low-carb dairy dinner.  Since I had just returned from an overseas trip, I found my refrigerator and pantry low-stocked. With very few ingredients to choose from, I opted to use the head of cabbage that I found in the refrigerator to prepare these of, so wonderful cheesy cabbage steaks.

Cabbage has many health benefits.  It is low in calories and carbs and high in fiber and vitamins. Cabbage is low in saturated fat and boasts high levels of vitamin C and vitamin K.  Best of all, it is inexpensive and available year-round.

I used red cabbage for this recipe, but any cabbage may be used.  In this simple recipe, the red cabbage creates a stunning purple backdrop to the velvety melted cheese on top. It may be used to Passover and is gluten free, too.

Cheesy cabbage steaks

INGREDIENTS

Red cabbage, cleaned and cut into steaks

4 minced garlic cloves or granulated garlic
coarse salt
coarse ground black pepper
olive oil or cooking spray

shredded cheese


DIRECTIONS

Preheat oven to 375 degrees F.  Line baking sheets with parchment paper or greased foil.

Remove first 4-5 tough outer leaves of cabbage.  Clean cabbage and cut into 1/2 inch to 3/4 thick steaks.  Place cabbage steaks in a single layer on lined cookie sheets.   Drizzle with olive oil or generously spray with cooking spray.   Lightly sprinkle with salt, garlic and black pepper.

Roast for 40-45 minutes, checking that cabbage steaks are soft and just starting to brown before removing from oven.


Sprinkle shredded cheese over the cooked cabbage steaks.  Return to the oven for 10-15 minutes more until cheese is melted and gooey.

Enjoy!

Perfectly Moist Baked Stuffed Chicken

baked stuffed chicken cut in half

For the Purim seuda (feast) this year, Don did almost all of the shopping for ingredients. My mother had emergency surgery shortly before Purim and I spent the week with her in Cleveland.  That meant that I would not have the time to shop and fully prepare for the seuda.  Don offered to help by doing the shopping for me.

Don did an awesome job shopping for the meat and chicken.  He bought thin sliced chicken cutlets for me to grill as one of the main dishes.   When I saw how thin the cutlets were, I was nervous that they would overcook easily.   So, I decided to develop a recipe that would accommodate cutlets that were butterflied and very thin.

I also had a bagful of frozen rice from a previous dinner party and lots of leftover frozen bread.  Keeping in mind that Pesach (Passover) was around the corner, I was eager to create a stuffing recipe that would use my leftover rice and bread.

And, so this stuffed chicken recipe was developed.

(more…)

Zucchini Mushroom Kugel

zucchini mushroom kugel

Jewish cooking favors the preparation of kugels (casseroles), probably because of their versatility.  Since cooking is prohibited on Shabbos (Sabbath) and is limited on the Jewish holidays, the kugel has become a go-to solution.  It allows for make-ahead preparation and can be served hot or at room temperature.

Although I favor keeping my vegetables raw and simply prepared, this kugel has become one of my favorites.  It highlights a simple list of fresh ingredients and this kugel  is perfect for freezing in advance of a busy Yom Tov (holiday, lit: good day) like Pesach (Passover).  Although zucchini squash has a high water content and usually needs to be squeezed out, the sliced zucchini in this recipe needs no squeezing.  The moisture of the zucchini slices creates a satisfying textural compliment to the other ingredients and make for a soft and juicy kugel.

INGREDIENTS

1 large onion or 2 shallots, diced
2-3 garlic cloves, minced or garlic powder
3 large zucchini, thinly sliced
1 package mushrooms, sliced

1/2 cup potato starch
3 eggs
1/4 cup oil

1 teaspoon salt
dash pepper

DIRECTIONS

Grease a pie dish or line a baking dish with parchment paper.

Saute onions, garlic and mushrooms until soft and starting to brown.

Whisk eggs and combine with oil, seasonings, sauteed onion, garlic and mushrooms. Sprinkle zucchnii slices with potato starch.  Fold egg mixture into zucchini slices until just combined.

Fill baking dish with mixture and bake uncovered at  400 degrees F for 45 minutes to one hour.  Kugel should be golden brown and set when ready.


VARIATIONS

Flour and a tad of baking powder may be substituted for the potato starch for non-Passover cooking.

Charoset Ices

charoset ices

Last year in Israel, we discovered that Ben and Jerry’s manufactures Charoset ice cream for Pesach (Passover).  We bought it at the Israel supermarket for its Passover-themed value but we devoured it for its delicious taste.

charoset ice cream.png

After all,  charoset is a traditional dip consumed at the Passover Seder. It is typically prepared with chopped apples, nuts, cinnamon and red wine or grape juice.   The charoset is a  gritty dip for the Maror (bitter herbs) that symbolizes the mortar used by the Jews to fashion bricks while they were enslaved in Egypt.

The apples and grape juice or wine lend a sweet taste to this dish and make for the perfect combination of ingredients to prepare charoset ices.  This will make the perfect dessert for your Pesach meal.


INGREDIENTS

3-4 apples, cut into large chunks
1 cup wine or grape juice
dash of cinnamon
1/4 cup nuts
1 cup frozen grapes
small romaine heart (optional, for garnish)

DIRECTIONS

Using the s-blade of the food processor, puree all ingredients except romaine heart until just combined.

Freeze until solid or overnight.

Once frozen, remove from freezer and defrost just enough to scoop back into the food processor fitted with the s-blade.

Pulse sorbet in food processor just until smooth.  Refreeze.

To allow for simple entertaining, I usually defrost for 20-30 minutes before scooping.

Garnish with a small piece of romaine lettuce.

SUBSTITUTIONS

Any frozen fruit may be substituted for the frozen grapes.  Just make sure to taste puree and blend with enough wine or  juice for optimal sweetness.  Honey may be added as well to sweeten the sorbet.

TIPS

I scoop the sorbet into small cups in advance and freeze in the cups until ready to serve. That speeds up the serving of a frozen dessert and keeps everything tidy.    I add the garnish at the end so that the leaves stay fresh and green.charoset ices.jpg

Frosted Candied Grapes

Grapes are featured prominently at the annual Pesach (Passover) seder (festive meal, lit: order).  After all, we drink four cups of wine or grape juice and the seder ceremony begins with the kiddush (santification) over the first cup of wine (or grape juice).  Wine is featured in the charoset (fruit and nut dip symbolizing mortar) for the maror (bitter herbs).

The seder is a mixture of tradition and whimsy.  It is the only night on the Jewish calendar when we sing Hallel (songs of praise) and tell the story of Egypt at length.  It is an evening in which we engage the children and pass these Jewish traditions from generation to generation.  In fact, so much of the elements of the seder are intended to pique the interest of our children.

Which brings me to candied grapes.  We are taught that parents are to give their children special foods and gifts in order to engage them at the seder.  So, why not combine the elements of tradition and whimsy in creating these adorable and delicious candied grapes?

One note of caution, though.  The round shape of the grapes  can create a choking hazard for small children.  These grapes should not be given to young children, unless they are quartered.

These grapes can make a delicious snack or the perfect garnish for desserts.

 
candied grapesINGREDIENTS

1 box jello
grapes

 
DIRECTIONS

Rinse individual grapes thoroughly in a colander. Spread jello powder in a pie plate or large plate.  Coat grapes with powder.    Place on waxed or parchment paper to dry.
Refrigerate for 1 hour to allow gelatin to set.

NOTES

The round shape of the grapes  can present a choking hazard for small children.  These grapes should not be given to young children, unless they are quartered.

Simple Lean Kosher for Passover Brisket

pesach FF onion brisket

Last week, I prepared my meats for Pesach (Passover).  The briskets that I purchased were leaner than I expected and I was nervous that they would cook up tough. When this happens, I usually smother the roast in fresh or french fried onions. This creates a blanket of moisture that replaces the fat and protects the tender beef.

This simple and perfect low temperature recipe is reminiscent of Low and Slow Oven Brisket: No Braising Necessary.  It has been adapted for Pesach and truly yielded the perfectly moist and tender brisket with very little effort.

INGREDIENTS

3-4 pound first cut brisket or top of the rib

wine
olive oil
lemon juice
garlic and/or onion powder

very thinly diced onions or baked french fried onions

DIRECTIONS

Pierce the brisket with a fork all over on both sides. Place in roasting pan and pour wine, oil and lemon juice over brisket, just until absorbed.

Turn roast over and repeat piercing, drizzling and sprinkling on the second side.

Place fattier side of the brisket up so that fat keeps the meat tender during cooking. Brush the top of the brisket with a light layer of olive oil and then smother with a layer of very thinly sliced onions or baked french fried onions, pressing into the roast.  Cover tightly with foil.

Let brisket come to room temperature or place in oven on delayed cook mode.

Set oven to cook for 3 hours on 325 degrees F. Let roast stay in oven until the oven cools down, at least for a half hour.

Remove from oven and allow to cool completely. Refrigerate before slicing.

Passover Meat Muffins

meat muffins

During the past March snowstorm, I began cooking for Pesach.

One of my favorite shortcuts is to prepare one batter and then use it to prepare a host of different menu items.  This time, I prepared one ground beef batter and used it to prepare baked meatballs, stuffed cabbage and these delicious and adorable meat muffins,

Meat muffins are just individual meatloaves prepared in round ramekins and topped with mashed potato or sweet potato icing.  They are whimsical enough to entice the children and delicious enough for even the adults to try.

INGREDIENTS

2 pounds ground beef
2 eggs
1/2 cup potato starch
1/2 Passover crumbs
1-2 onions, grated or diced small
2-3 garlic cloves or 2 tablespoons minced or granulated garlic
1 small can of tomato sauce or paste
1 squirt of ketchup

Mashed Potato Icing

4 large potatoes or sweet potatoes
½ cup vegetable stock or water
2 tablespoons olive or canola oil
Salt and pepper to taste

SUPPLIES

Piping Set for Icing
Disposable Ramekins
Wilton Large Piping Tip Set
Heavy Duty 16″ Disposable Piping Bags
Wood and Silicone Spatula
jumbo zipper bags

DIRECTIONS

Preheat oven to 375 degrees F.

In large mixing bowl or extra large ziploc bag, combine all ingredients, kneading until just combined.  Be careful not to overmix.

Using a Wood and Silicone Spatula, press meat batter into individual ramekins or disposable round ramekins.  Bake for 35-40 minutes until meat muffins are no longer pink in center.  Pour grease off of each ramekin right after removing from the oven.

Cool to room temperature before icing.

Mashed Potato Icing

Peel and dice potatoes or sweet potatoes.   Steam or boil until soft.  Drain, then add oil and liquid.

Mash until smooth and creamy but stiff enough to spread or pipe onto the Meat Cupcakes. To pipe, fill piping bag fitted with tip or large ziploc bag with one cut corner.

NOTES

You can use any combination of ground veal, ground lamb, ground chicken and/or ground turkey.

TIPS

Double or triple the meatball batter and use to make meatloaf, stuffed cabbage and baked meatballs.

Mixing the meatball batter by hand is best, but if you would rather not, use a jumbo zipper bag instead.  Just place all ingredients inside bag and close zipper, releasing any air.  Knead batter from the outside of the bag.

To fill mashed potato icing most easily and without making much of a mess, cuff bag over tall jar or glass.  Use a stiff rubber spatula to load puree into piping bag or zipper bag.

Please Note: This post contains affiliate links from Amazon, which means I earn a small commission if you click and make a purchase.

Pesach Pesto Stuffed Chicken

Stuffed chicken is the perfect way to prepare a main dish and side dish all in one.  I find that it is a main dish that can be served hot or at room temperature and makes for great leftovers.

I developed this stuffed chicken recipe in honor of Rachel.  Last week, after the big snowstorm, I offered to prepare a few Shabbos foods for Rachel’s family.  Rachel placed a request for me to prepare grilled pesto chicken.  I had prepared pesto grilled chicken for Rachel in the past and it has become one of her favorites.   I had already marinated the chicken for the grill and was ready to go outside to grill the chicken, when I realized that it just wasn’t possible to grill.

The snow was too high and the grill was entombed in layers and layers of ice.  So, I had to rethink the grilled pesto chicken idea.  And, I did.   I prepared some sauteed vegetables for stuffing and baked the pesto chicken in the oven, instead.

And, I’m hoping that this new recipe will become one of Rachel’s favorites, too. The fact that her mom asked if it will be on this blog sounded promising.

Necessity really is the mother of invention.  I hope you will love this recipe.  It is simple enough and doesn’t require going out to an ice-encased grill.


INGREDIENTS

1 package chicken cutlets

basil pesto
1/3 cup oil
1/2 cup basil leaves
2-3 garlic cloves or 2 tablespoons garlic powder
3 tablespoons vinegar or lemon juice
salt and pepper to taste

stuffing
1 large onion
2-3 cloves garlic minced or garlic powder
1-2 cups shredded cabbage and carrots
potato starch (optional)
salt and pepper to taste

french fried onions (optional)


DIRECTIONS

In food processor fitted with an s-blade or in a blender, pulse pesto ingredients until smooth. Reserve half of the pesto for later and reserve a bit for serving, taking care not to reuse pesto that has been in contact with the raw chicken.

In a zipper bag, marinate chicken with pesto marinade for at least one hour.

Saute onion and garlic until just starting to brown.  Add cabbage and carrots until wilted and fragrant. Optionally, dust with potato starch to absorb the moisture.

Preheat oven to 375 degrees F.

Line a baking sheet with parchment paper or greased foil.

Open each chicken cutlet and fill with a golf-size clump of stuffing.  Roll chicken cutlet around stuffing and place seam side down on lined baking sheet.  Leave a bit of space in between chicken cutlet rolls taking care not to crowd the cutlets.

Using a silicone brush, brush each stuffed cutlet with some of the reserved pesto. Optionally, press some french fried onions on top.

Lightly drizzle olive oil or spray with cooking spray.  Bake for 30 minutes, cutting largest stuffed chicken roll open to ascertain that chicken is no longer pink on the inside.  If pink, bake for a few minutes longer.

DIY Passover French Baked Onions

french fried onions for pesach

So many of my simple and moist recipes rely on french fried onions.  They add moisture and pizazz to even the simplest and leanest of fish, meats and poultry.  Recipes such as Onion-Battered Baked TilapiaSimple Onion Baked Chicken Cutlets and Low and Slow Oven Brisket require this as a key ingredient.

Year-round, this is a readily available ingredient with so many kosher brands to choose from.  For some reason the smaller packages of French’s do not carry an o-u kosher certification while the 26.5 ounce package of Family size french fried onions is available on Amazon with a reliable o-u certification.

Since these products have flour listed on the ingredient list, I understood that they would not acceptable for Passover use.    However, I was hoping to find a similar product this year that would be kosher for Passover.   Alas, I was unsuccessful.

That meant that I needed to develop a recipe for french fried onions similar enough to the store-bought ones.  I also wanted a recipe that would not require frying.  There is just too much to be done before Pesach (Passover) for me to be frying onions in small batches.

This recipe is good.  It is not as dry and crunchy as the original.  But, it does serve as a good replacement for these recipes.  And, it is simple.

I would love to hear your comments, especially if you found this recipe to be simple to wow.

INGREDIENTS

4 large yellow onions, thinly sliced
1/2 cup olive oil
1/2 cup potato starch
1/2 cup Passover crumbs
1 teaspoon salt
1/2 teaspoon garlic powder
1/2 teaspoon onion powder
1/2 teaspoon paprika
1/4 teaspoon pepper
olive oil or cooking spray

DIRECTIONS

Preheat oven to 450 degrees F.
Line a baking sheet with parchment paper or greased aluminum foil.

Separate thinly sliced onion rings into individual rings. In a large bowl, add the rest of the ingredients and toss to coat the onion rings.

Place the onion rings ton the baking sheet and drizzle olive oil or generously spray with cooking spray.

Bake for 25-35 minutes, frequently checking that the onions do not burn.  When ready, these onions should be just starting to turn golden brown.

Allow onions to come to room temperature before using.

Passover Stuffed Cabbage

passover stuffed cabbage

Last week, I began cooking and freezing for Pesach (Passover).  With the furious and beautiful backdrop of a March snowstorm, I prepared most of my main dishes for the week of Passover.

It may sound a bit compulsive, but this just helps me manage the fury and beauty of the Passover holiday.

We travel to Israel for the holiday where we have a tiny kitchen and doll-sized appliances. The smallness of the food preparation facilities stand in direct contrast to the number of guests and family members that join us for the Passover seder and meals.

I have discovered that cooking the main dishes in advance really takes the edge off of the frenzy of Erev Pesach (Passover eve) and helps our family enjoy the beautiful surroundings of Jerusalem with some measure of serenity.

It certainly helps me appreciate the purity of the holiday and the freshness of the spring season.  It allows me to focus on the theme of this holiday that is so central to Judaism.  I can savor the beautiful traditions of Pesach, all to remind us of the birth of the Jewish nation as we miraculously left Egypt so many centuries ago.

Many women note that they feel enslaved by the enormity and difficulty of Passover cooking and that reminds them more than anything at the seder of the bondage of Jewish nation in Egypt.  I would rather celebrate the freedom from slavery by planning ahead and leaving time and energy to enjoy the traditions and themes of Passover.  It makes for a better me and it allows me to enjoy this wonderful spring holiday.

I have been making stuffed cabbage for many, many years.  Traditionally, rice is used as a filler.  Jews of Ashkenazic (Eastern European)  origin do not eat rice on Passover while those of  Sephardic (originally from Iberian Peninsula) background eat certain types of rice during the holiday.  For this use, you can either substitute quinoa for the rice or skip the rice altogether.

Last year, I did not prepare my cooktop for Passover advance cooking so I was unable to boil the heads of cabbage.  Instead, I froze the heads of cabbage and found it to be a simpler way to prepare the cabbage leaves for stuffing.  Best of all, it meant one less pot to clean at the end.  So, this year I wouldn’t prepare my cabbage leaves any other way.

Stuffed cabbage is one of those menu items that takes some time, but makes enough for many meals.  This year’s stuffed cabbage made enough for two Passover meals with some extras to deliver to some of my friends for their Passover meals.

Stuffed cabbage freezes so well.  The cabbage rolls can be frozen either with or without the suace.  I freeze the cabbage rolls in freezer bags and just take out as many as needed for the next meal.

INGREDIENTS

2 heads of cabbage

2 pounds ground beef
2 eggs
1/2 cup potato starch
1/2 Passover crumbs
1 cup quinoa (optional)
1-2 onions, grated or diced small
2-3 garlic cloves or 2 tablespoons minced or granulated garlic
1 small can of tomato sauce or paste
1 squirt of ketchup

sweet and sour sauce

2 cans tomato sauce
2/3 cup sugar or honey
1/2 cup lemon juice
1/2 cup raisins or craisins (optional)

SUPPLIES

Wood and Silicone Spatula
jumbo zipper bags

DIRECTIONS

Carefully remove the first 4-6 leaves of the cabbage and freeze the cabbage for at least 12 hours.

Defrost cabbage for several hours and/or microwave the frozen cabbage heads in 4 minute increments until leaves are soft and pliable enough to remove from head.

Preheat oven to 375 degrees F.

In large mixing bowl or extra large ziploc bag, combine all meat batter ingredients, kneading until just combined.  Be careful not to overmix.

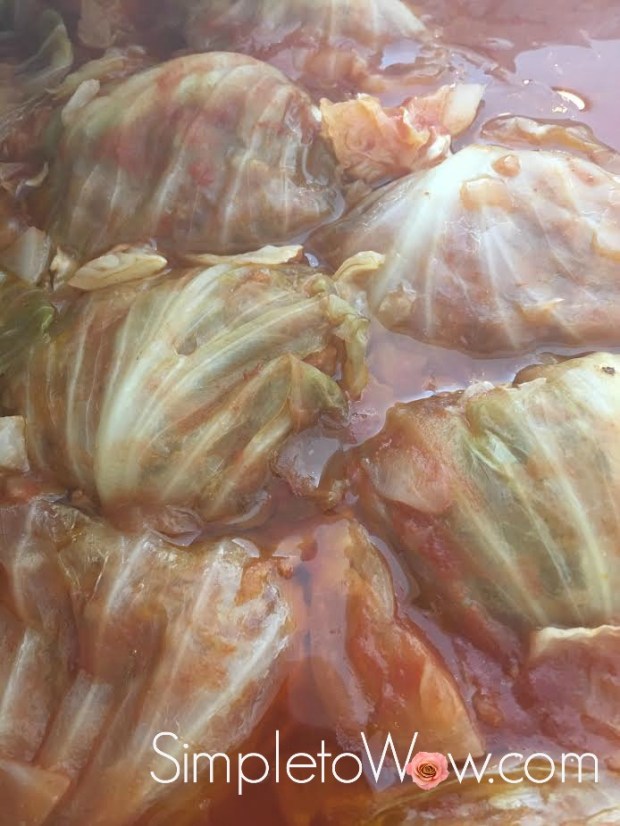
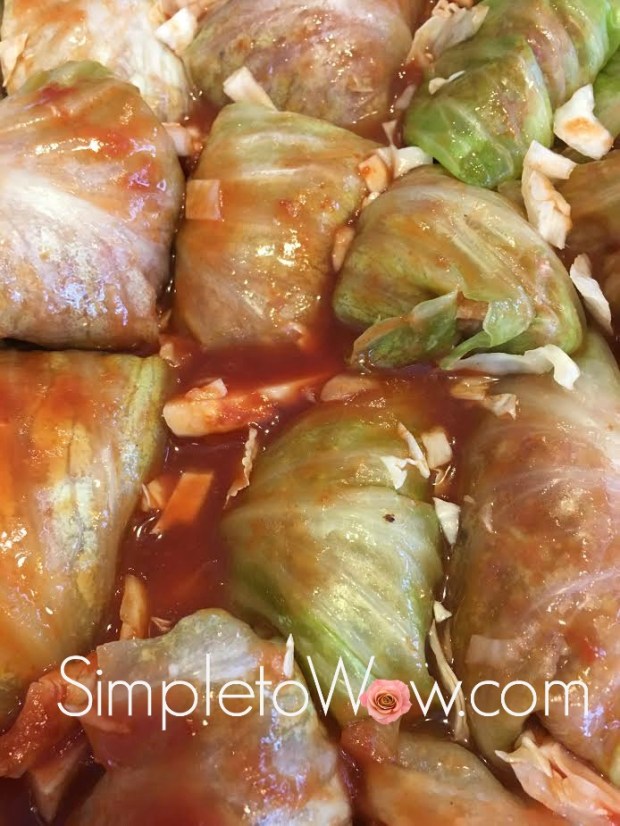
Using a Wood and Silicone Spatula, press a golf ball size of meat batter into each cabbage leaf.  Roll soft cabbage leaf around meat, tucking ends under.  Place cabbage rolls seam side down in baking dish or pan.

Cut leftover cabbage into bite size pieces and toss among the cabbage rolls.

Prepare sauce by combining all ingredients and heating in sauce pan or microwave.   Pour sweet and sour sauce over cabbage rolls.

Bake tightly covered for 90 minutes.


NOTES

You can use any combination of ground veal, ground lamb, ground chicken and/or ground turkey.


TIPS

Double or triple the meatball batter and use to make meatloaf, meat muffins and baked meatballs.

Mixing the meatball batter by hand is best, but if you would rather not, use a jumbo zipper bag instead.  Just place all ingredients inside bag and close zipper, releasing any air.  Knead batter from the outside of the bag.


Please Note: This post contains affiliate links from Amazon, which means I earn a small commission if you click and make a purchase.

Passover Baked Meatballs

The Pesach (Passover) marathon has begun!

Now that Purim is behind us, the supermarkets have started to stock Kosher for Passover meats and ingredients.  To add another element of excitement, right before Purim we were advised that a Nor’easter was due to hit the Northeast two days after Purim.

Most people ran out to stock up on food supplies, snow equipment and salt.

I stocked up on Kosher for Passover meat and staples, instead.  After all, a Nor’easter would mean that I could cook all day in my pajamas with no deliveries, meetings or other responsibilities.

I cooked eleven large roasts, 48 stuffed cabbage, 16 meat cupcakes and 80 baked meatballs. Best part was that I had the most beautiful backdrop of white snow to gaze at as I was cooking, slicing and packaging everything for the freezer.

baked-meatballs

And, I finished just in time to get the snowblower out of the garage to clear the 18 inches of snow that had fallen while I was cooking for Passover.

Sure hope that spring arrives soon!

For this Pesach cooking marathon, I tripled this recipe.   From this basic batch, I made Passover meat cupcakes and stuffed cabbage with only minor modifications.  Stay tuned for these Passover recipes, too.

INGREDIENTS

2 pounds ground beef
2 eggs
1/2 cup potato starch
1/2 cup Passover crumbs
1-2 onions, grated or diced small
2-3 garlic cloves or 2 tablespoons minced or granulated garlic
1 small can of tomato sauce or paste
1 squirt of ketchup

DIRECTIONS

Preheat oven to 375 degrees F.

In large mixing bowl or extra large ziploc bag, combine all ingredients, kneading until just combined.  Be careful not to overmix.

Form into meatballs about 1 inch in diameter and place on a baking sheet lined with foil or parchment paper. Bake for 25-30 minutes until meatballs are no longer pink in center. Skim meatballs off of the pan, leaving grease behind.

Cool and use with your favorite sauce recipe.

NOTES

You can use any combination of ground veal, ground lamb, ground chicken and/or ground turkey.

These meatballs freeze well.  Just place in zipper freezer bags and freeze.  Add sauce after removing from freezer.  Bake frozen meatballs with sauce at 375 degrees F for at least 45 minutes.

TIPS

Double or triple the meatball batter and use to make meatloaf, stuffed cabbage and meat muffins.

Mixing the meatball batter by hand is best, but if you would rather not, use a jumbo zipper bag instead.  Just place all ingredients inside bag and close zipper, releasing any air.  Knead batter from the outside of the bag.

PASSOVER SERVING SUGGESTIONS

Serve over a bed of quinoa, prepared in rice cooker with salt pepper and garlic.

Serve over a bed of raw or quickly sauteed spiralized zucchini, turnips, kohlrabi  or beets.

Serve over a bed of spaghetti squash “noodles”.  Scrub and cut spaghetti squash in half. Place cut-side down on greased foil-lined pan or on parchment-lined pan.  Bake at 400 degrees F for one hour.  Carefully remove seeds and scrape out spaghetti squash noodles with a fork.  Discard spaghetti squash skin.


Please Note:  This post contains affiliate links from Amazon, which means I earn a small commission if you click and make a purchase.

Roasted Sweet Potato and Beet Salad

For our annual Purim seuda (festive meal),  I decided to prepare a new salad.

This salad took inspiration from a delicious battata (sweet potato) salad that I enjoyed at Cafe Greg in Rosh Pina in the Upper Galilee of Israel.  It combined the delicious colors, flavors and textures of roasted sweet potatoes, candied almonds and shredded fresh beets. All these were served atop a bed of arugula and baby kale and then tossed right before serving.

I prepared this salad as my feature salad, reserving my biggest salad bowl for this new recipe.

The only thing that took extra time was roasting the sweet potato cubes in advance.  It was well worth the effort.

It must have been delicious because it was the only item that I prepared for the seuda that was finished within the first hour.

INGREDIENTS

3 cups checked salad greens (see kosher notes)
2 cups roasted cubed sweet potatoes
2 cups shredded fresh beets
1/2 cup nuts
thinly sliced scallions
french fried onions (optional)

4 tablespoons olive oil
4 tablespoons cider vinegar or lemon juice
1 teaspoon Dijon mustard
1 teaspoon honey

DIRECTIONS

Preheat oven to 425 degrees F.  Line baking sheet with parchment paper or greased foil.

Peel sweet potato and cut into small cubes.  Place sweet potato cubes in a single layer on baking sheet. Drizzle with olive oil or spray with cooking spray and lightly sprinkle with kosher salt.

Roast for 35-55 minutes checking that sweet potato cubes are crisp on outside and soft on inside before removing from oven.  Cubes may be prepared in advance.  They may either be added to the salad warm or at room temperature.

Peel beets.  Using the shredder disk on the food processor, shred beets.

Combine, process or shake all dressing ingredients together.

Layer greens and shredded beets. Lightly drizzle dressing over the salad. Top with nuts, scallions and french fried onions.  Toss right before serving.


KOSHER NOTES

Kosher laws disallow the eating of  any whole insects and therefore most greens require a process of soaking, rinsing and in some cases, pureeing.  I have found that flat-leafed greens like baby spinach and flat-leaf  kale are much easier to check for insects than their curly-leaf counterparts.  Kashrut authorities differ on the proper checking of leafy vegetables and some disallow the use of spinach and kale altogether.  This blog was not designed to be your  kosher authority, so please consult your local rabbinic authority regarding using and preparing greens such as spinach and kale.


VARIATIONS

Cubed butternut squash or fresh pumpkin may be substituted for the sweet potatoes.


TIPS

When I prepare greens in advance, I place a few absorbent paper towels at the bottom of the bag or dish.  I then layer the greens over the paper towels.  These paper towels will absorb any extra moisture in the greens and will keep the green fresh. roasted sweet potato salad