Tips and Shortcuts

Pulled Beef Babka

pulled beef babka ready to eat.jpg

Today’s stormy and snowy weather in the Northeast was already predicted several days ago.  The first snow of the season is exciting, especially when it greets us before Thanksgiving.  Although Thursdays typically are spent in the car, I sorted out my day to start early and finish in the early afternoon, before the storm was to hit.

I arrived home just as the snow was beginning to accumulate and I headed to the kitchen.   My kitchen faces the backyard and as I cook,  I can enjoy the snowflakes and the changing landscape.   With my head full of new recipe ideas and the snowflakes arriving furiously, I began to cook in the snow.

snowy backyard.jpg

The idea of a savory pulled beef babka has been consuming me.  I had already prepared pulled beef to serve Friday night and I had been mulling over the simplest way to transform some of the pulled beef into a savory babka to serve for Shabbos lunch.  One of my favorite shortcuts is to prepare one dish and serve it in a multitude of different ways.  Pulled beef is that type of recipe.

I thought long and hard about how to prepare this simply with minimal cleanup.  And, I think I nailed it.  Because, it really was simple to prepare.  And, it was easy to clean up afterward.  Best of all, the pulled beef babka was delicious and gorgeous.

Now, let’s see what my fifteen Shabbos guests say!

INGREDIENTS

1 lb. pizza dough or challah dough
1/2 cup barbecue sauce
2 cups thinly shredded  Pulled Beef


DIRECTIONS

Preheat oven to 375 degrees.

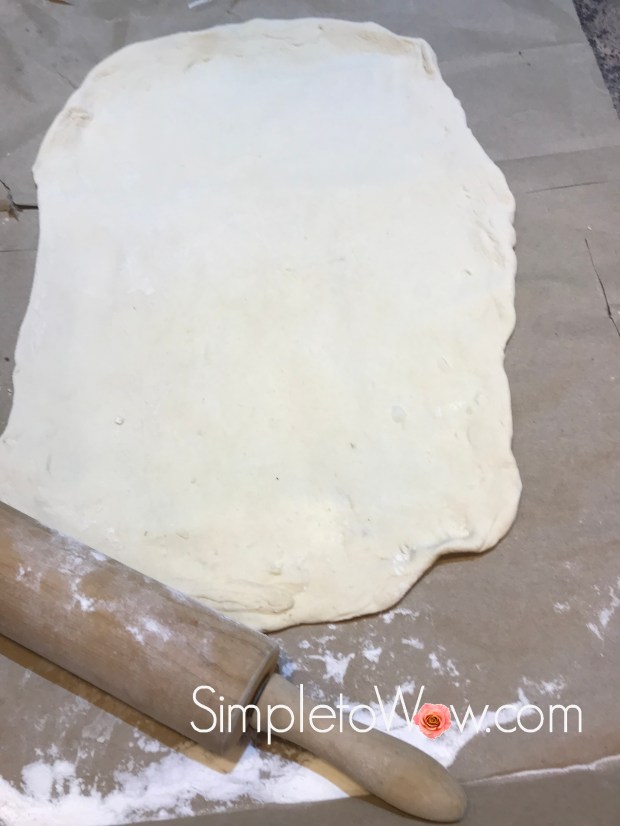
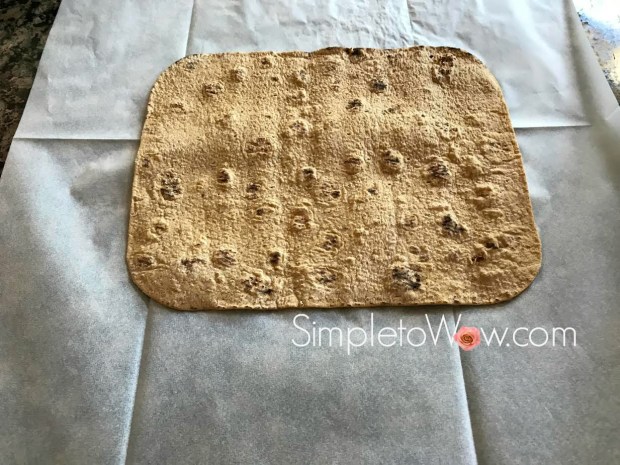
On a large piece of parchment paper, roll the pizza dough out into the thinnest rectangle that you can.

pulled beef dough rolled out.jpg

Spread the pulled beef onto the top of the rolled-out dough, leaving up to an inch of dough all around.

pulled beef babka spread over dough.jpg

Roll the dough jelly-roll style until completely rolled up.

Cut the roll in two lengthwise down the center.

Carefully twist the two jelly roll logs together, trying to keep the twists together as much as possible.  If some of the pulled beef protrudes, don’t worry.  Those pulled beef pieces on the surface will caramelize during baking and will add extra flavor and texture.

pulled beef babka twisted and ready for loaf pan.jpg

Carefully place the parchment paper into a loaf pan, trimming the edges if necessary.  Stick some extra pulled beef and brush extra barbecue sauce on top.

Bake until golden brown, about 40-50 minutes.

pulled beef babka ready to eat

Remove from the loaf pan and slice. Serve warm.

pulled beef babka slice.jpg

TIPS

Prepare a large batch of  Pulled Beef and serve the rest over rice or farfel

Tear open a paper bag and work over the inside of the bag.  Roll everything up after this messy preparation to save cleaning up loose flour and dough bits.


DIY Sanding Sugar

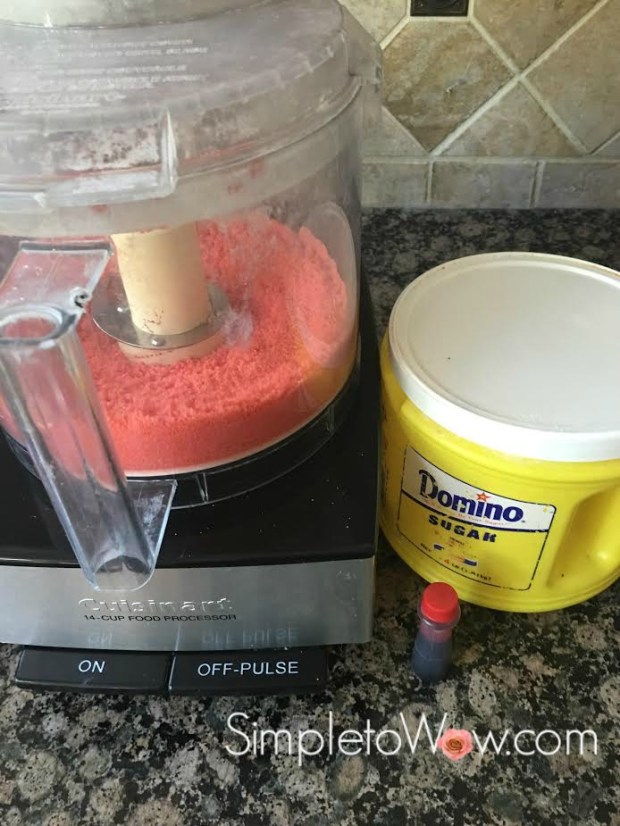
Sanding sugar adds a wow to so many of my simplest desserts.  While some recipes call for sanding sugar in colors that are impossible to find, others call for such minute or such immense quantity that it makes no sense to purchase.   And, sanding sugar is so simple to create in exactly the hue that you need using two simple ingredients.

Wow!


INGREDIENTS
1 cup sugar
food coloring

Combine 1 cup of sugar with food coloring, adding drops of food coloring until the desired hue and depth of color is reached.  Either pulse in food processor, using the s-blade or combine in a ziploc bag, kneading on outside of bag until well-combined.

My Grilled Chicken Mentor

My mother is one of the most persistent and resourceful people that I know. Nowadays, when I look in the mirror, I see my mother. And, I’ve learned so much from her determination.

During my childhood, my mother went back to college and then to law school. We grew up eating cereal for dinner most nights and we were okay with that, because that was our reality. My mother had never taken algebra or writing classes before college and my father tutored her along the fourteen year path from Math 101 to LSAT’s until her graduation from Law School.

It all started years before when she appeared in court for a traffic violation. As she explained the position of her car and the related facts, the judge was visibly impressed. He asked what her line of work was. She replied, “I’m a Hebrew school teacher.” The judge then asked, “And, what does your husband do?” My mother answered, “He’s a rabbinic student.” The judge then gave her a life-altering piece of advice before waiving the ticket. He simply said, “When you are done pulling your husband through Rabbinic school, ask him to pull you through Law School. You have the underpinnings of a great lawyer.”

That judge’s understanding of law was infinitely better than his comprehension of the Torah lifestyle that my parents had chosen.    After all, Torah is a lifetime pursuit and my mother never stopped “pulling my father through Rabbinic school”.  But, my mother listened carefully to his encouraging words and put the wheels in motion.   Her own father had been studying in Law School before the Holocaust and never completed his education. His dream was that one of his children would carry on that legacy.  Until the judge’s comment, my mother had never imagined that she would be the child to fulfill her father’s dream.

Fourteen years of education pursuing that dream as a working mother of four lively children had its challenges. And, it was not the typical course for a kollel (Rabbinic student) wife, especially in those days.   There were many nights where we attended college and law school with my mother.  And, there were those snarky comments from those that just didn’t understand or agree with the dream.  But, with G-d’s help, we all persevered and celebrated when my mother passed the Ohio Bar on the first try, after those long and difficult years of study.

And, then we began worrying.  How would my mother, the perennial student, manage as a self-employed attorney?  The fourteen years began when I was in fourth grade and now I was newly married and living elsewhere.   How would my mother transition from the theoretical to the practical?  How would she find the practical expertise to help her clients?

And, the worries persisted for only a short while.  Because, my mother was vested in the transition from school to practice.  My mother was determined to become the expert in certain aspects of law and she lacked the practical know-how.  Law school had taught her so much of the theoretical, but there were gaping holes in her practical application of the law.  And, her persistence, creativity  and resourcefulness were up to this new challenge.

My mother found mentors.   And, not just any mentors.  She sought out the experts in Cleveland in the areas of law in which she needed help.

She called the top Cleveland lawyers in each area of law expertise.  She introduced herself, gave a brief description of her background and asked if they would be willing to do a good deed and mentor her.  When they asked how she had found them, she told them that they were well-known as the experts in that area of law and she would be honored to have them as her mentors.

Just about every one of these top-notch attorneys agreed to mentor my mother.  They were kind, helpful and attentive to her and she was most appreciative of their assistance.  When she felt that she knew enough to manage on her own, she sent each one of these lawyers a small gift with a handwritten thank you note in her large scrawl.

That is mentoring done right.

It had worked so well for my mother that I tried it on my best friend, Lori.  In our house, she is the grilled chicken guru.  I had a long way to go to preparing the perfect grilled chicken.  So, I called Lori before Purim  and asked if she would mentor me by helping me prepare the grilled chicken for our Purim seuda (feast) on our grill so that I could watch and learn.

I learned how to grill chicken properly.  Mostly, I learned that I would never be able to match Lori’s meticulousness.  She had a cutting board and special knife set up for slicing each piece of chicken down the middle and a stopwatch for timing everything perfectly.

There was one important take-away from our backyard mentoring session that I have been implementing.  I never leave the backyard while anything is on the grill.  Although I skip the cutting board and stopwatch, I watch the grill fastidiously, making sure to turn and remove everything in the right time.  There are occasions that will test the doneness of my grilled chicken by slicing the thickest one open to check that there is no pink in the middle.  I leave the perfection to Lori and I thank her because the mentoring paid off immeasurably.

grilled chicken.jpg

Now, for some grilling tips:

(1) Use a great marinade and marinate for at least a few hours or overnight.  The marinade will tenderize and flavor the chicken.

(2) Clean your grill and spray with cooking spray before placing the chicken on the grill.

(3) Use your hot spots on the grill for the thickest pieces of chicken and cooler spots for the smallest pieces.

(4) Stay vigilant!  Do not leave your backyard until the chicken is ready.  Turn and remove pieces as they are ready.

(5) Make the grilled chicken yours by serving with torn fresh herbs, salsa or a homemade sauce.

Happy grilling!

Simple No-Cook Salmon Appetizer

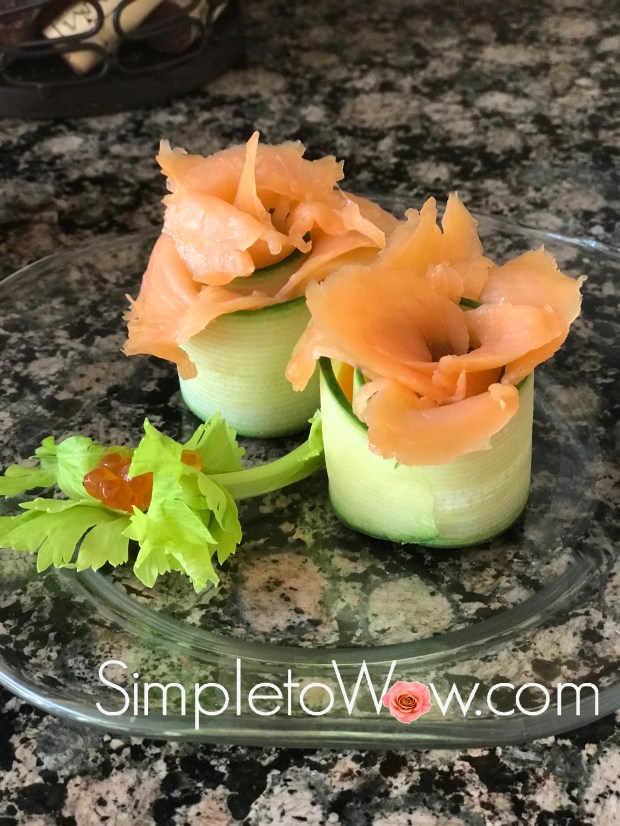
no-cook salmon appetizers

There are times that a simple no-cook appetizer is the way to go.

Like, when there are six Yom Tov (holiday) meals in a row and you’re looking for a new creative way to serve an appetizer with minimal effort.  The upcoming Shavuos holiday comes on the heels of a Shabbos, calling for six consecutive festive meals.  And, because it is fish, this appetizer can be served pareve (non-dairy) or with crème fraîche on the side with a dairy meal.

It is simple.  It is beautiful.  That simple and beautiful combination is a wow!

SUPPLIES

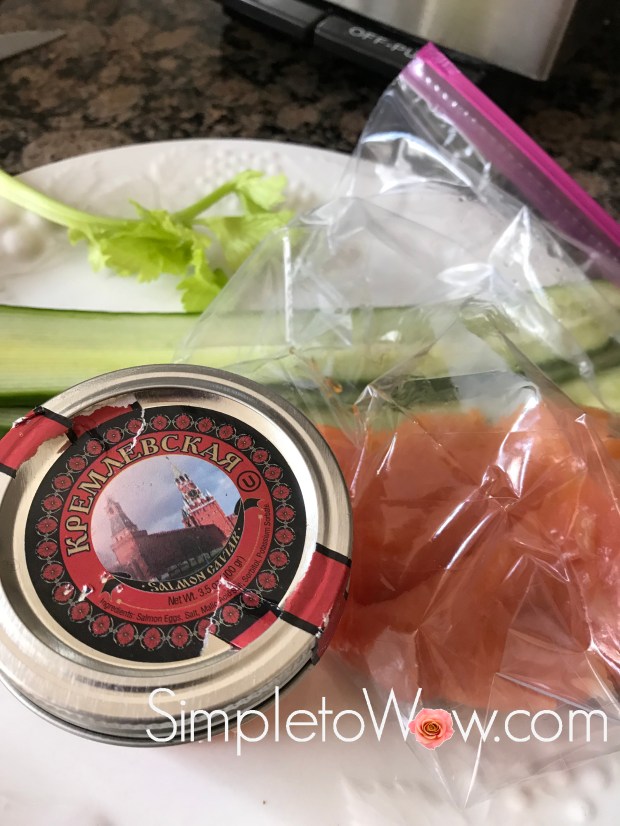
wide vegetable peeler

no-cook salmon appetizers-ingredients.jpg

INGREDIENTS

Long Seedless cucumber
lox or smoked salmon, sliced thin

celery leaves (optional)
salmon caviar (optional)


DIRECTIONS

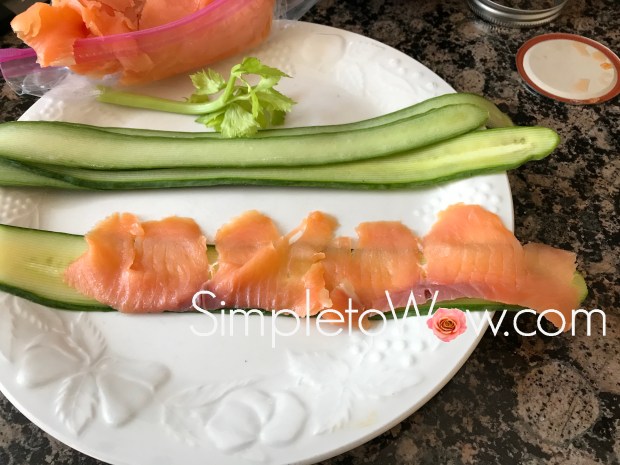
Using a wide vegetable peeler, carefully peel long, thin slices of seedless cucumber.

Spread each slice of cucumber flat and top with lox slice(s), lining up bottom edges of cucumber and lox.

no-cook salmon appetizers-ready to roll.jpg


Starting at end that has both cucumber and lox, carefully roll up to form a rose.

no-cook salmon appetizers-in progress


Stand up and unfurl lox petals for a delicate rose-like formation.

Optionally, garnish with celery leaves and salmon caviar.

Voila!

no-cook salmon appetizers.jpg

Please Note: This post contains affiliate links from Amazon, which means I earn a small commission if you click and make a purchase.

Broccoli Encrusted Baked Chicken Cutlets: A Basic Lesson in Sharing

broccoli encrusted chicken cutlets.jpg

I am on a forever quest to produce great meals with minimal effort.  In that endeavor, I have found many shortcuts.  One of my favorites is to prepare one starter and use it in multiple recipes and in different ways.  I convince myself that it is just another form of sharing, true collaboration between recipes.   I vehemently deny that it has anything to do with laziness.

On the most basic level, I use this sharing shortcut for sauteed onions and/or garlic.  Sauteed vegetables add an important depth of flavor to most recipes but can be time-consuming.  Therefore, I saute one large batch and then split the sauteed batch between the soup, side dishes and main dish within the same menu.   Any leftover sauteed vegetables are then moved to a zipper bag and placed in the freezer for future sharing.

This recipe is the next step in batter-sharing.  This recipe began as the batter for my Broccoli Kugel.  I was planning to prepare Baked Chicken Cutlets later on in the day.  While I was pulsing the Broccoli Kugel batter in my food processor, I thought, “why not use this batter to coat the baked chicken cutlets?”  After all, the batter incorporated so many of the ingredients necessary for moist baked chicken.  And, the addition of broccoli would add a moist barrier to the chicken while adding a new color and flavor profile!

And, so I applied the batter-sharing concept to my broccoli batter.  In a moment of boldness, I split off  some of the kugel batter for the coating of these chicken cutlets.

Wow!  Sharing can be daring, and oh, so delicious!

SUPPLIES
food processor
parchment paper

INGREDIENTS
4-6 boneless skinless chicken breasts, pounded or cut thin
1 cup cooked or thawed frozen broccoli (see kosher notes)
1 sauteed onion or 1/4 cup French Fried Onions
1 egg, beaten or 1/2 cup of your favorite dressing
1/2 teaspoon salt
dash pepper
Spicy Mayo (optional)

DIRECTIONS
Preheat oven to 400 degrees F.  Line a baking sheet with parchment paper or spray with cooking spray.

Pulse French Fried Onions soft broccoli, egg, salt and pepper.

Coat the thin chicken breasts in broccoli mixture.

Place chicken on parchment on prepared baking sheet.  Optionally, drizzle with Spicy Mayo

Bake chicken for 20-30 minutes or until chicken is fully cooked.

KOSHER NOTES
Kosher laws disallow the eating of any whole insects and therefore broccoli requires a process of soaking, rinsing and in some cases, pureeing, unless purchased with a reputable kosher hashgacha (certification). Kashrut authorities differ on the proper checking of broccoli. This blog was not designed to be your kosher authority, so please consult your local rabbinic authority regarding using and preparing broccoli.

Enjoy!


Please Note: This post contains affiliate links from Amazon, which means I earn a small commission if you click and make a purchase.

Pesach Onion Kugel

pesach onion kugel

I absolutely love a challenge!  In a comment on my Simply Amazing Onion Kugel, Pearl asked about adjusting this simple and delicious recipe to Pesach (Passover) cooking.  I worked on making this recipe suitable for Pesach and my family contends that this recipe is even better than the original.

I agree.

Our custom on Pesach is not to bruck (use matzo products with liquid), so it was not possible to merely substitute soaked matzo for the soaked bread in the original recipe.  I played with the recipe until I came up with this Pesach variation.

We all licked our plates clean.  It is a winner and it will be on our seder menu this year.

Have a Chag Kasher V’Samaech (Happy and Kosher Passover)!

SUPPLIES

food processor
pyrex pie plate


INGREDIENTS

4-5 onions

3 eggs
2/3 cup potato starch
1/4 cup oil
1/3 cup seltzer
1 teaspoon salt
pinch black pepper


DIRECTIONS

Preheat oven to 425 degrees F.

Coat a pyrex pie plate lightly with oil and place in oven.

While the oil is heating up, cut the onions into large chunks. Using the metal s-blade of the food processor, pulse the onions until they are shredded but not liquidy.  Add eggs, oil, seltzer,  salt and pepper. Pulse a few times to combine.

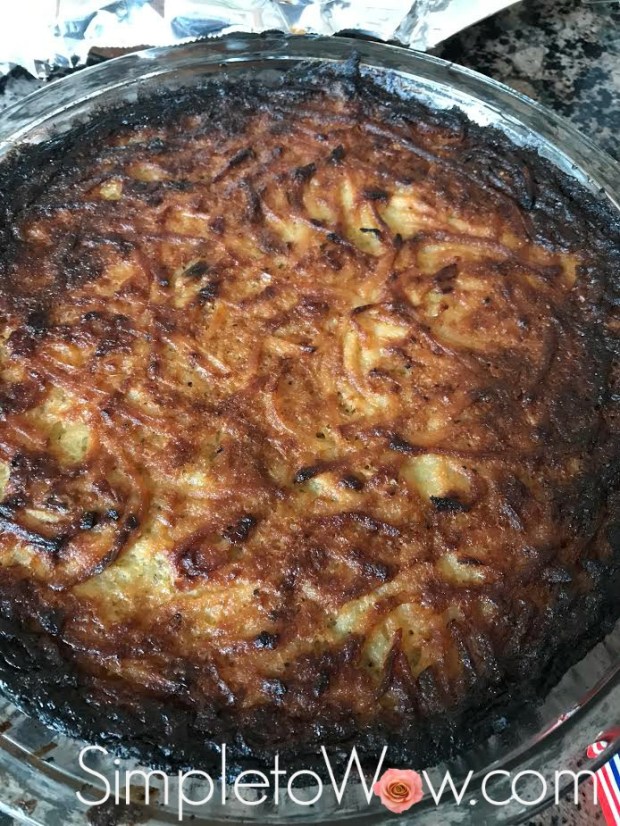
Carefully remove the sizzling pyrex pie plate from the oven. Pour the mixture directly from the food processor bowl into the pyrex pie plate and bake uncovered for one hour and ten minutes. When done, the onion kugel should be caramelized on top and bottom and soft and creamy on the inside.


TIPS

Because sulphuric gas released from the onion during cutting reacts with tear ducts, eyes feel irritated and release tears when cutting onions.  Heating the onion before cutting  breaks apart the enzymes that emit sulphuric gas to reduce and/or eliminate the tears.   The easiest way to heat the onions for this kugel is to microwave them on high for several minutes  in 30 second increments.  For best results, cool the microwaved onions before cutting into chunks.

Please Note: This post contains affiliate links from Amazon, which means I earn a small commission if you click and make a purchase.

Simple Cranberry Sorbet

cranberry sorbet

I’ll share a secret with you.

My Purim seuda (feast) menu is designed around the chametz (leavened products) that I must use up before Pesach (Passover).

This year, I found myself with lots of frozen challah, hence the stuffed chicken breasts and meatballs.  I found that I had three bags of fine egg noodles, and thus yerushalmi kugel was added to the menu. I found myself with way too many boxes of brownie mix, even after giving so many boxes away to the fastest respondents on our Cousins WhatsApp chat.  I created stunning pecan truffle cookies and made delicious Strawberry and Brownie Mini Trifles to use up the remaining boxes of brownie mix.

As I was sorting through the freezer, I found a few bags of frozen cranberries.  According to halacha (Jewish law),  cranberries are not chametz.  Therefore, they did not need to be consumed or discarded before Pesach, but after doing the math, I realized that they probably were already several months old.  After all, I usually buy fresh cranberries around Thanksgiving and then wash and freeze them in late November or early December.

I set a handful of cranberries aside to prepare Frosted Sugar-Coated Cranberries to be used as a garnish, but decided to prepare cranberry sorbet with the rest of the frozen cranberries.  I remember seeing a Cranberry Ice recipe posted by one of my favorite kosher bloggers, CookingfortheTimeChallenged and I used that as my inspiration for this recipe.

This recipe uses sweet soda or juice as the liquid base.  I found some flat soda left over from a Sheva Brochos that I recently hosted.  This is the perfect recipe to use up that leftover grape juice, orange juice or flat soda.

I love the sweet and savory flavor combination.  I garnished these ices with chives for a surprising bite, but other herbs like mint or basil may be blended right in for that stunning palate sensation.

INGREDIENTS

one can cranberry sauce, whole or jellied
1 cup soda or juice
1 bag frozen berries or 2 cups frozen grapes

herb garnish, such as basil, mint or chives (optional)

DIRECTIONS

Using the s-blade of the food processor, puree cranberry sauce, berries and liquid.

Freeze until solid or overnight.

Once frozen, remove from freezer and defrost just enough to scoop back into the food processor fitted with the s-blade.

Pulse sorbet in food processor just until smooth.  Refreeze.

To allow for simple entertaining, I usually defrost for 20-30 minutes before scooping.

Garnish with mint leaves and Frosted Sugar-Coated Cranberries

SUBSTITUTIONS

Any canned fruit may be substituted for the canned cranberry sauce.

Any frozen fruit may be substituted for the frozen berries.  Just make sure to taste puree and blend with enough soda or juice for optimal sweetness.  Honey may be added as well to sweeten the sorbet.

Blend your choice of fresh herbs like mint, basil or chives for that unusual sweet and savory flavor sensation.

TIPS

I scoop the sorbet into small cups in advance and freeze in the cups until ready to serve. That speeds up the serving of a frozen dessert and keeps everything tidy.    I add the garnish at the end so that the leaves stay fresh and green.

No-Chop No-Fuss Spinach Split Pea Soup

split pea spinach soup

On these wintry days, there is nothing like a hot bowl of soup.

This soup takes the bowl! It uses a few simple wholesome ingredients with no chopping and no mess.  Just take a few minutes to toss all the ingredients in the crockpot in the morning and come home to a finished delicious soup in the evening.  The pot does all the work, no dicing. no sauteing, no prep mess.

INGREDIENTS
one 16 ounce bag (2 cups) of yellow split peas
one bag of fresh or frozen baby spinach (see kosher notes)
one tablespoon salt
dash of pepper
water

SUPPLIES

6 quart crockpot


DIRECTIONS
Fill crockpot two-thirds to the top with water. Toss split peas, spinach, salt and pepper into the crockpot and stir. Cook on high from morning to evening, at least six hours.

KOSHER NOTES
Kosher laws disallow the eating of any whole insects and therefore most greens require a process of soaking, rinsing and in some cases, pureeing. I have found that flat-leafed greens like baby spinach are much easier to check for insects than their curly-leaf counterparts. Kashrut authorities differ on the proper checking of leafy vegetables and some disallow the use of spinach altogether. This blog was not designed to be your kosher authority, so please consult your local rabbinic authority regarding using leafy greens such as spinach.

TIPS
This soup freezes extremely well. Cool soup and decant into freezer-safe containers or freezer-type zipper bags. Just defrost and reheat. Add fresh herbs and water if necessary to freshen it up.


Please Note: This post contains affiliate links from Amazon, which means I earn a small commission if you click and make a purchase.

Set It and Forget It Lentil-Vegetable Soup

There is something so hearty and comforting about lentil soup.  And, there is something about taking just a few minutes to prepare a soup on these cold, snowy mornings and coming back at the end of the day to a warm, thick, velvety and delicious soup.  Ordinary lentils really have that magical texture, firm yet creamy.  Adding vegetables to the ingredient list just takes lentil soup to a whole new level.

For this soup, I used the most common brown lentil .  It has the seed hull intact and is most suitable for salads and soups that require the lentil to retain its shape.   If you are short on time, you can use red lentils, instead.   It will cut down on the cooking time and still yield a hearty and delicious soup with a less defined texture to the lentil base.

set it and forget it lentil soup in crock

INGREDIENTS
one bag lentils
1 1/2 teaspoons salt
dash of pepper
3-4 garlic cloves, minced or 1 teaspoon garlic powder

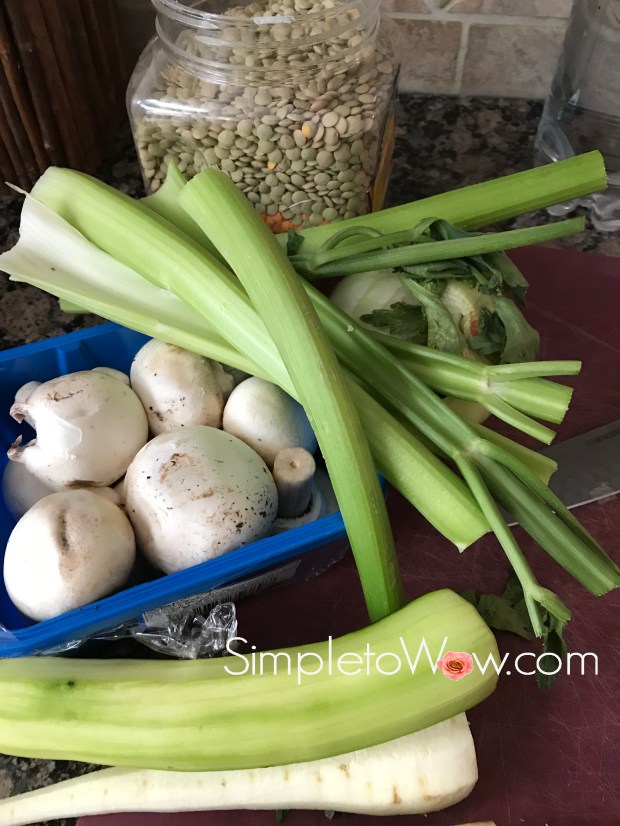
1 parsnip, cut into thin slices
1 package mushrooms, sliced thin
4 stalks celery, sliced thin
1 onion, diced
1 zucchini, diced
water

celery leaves, for garnish (optional)

set it and forget it lentil soup.jpg

DIRECTIONS

Place lentils, vegetables and seasonings into a crockpot. Fill crockpot 3/4 to top with water. Cook on high from morning to evening. If the soup is too thick, add up to a cup of water and stir well. Garnish with celery leaves right before serving.

SHORTCUTS
When in a hurry, I substitute red lentils and adjust the cooking time to 4 hours.  Right before serving, puree soup with a  stick blender for a creamy texture.

15 Minute Mushroom Soup

mushroom soup

The weather outside is frightfully cold and nothing warms the soul like a hot bowl of satisfying soup.   Although yesterday morning, I intended to start my  Crockpot Drunken Mushroom Soup in the crockpot,  I never did.  Instead, I got home late with only 15 minutes to get dinner on the table.   That meant that I needed to make the soup in a heavy-bottom pot using every shortcut possible.

I skimped on sauteing the onions and celery slowly and carefully.  Instead, I cut the onions and celery very small and started the soup by just sauteing the small bits of onions and celery for a few minutes.  I then shredded the mushrooms and zucchini in the food processor so that the tiny bits would cook quickly.  I skipped the wine and just added salt and pepper for flavor.

This soup was one of the best that I ever produced.  Sorry, kids!  Although my kids often chastise me for complimenting my own food, I subscribe to the belief that a cook may compliment or criticize their own handiwork.  Why not?

The soup was so flavorful and so silky that Don could not believe that there was no cream in this soup.  He loved this soup so much that he enjoyed three bowls of it.  So, guys, I didn’t even need to compliment my own soup.  Dad did it for me in word and in deed.  Indeed!


INGREDIENTS

2-3 tablespoons oil
1 onion, diced small
3 stalks celery, diced small
2 containers mushrooms, shredded
2-3 medium zucchini,shredded
1 1/2 teaspoons salt
dash pepper
4-6 cups of water

Celery Garnish (optional)


DIRECTIONS
In a heavy bottom pot over medium-high heat, saute onion and celery in oil for just a few minutes, until onions and celery are soft but not brown.

While vegetables are sauteing, shred the mushrooms and zucchini in the food processor using the s-blade or the shredding blade.

Add the shredded mushrooms and zucchini to the onions and celery. Add the salt and pepper and stir to combine. Add water and bring to a boil.  Simmer for a few minutes more until the soup is cooked through and silky.

Garnish with a celery curl.

Enjoy!


TIPS

To speed up recipes, cut, shred or dice ingredients into smaller pieces.   Smaller bits create more surface area for the heat and cooking media to enter.  Just take care, because the smaller the pieces of ingredients, the easier these ingredients are to overcook or to burn.

Simple No-Bake Sorbet cakes

no-bake sorbet cake 2.JPG

Desperate times call for desperate measures.

A few weeks ago, I had finished preparing a simple Shabbos menu when we found out that we were about to have a houseful of Shabbos company.  I had plenty of real food, but I needed to create an impressive dessert for the next day…quickly and with ingredients already on hand.

I had been planning to serve some cut-up watermelon for dessert and that just wouldn’t do for this audience.  I looked around the house for dessert ingredients that required no baking.  I found a few  pints of  fruit sorbet, chocolate ices, pareve pizzelle cookies and whipped cream.  I had some beautiful variegated basil in the garden and  a pint of strawberries in my refrigerator.  And, this is what I created.

no-bake sorbet cake

SUPPLIES

cupcake pan

cupcake liners

rubber spatulas

INGREDIENTS

ice cream, sorbet or ices
whipped cream, whipped with some vanilla sugar

fresh mint, basil or other herb for garnish
fancy cookies
strawberries

pizzelle cookies or other fancy-shaped cookies


DIRECTIONS

Partially defrost ice cream, sorbet or ices on the counter or using the defrost mode on the microwave.  It should be thin enough to remove with rubber spatulas but not a drippy liquid.

Prepare whipped cream by whipping cream with a tablespoon of vanilla sugar until almost stiff.

Line cupcake pan with cupcake liners.  If the cupcake liners are thin, double them so that they will stand up to the sorbet filling.

With a teaspoon or  rubber spatulas, drop a small bit of each flavor of ices, sorbet, ice cream and whipped cream into the cupcake liners until they are almost  filled to the top. Freeze for several hours or overnight.

Remove sorbet cupcakes from freezer and peel away cupcake liners so that the ridges of the cupcake liners are visible.  Garnish with herbs, strawberries, whipped cream and pizzelle cookies cut in half.


TIPS

I peel away the cupcake liners in advance and refreeze the sorbet cakes until firm.  This allows for a faster and neater serving procedure.

To create a strawberry rose, cut thin slices on the strawberry without cutting through the bottom.  Fan the cut strawberry out to create a rose effect.

I garnish the plates before placing the sorbet cakes.  They melt quickly!

Please Note:  This post contains affiliate links from Amazon, which means I earn a small commission if you click and make a purchase.

Streusel Topped Challah

Sometimes, just a simple topping can be a recipe-changer.  This simple streusel topping transforms my Simply the Best Challah Recipe…ever! into something extraordinary.  It adds a delicious sweetness and texture that is unique and oh, so decadent.

Since this streusel challah uses the same dough recipe, I can produce two different types of challah with the same dough.  I top some of the challah with the streusel topping and leave some of the challah dough as is.

Often, when I prepare a recipe of the streusel topping, I place the left-overs in a plastic zipper bag and freeze it on a freezer door shelf.  I then top next week’s Friday night challah with the leftover streusel.

streusel challah


INGREDIENTS

one recipe of  Simply the Best Challah Recipe…ever!

1/2 cup sugar
1/2 cup all-purpose flour
1/4 cup oil
1/2 teaspoon cinnamon
1/2 teaspoon vanilla sugar (optional)


DIRECTIONS

Combine streusel ingredients using a large fork, wooden spoon, pastry blender or food processor s-blade.  Texture of streusel should resemble coarse crumbs.  If crumbs are not coarse enough, add a few more drops of oil.  If crumbs are too coarse, add a bit more flour.

Prepare  Simply the Best Challah Recipe…ever! dough according to blog post instructions. Braid challah loaves or form pull-apart challah by creating challah roll twists and placing them side by side.

Press streusel topping into crevices between braided logs or challah roll twists.

Pacman Gefilte Fish

pacman gefilte fish 1

Sometimes the wow is all in the presentation.  The presentation takes a simple menu item to a whole new level.   Just cutting something a different way or finding a unique manner to plate it creates a real wow.

Gefilte fish is a Jewish Shabbos and Yom Tov (holiday) staple.  It is like a meatloaf, except with ground fish.  And, traditionally, it is cut into slices and served with horseradish and beets.  This is a simple and unique way to serve gefilte fish.

I first saw this way of serving gefilte fish at my friend, Lori’s house many years ago.  I have served gefilte fish so many times this way and it never fails to bring a smile to the lips of my guests.  This Pacman presentation has received lots of mileage, especially with Avigail and Judah, my grandchildren.  They are too young to know what Pacman is, so we just call it “fish” gefilte fish and they look forward to it whenever they visit for Shabbos.

pacman gefilte fish 2

INGREDIENTS

one loaf of gefilte fish and 1-2 carrots, prepared according to directions


DIRECTIONS

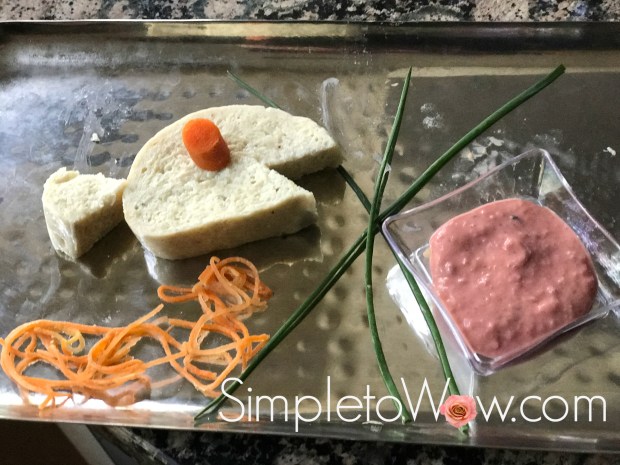
Prepare gefilte fish and carrot according to package directions.  I used A&B Cut cooked gefilte fish loaf into slices.  Cut a notch out of the narrow end of each slice and remove it.  Move it to the other end of the slice, creating a fishtail.

Cut carrot into slices.  Place one over the notch cutout to resemble a fish eye.

Voila!


To Preheat or Not to Preheat?

oven thermometer.jpgI have a confession to make.  I almost never preheat the oven.

“I don’t want to take the extra time.  I don’t like to stick my hands into a hot oven, unless absolutely necessary.  I love shortcuts.  I love to use the delay timed cook feature on the oven.  I don’t want to waste the few minutes of gas/electricity it takes to preheat (thanks Mom!).”

I have lots of excuses.

Preheating the oven for a recipe seems to be a rite of passage for the culinary enthusiast. After all, whenever I read a recipe, it begins with “preheat oven”.  Most of the time, whenever I write a recipe, it also begins with “preheat oven”.

So, am I a hypocrite?

Probably, but my recipes come out just fine without preheating the oven.

Preheating the oven is necessary for certain precise recipes and I do preheat the outside grill.  But, simpletowow is really not about precision.  It’s about culinary license.  Like poetic license, this blog is allowed to break some rules in favor of creativity and simplicity.

After all, most of the feedback that I get is that this blog introduced them to a new ingredient (take Farro: A Simple, Ancient and Fabulous Grain, for instance) or a new way of preparing an age-old ingredient (like Balsamic Beet Slaw: Easy, Fresh and Delicious) or trying new varieties of simple vegetables (see You Say Tomato…I Say Heirloom Tomato Salad.

It is about healthier cooking preparations, like baking instead of frying (see Onion-Battered Baked Tilapia) and finding one’s own cooking voice.  Really, progressive cooking could stand to shed some of the annoying conventions like preheating.  Simplicity and producing delicious, wholesome food with minimal effort does reign supreme.

So, I leave it to you.  Preheat or don’t preheat.  It’s your choice.

But, I still will start my recipes with “preheat oven”.  Shhh…don’t let my secret out.


Simple Chicken Vegetable Packets

I devone of those hot and humid days that were exhausting.  I just had very little energy left at the end of the day to prepare dinner.  I had defrosted chicken breasts earlier to use for dinner and needed inspiration to create a simple and delicious meal.

I wanted no fuss and very little effort.    I didn’t even want the extra effort of preheating the oven.  I wanted to use at-hand ingredients and easy cleanup.

Packet cooking seemed like the perfect solution.

I have prepared packet meals with salmon (Low-Carb Cajun Salmon Fillets in Foil Packets) and decided to try it with the chicken breasts.   To keep the meal hearty and fuss-free, I decided to add an assortment of fresh and frozen vegetables that I had on hand to the packets, too.

This really was simple.  And, yes, it was a wow!

INGREDIENTS

4 chicken breasts

barbecue sauce
soy sauce

frozen green beans
tomatoes
peppers

DIRECTIONS

Cut four square pieces of heavy duty foil. On each piece of foil, place one chicken breast and then lightly drizzle with soy sauce and then barbecue sauce. Layer tomatoes and peppers and then sprinkle with a few frozen green beans. Seal foil into packets.

Bake at 400 degrees F for 30-40 minutes. Open foil packets carefully to let steamm escape and serve immediately.

The Perfect Grilled Salmon Wrap

salmon tortilla wraps 2

Salmon is one of the staples in my house.  Just about everyone here (except my mother) really enjoys salmon, so it is often a go-to dinner.  Very often, I prepare a family pack of salmon, only to find that someone has already eaten dinner elsewhere.   I then repurpose the salmon for lunch the next day.

One of my favorite lunches is a grilled salmon wrap.  It is portable, delicious and very satisfying.  It is so simple to prepare once you know the way to roll the perfect wrap.


INGREDIENTS

large pliable tortillas or wraps

arugula (see Kosher notes)

Thinly sliced tomatoes  or other vegetables (optional)

grilled or baked salmon

Spicy Mayo


STEP BY STEP DIRECTIONS

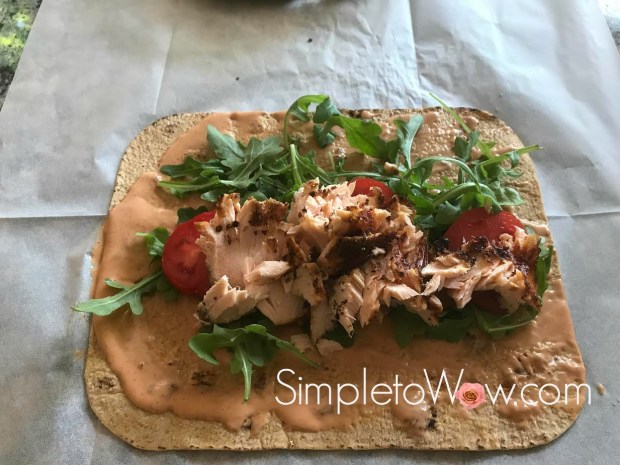
Lay out the wrap on a flat surface.  I chose a rectangular wrap, but this can be made in exactly the same way using a round tortilla or wrap.  Just make sure to use a tortilla or wrap that is soft and pliable, not brittle.

tortilla wrap step 1

Choose your favorite dip or dressing or and spread it all over the wrap.  This gives extra flavor to the salmon and helps the fillings  adhere to the wrap.


Add the arugula by placing in a thin layer right over the sauce, making sure to cover about half of the tortilla.

tortilla wrap step 2

Add any other thinly sliced vegetables.   This will add another texture and/or moisture to your wrap.

Here I added beefsteak tomatoes from my garden.  Tomatoes will add favor and moisture to the wrap.  You can add thinly sliced cucumbers, peppers or jicama to add crunch.  Of course, you may omit this step if you are a purist about your wrap.

tortilla wrap step 3

Next, add the salmon.  If there are any bones, remove and lay in a single strip or flake and place atop the arugula and vegetables.

tortilla wrap step 4

Sprinkle on another thin layer of dressing or dip to keep the salmon flavorful.

tortilla wrap step 5

Next, fold your wrap carefully.

Before we begin, here are two important points:

  1. Make sure that you are using a pliable and soft wrap or tortilla.  Brittle tortillas or wraps will not work well for these wraps.
  2. You will be tempted to overfill your wrap.  Don’t give in to temptation,  It will make your wrap messy and impossible to roll up neatly.

Here are step-by-step instructions:

  1. Fold in the first sidetortilla wrap step 6
  2. Now, fold in the second side  tortilla wraps step 6a
  3. Start rolling wrap from bottom to top, carefully move the stuffing toward the bottom of the wrap as your roll, leaving a least 1 1/2 to 2 inches at the top of the wrap.   Roll the wrap all the way to the top.tortilla wrap step 7tortilla wrap step 8
  4. Wrap the parchment or wax paper around it.
  5. Using a very sharp knife, cut through the wrap on a diagonal.salmon tortilla wraps 2


Voila!


KOSHER NOTES

Kosher laws disallow the eating of any whole insects and therefore most greens require a process of soaking, rinsing and in some cases, pureeing. Kashrut authorities differ somewhat on the proper checking of leafy vegetables. This blog was not designed to be your kosher authority, so please consult your local rabbinic authority regarding using greens such as arugula.

Davida’s Awesome Potato Kugel

It is so wonderful to have Davida back from Israel.  The house is a more joyful abode and Davida and her friends fill our house with laughter, music and good food.  No matter how chaotic things are, Davida seems to have just the right lighthearted joke and is always willing and able to prepare delicious food for all.

Whatever Davida prepares is not only delicious, but perfectly executed, as well.   Her challahs are beautifully braided, her salads are impeccably tossed and her food just begs to be enjoyed.

When we visited Israel for Pesach (Passover),  Davida prepared this delicious kugel for us.  This past winter, Davida first tried this recipe when she prepared a Shabbos in Jerusalem  for Michelle, Scotty and their gluten-free guests.

The original recipe is from Susie Fischbein’s Pesach cookbook.   Davida tweaked and simplified it just a bit.   It contains a small amount of sugar and when I scoffed at that, Davida admitted that she tried it without the sugar and it just wasn’t the same.

This past Shabbos, Davida prepared this potato kugel again and it was another winner.

Welcome home, Davida!

davidas awesome potato kugel

SUPPLIES

food processor
2 pyrex pie plates

INGREDIENTS

1⁄2 cup  oil
8 medium potatoes, peeled and cut into chunks
2 medium onions, peeled and quartered
1 tablespoon salt
1 teaspoon black pepper
2 tablespoons sugar
5 large eggs

DIRECTIONS

Preheat oven to 425°F degrees.

Using the metal s-blade of the food processor,  shred the onions and then place in a large mixing bowl.  I like to use the stainless steel mixing bowl of my Kitchen Aid mixer, since it is a large, sturdy bowl with a handle for pouring,

Using the metal s-blade of the food processor,  shred the peeled potato chunks until almost smooth.  Add the potatoes to the mixing bowl

Add the salt, pepper, and sugar to the potato-onion mixture and then add the eggs.  Stir until completely combined.

Coat each pyrex pie plate with 1/4 cup of oil and place in preheated oven. When the oil sizzles, carefully remove each pyrex pie plate from oven and spoon some of the sizzling oil into the waiting potato mixture to add fluffiness to the kugel.  Incorporate the sizzling oil into the mixture until well combined.   Pour the mixture into the 2 pyrex pie plates and bake uncovered for one hour.

Enjoy this delicious kugel with music and laughter!

Please Note: This post contains affiliate links from Amazon, which means I earn a small commission if you click and make a purchase.

A Vinegar Pantry Tutorial

Vinegar is one of the most versatile ingredients. It is characterized by its acidic taste and is known best for the pungent flavor it imparts to salads.   For centuries, vinegar has been valued for its health benefits.  Vinegar comes in many different tastes and colors and has a wide variety of uses beyond the salad bowl.

vinegar tutorial 1

Adding a splash of an acidic ingredient like vinegar is an excellent way to brighten all types of salads and other dishes.  There are so many varieties and each one has a distinct personality and flavor.

I reserve the standard white variety for cleaning uses, since it boasts a very pungent and sharp taste that can be overly assertive.  It can be used for weed control and cleaning purposes.

My go-to vinegar is cider vinegar since it imparts a medium acidic taste while still tasting fruity and fresh.

Different vinegars impart a variety of  flavors and can change the way that you prepare and enjoy your food.   Feel free to experiment with different vinegars to find the ones that you enjoy most.

My pantry boasts a large variety of vinegars and here are some of my favorites:


Cider vinegar: Cider vinegar is fashioned from apples.  This brownish clear vinegar stands up well to hardy salads and is the go-to ingredient in marinades.  It is perfect for recipes like: Roasted Sweet Potato and Beet Salad,  Cowboy Caviar: A Simple and Hearty Salad with Attitude and Simply the Best Marinade: A Science Lesson

White vinegar: White vinegar is assertive and clear.  It is distilled from grain and can be used with sturdy greens.  It has a very assertive flavor that sticks to the back of my throat, so I tend to reserve it for cleaning (When Crayons Must Learn Boundaries: Simple Ways to Clean Crayon Marks on Walls) and garden tasks like (At War with Weeds: A Homemade Non-Toxic Weed-Killer)

Wine vinegar:  Wine vinegar comes in red and white varieties.  Heinz manufactures an assortment of delicious wine vinegars that carry the o-u-p (kosher for Passover) certification year-round.  This type of vinegar is light and delicious and can be used in dressings for a variety of light and pungent salads.   Typically, wine vinegar comes in a shaker bottle and should be shaken sparingly directly on salad.   Wine vinegar is perfect for recipes like Warm Zucchini-Mushroom Salad with Almonds and Sunflower Seeds and Etty’s Simple Basil-Dijon Vinaigrette

Rice vinegar:  Rice vinegar is an excellent alternative to cider or white vinegar.  I used it in a variety of Asian-inspired dishes.  It combines perfectly with soy sauce and sesame oil.  Try it is dishes like Individual Sushi Salads and Asian Red Cabbage Salad…Simple and Wow

Balsamic vinegar:  Balsamic vinegar is one of my favorites, too.  It is dark brown in color and imparts a sweet, syrupy flavor.  Balsamic vinegar is not a tye of wine vinegar, but is rather made from grape pressings that have not been allowed to ferment.  This vinegar imparts a very distinctive flavor and should be used sparingly, often just dotted onto salads, vegetable and protein dishes and fruit.  This vinegar is delicious in Simple, Creamy and Perfect Homemade Balsamic Vinaigrette and Roasted Rainbow Skewers.


Simple Jalapeño  Dip

This dip recipe has become a family favorite.  I prepare it before Shabbos as  a delicious dip for challah.  I often serve it with salmon and grilled chicken, too.  Both my sons-in-law, Aaron and Scotty, look forward to this jalapeño  dip at our Shabbos table.  It is simple to prepare and lasts in the refrigerator for about 2 weeks.

Jalapeño peppers are a type of medium-hot chili pepper that originated in Mexico.   Its strong spicy flavor and thick dark green skin make them perfect for this dip, which boasts a lovely green color and spicy after-taste bite.  Fresh jalapeno peppers are a rich source of vitamins A and C.

For this recipe, I remove the seeds and veins of the jalapeño peppers.  While the veins and the seeds carry most of the hear, it is the oils in these peppers that can irritate your skin and eyes.

Take care when handling jalapeño peppers as the oils from these peppers can burn your skin, eyes, nose and mouth and make you cough.  You may want to wear latex gloves when working with these peppers. Nonetheless, when you are finished, always wash your hands well with soap and water.


SUPPLIES

melon baller
paring knife
food processor
wide-mouth squeeze bottles


INGREDIENTS
3/4 cup cup mayonnaise

1/4 cup olive oil
6-8 large jalapeño peppers, rinsed and seeded, ribs removed
1-2 tbsp lemon juice
1/2 teaspoon salt
pinch coarse black pepper

2 small cloves garlic or garlic powder to taste

pinch sugar or agave syrup (optional)


DIRECTIONS

Rinse and seed jalapeño peppers, making sure to remove all seeds and ribs.  Take care not to touch eyes, nose or mouth while working with jalapeño  peppers and wear gloves, if necessary, to protect hands.  You can use a paring knife or melon baller  to remove seeds and ribs.

Place everything in the food processor; pulse until smooth and enjoy!

Decant into wide-mouth squirt bottles.

Enjoy!


Please Note: This post contains affiliate links from Amazon, which means I earn a small commission if you click and make a purchase.

Individual Sushi Salads


individual sushi salad 1

My kids all love sushi.   To them, having sushi as an appetizer Shabbos lunch is a real luxury.  While sushi is a fan favorite, I don’t feel that it has enough nutritional value as it is mostly rice.  Furthermore, sushi rolls do not stay fresh enough from Friday until Shabbos lunch to make for an appetizing appetizer.

So, I have been preparing individual sushi salads as a Shabbos lunch appetizer, instead.

And, sushi salads eliminate most of  the fussiness of rolling sushi.  I can choose the proportions of each element in the sushi salad, favoring more vegetables and fish than rice and nori.  The elements of the sushi salad can all be prepared in advance.   Furthermore, they are all simple ingredients that I can use in different ways for the Friday night Shabbos dinner.  And,  best of all, once assembled on Shabbos morning, the individual sushi salad ingredients stay perfectly fresh, simply delicious and gorgeous until ready to serve.

INGREDIENTS

1 cup sushi rice (I favor brown sushi rice) prepared in rice cooker

1/4 cup rice vinegar

baked or roasted salmon fillet, cubed or shredded

nori, cut into thin strips

1 medium avocado

1-2 zucchini or cucumber, diced or grated

1-2 Carrots, grated (optional)

Simple and Perfect Spicy Mayo


DIRECTIONS

Prepare sushi rice in a rice cooker, using 1 cup of rice to 1 cup of water.   Add 1/4 cup rice vinegar to prepared sushi rice.

Prepare salmon fillet.  Cube or shred.

Cube avocado and place in a solution of 1 cup water with juice of one lemon.

Grate cucumber, zucchini and/or carrots.

Gently roll nori sheets and cut thin strips with scissors.

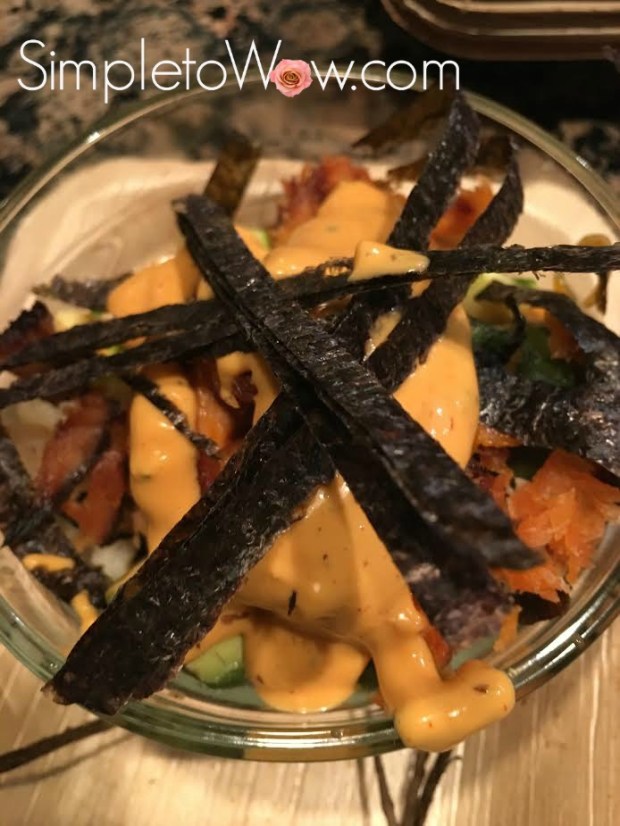
In a clear glass or plastic bowl, layer cooked rice, salmon, nori, avocado, cucumber and carrot.  Drizzle spicy mayo on top and garnish with thin strips of nori drizzle of spicy mayo.

TIPS

For Shabbos lunch, prepare salmon, rice and grated vegetables before Shabbos.  Store each ingredient separately in a zipper bag.  Prepare Simple and Perfect Spicy Mayo and store in 16-oz wide-mouth squeeze bottles or 24-oz wide mouth squeeze bottles.

Before assembling, mix sushi rice with rice vinegar.  Cut or shred salmon.  Cube avocado and place in a solution of 1 cup water with juice of one lemon.

In a clear glass or plastic bowl, layer cooked rice, salmon, nori, avocado, cucumber and carrot.  Drizzle spicy mayo on top and garnish with thin strips of nori and drizzle of spicy mayo.


VARIATIONS

For Pesach, substitute quinoa for the sushi rice and cider vinegar for the rice vinegar.


PLATING TIPS

Use clear glass or plastic bowl and overlap thin strips of nori on top, creating an x or star for an impressive presentation.


individual sushi salad

Perfectly Moist Baked Stuffed Chicken

baked stuffed chicken cut in half

For the Purim seuda (feast) this year, Don did almost all of the shopping for ingredients. My mother had emergency surgery shortly before Purim and I spent the week with her in Cleveland.  That meant that I would not have the time to shop and fully prepare for the seuda.  Don offered to help by doing the shopping for me.

Don did an awesome job shopping for the meat and chicken.  He bought thin sliced chicken cutlets for me to grill as one of the main dishes.   When I saw how thin the cutlets were, I was nervous that they would overcook easily.   So, I decided to develop a recipe that would accommodate cutlets that were butterflied and very thin.

I also had a bagful of frozen rice from a previous dinner party and lots of leftover frozen bread.  Keeping in mind that Pesach (Passover) was around the corner, I was eager to create a stuffing recipe that would use my leftover rice and bread.

And, so this stuffed chicken recipe was developed.

(more…)

Passover Meat Muffins

meat muffins

During the past March snowstorm, I began cooking for Pesach.

One of my favorite shortcuts is to prepare one batter and then use it to prepare a host of different menu items.  This time, I prepared one ground beef batter and used it to prepare baked meatballs, stuffed cabbage and these delicious and adorable meat muffins,

Meat muffins are just individual meatloaves prepared in round ramekins and topped with mashed potato or sweet potato icing.  They are whimsical enough to entice the children and delicious enough for even the adults to try.

INGREDIENTS

2 pounds ground beef
2 eggs
1/2 cup potato starch
1/2 Passover crumbs
1-2 onions, grated or diced small
2-3 garlic cloves or 2 tablespoons minced or granulated garlic
1 small can of tomato sauce or paste
1 squirt of ketchup

Mashed Potato Icing

4 large potatoes or sweet potatoes
½ cup vegetable stock or water
2 tablespoons olive or canola oil
Salt and pepper to taste

SUPPLIES

Piping Set for Icing
Disposable Ramekins
Wilton Large Piping Tip Set
Heavy Duty 16″ Disposable Piping Bags
Wood and Silicone Spatula
jumbo zipper bags

DIRECTIONS

Preheat oven to 375 degrees F.

In large mixing bowl or extra large ziploc bag, combine all ingredients, kneading until just combined.  Be careful not to overmix.

Using a Wood and Silicone Spatula, press meat batter into individual ramekins or disposable round ramekins.  Bake for 35-40 minutes until meat muffins are no longer pink in center.  Pour grease off of each ramekin right after removing from the oven.

Cool to room temperature before icing.

Mashed Potato Icing

Peel and dice potatoes or sweet potatoes.   Steam or boil until soft.  Drain, then add oil and liquid.

Mash until smooth and creamy but stiff enough to spread or pipe onto the Meat Cupcakes. To pipe, fill piping bag fitted with tip or large ziploc bag with one cut corner.

NOTES

You can use any combination of ground veal, ground lamb, ground chicken and/or ground turkey.

TIPS

Double or triple the meatball batter and use to make meatloaf, stuffed cabbage and baked meatballs.

Mixing the meatball batter by hand is best, but if you would rather not, use a jumbo zipper bag instead.  Just place all ingredients inside bag and close zipper, releasing any air.  Knead batter from the outside of the bag.

To fill mashed potato icing most easily and without making much of a mess, cuff bag over tall jar or glass.  Use a stiff rubber spatula to load puree into piping bag or zipper bag.

Please Note: This post contains affiliate links from Amazon, which means I earn a small commission if you click and make a purchase.

DIY Passover French Baked Onions

french fried onions for pesach

So many of my simple and moist recipes rely on french fried onions.  They add moisture and pizazz to even the simplest and leanest of fish, meats and poultry.  Recipes such as Onion-Battered Baked TilapiaSimple Onion Baked Chicken Cutlets and Low and Slow Oven Brisket require this as a key ingredient.

Year-round, this is a readily available ingredient with so many kosher brands to choose from.  For some reason the smaller packages of French’s do not carry an o-u kosher certification while the 26.5 ounce package of Family size french fried onions is available on Amazon with a reliable o-u certification.

Since these products have flour listed on the ingredient list, I understood that they would not acceptable for Passover use.    However, I was hoping to find a similar product this year that would be kosher for Passover.   Alas, I was unsuccessful.

That meant that I needed to develop a recipe for french fried onions similar enough to the store-bought ones.  I also wanted a recipe that would not require frying.  There is just too much to be done before Pesach (Passover) for me to be frying onions in small batches.

This recipe is good.  It is not as dry and crunchy as the original.  But, it does serve as a good replacement for these recipes.  And, it is simple.

I would love to hear your comments, especially if you found this recipe to be simple to wow.

INGREDIENTS

4 large yellow onions, thinly sliced
1/2 cup olive oil
1/2 cup potato starch
1/2 cup Passover crumbs
1 teaspoon salt
1/2 teaspoon garlic powder
1/2 teaspoon onion powder
1/2 teaspoon paprika
1/4 teaspoon pepper
olive oil or cooking spray

DIRECTIONS

Preheat oven to 450 degrees F.
Line a baking sheet with parchment paper or greased aluminum foil.

Separate thinly sliced onion rings into individual rings. In a large bowl, add the rest of the ingredients and toss to coat the onion rings.

Place the onion rings ton the baking sheet and drizzle olive oil or generously spray with cooking spray.

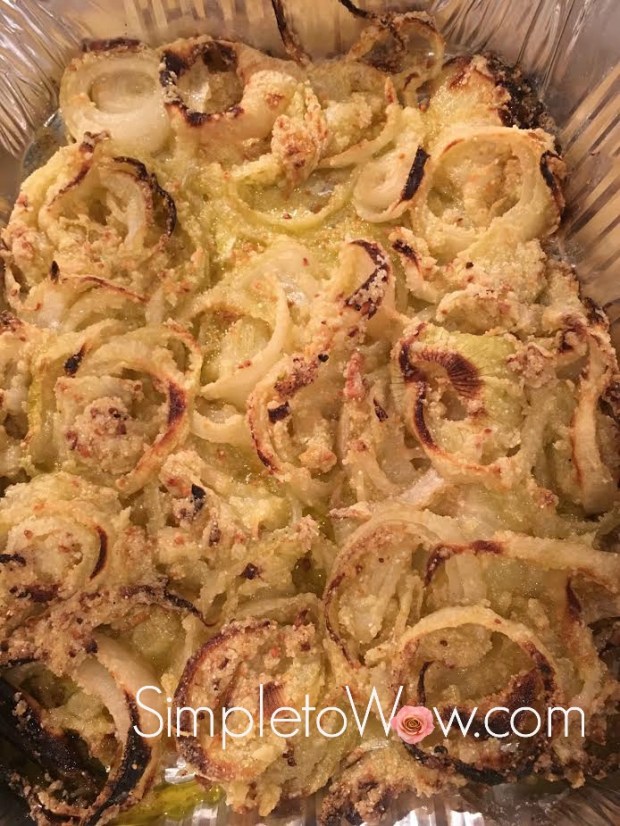
Bake for 25-35 minutes, frequently checking that the onions do not burn.  When ready, these onions should be just starting to turn golden brown.

Allow onions to come to room temperature before using.

Passover Stuffed Cabbage

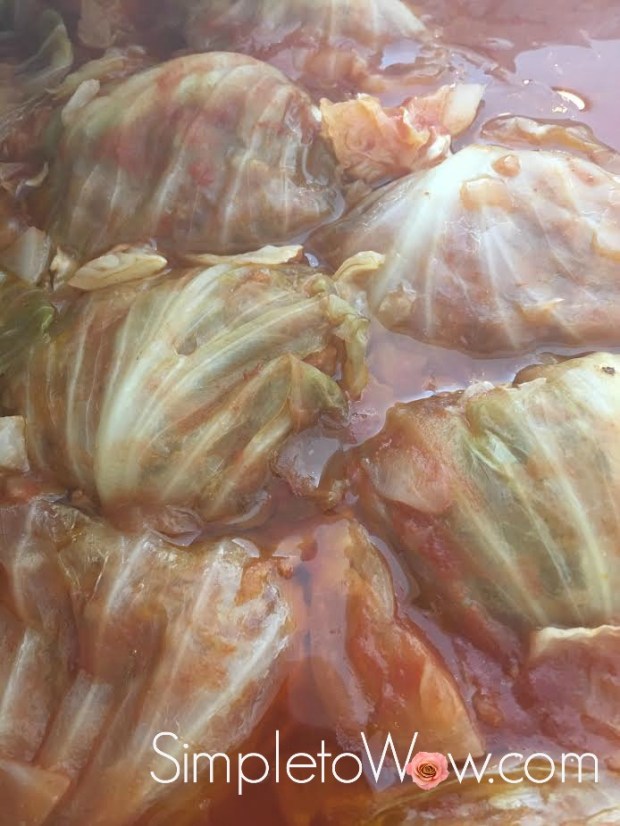
passover stuffed cabbage

Last week, I began cooking and freezing for Pesach (Passover).  With the furious and beautiful backdrop of a March snowstorm, I prepared most of my main dishes for the week of Passover.

It may sound a bit compulsive, but this just helps me manage the fury and beauty of the Passover holiday.

We travel to Israel for the holiday where we have a tiny kitchen and doll-sized appliances. The smallness of the food preparation facilities stand in direct contrast to the number of guests and family members that join us for the Passover seder and meals.

I have discovered that cooking the main dishes in advance really takes the edge off of the frenzy of Erev Pesach (Passover eve) and helps our family enjoy the beautiful surroundings of Jerusalem with some measure of serenity.

It certainly helps me appreciate the purity of the holiday and the freshness of the spring season.  It allows me to focus on the theme of this holiday that is so central to Judaism.  I can savor the beautiful traditions of Pesach, all to remind us of the birth of the Jewish nation as we miraculously left Egypt so many centuries ago.

Many women note that they feel enslaved by the enormity and difficulty of Passover cooking and that reminds them more than anything at the seder of the bondage of Jewish nation in Egypt.  I would rather celebrate the freedom from slavery by planning ahead and leaving time and energy to enjoy the traditions and themes of Passover.  It makes for a better me and it allows me to enjoy this wonderful spring holiday.

I have been making stuffed cabbage for many, many years.  Traditionally, rice is used as a filler.  Jews of Ashkenazic (Eastern European)  origin do not eat rice on Passover while those of  Sephardic (originally from Iberian Peninsula) background eat certain types of rice during the holiday.  For this use, you can either substitute quinoa for the rice or skip the rice altogether.

Last year, I did not prepare my cooktop for Passover advance cooking so I was unable to boil the heads of cabbage.  Instead, I froze the heads of cabbage and found it to be a simpler way to prepare the cabbage leaves for stuffing.  Best of all, it meant one less pot to clean at the end.  So, this year I wouldn’t prepare my cabbage leaves any other way.

Stuffed cabbage is one of those menu items that takes some time, but makes enough for many meals.  This year’s stuffed cabbage made enough for two Passover meals with some extras to deliver to some of my friends for their Passover meals.

Stuffed cabbage freezes so well.  The cabbage rolls can be frozen either with or without the suace.  I freeze the cabbage rolls in freezer bags and just take out as many as needed for the next meal.

INGREDIENTS

2 heads of cabbage

2 pounds ground beef
2 eggs
1/2 cup potato starch
1/2 Passover crumbs
1 cup quinoa (optional)
1-2 onions, grated or diced small
2-3 garlic cloves or 2 tablespoons minced or granulated garlic
1 small can of tomato sauce or paste
1 squirt of ketchup

sweet and sour sauce

2 cans tomato sauce
2/3 cup sugar or honey
1/2 cup lemon juice
1/2 cup raisins or craisins (optional)

SUPPLIES

Wood and Silicone Spatula
jumbo zipper bags

DIRECTIONS

Carefully remove the first 4-6 leaves of the cabbage and freeze the cabbage for at least 12 hours.

Defrost cabbage for several hours and/or microwave the frozen cabbage heads in 4 minute increments until leaves are soft and pliable enough to remove from head.

Preheat oven to 375 degrees F.

In large mixing bowl or extra large ziploc bag, combine all meat batter ingredients, kneading until just combined.  Be careful not to overmix.

Using a Wood and Silicone Spatula, press a golf ball size of meat batter into each cabbage leaf.  Roll soft cabbage leaf around meat, tucking ends under.  Place cabbage rolls seam side down in baking dish or pan.

Cut leftover cabbage into bite size pieces and toss among the cabbage rolls.

Prepare sauce by combining all ingredients and heating in sauce pan or microwave.   Pour sweet and sour sauce over cabbage rolls.

Bake tightly covered for 90 minutes.


NOTES

You can use any combination of ground veal, ground lamb, ground chicken and/or ground turkey.


TIPS

Double or triple the meatball batter and use to make meatloaf, meat muffins and baked meatballs.

Mixing the meatball batter by hand is best, but if you would rather not, use a jumbo zipper bag instead.  Just place all ingredients inside bag and close zipper, releasing any air.  Knead batter from the outside of the bag.


Please Note: This post contains affiliate links from Amazon, which means I earn a small commission if you click and make a purchase.

Roasted Sweet Potato and Beet Salad

For our annual Purim seuda (festive meal),  I decided to prepare a new salad.

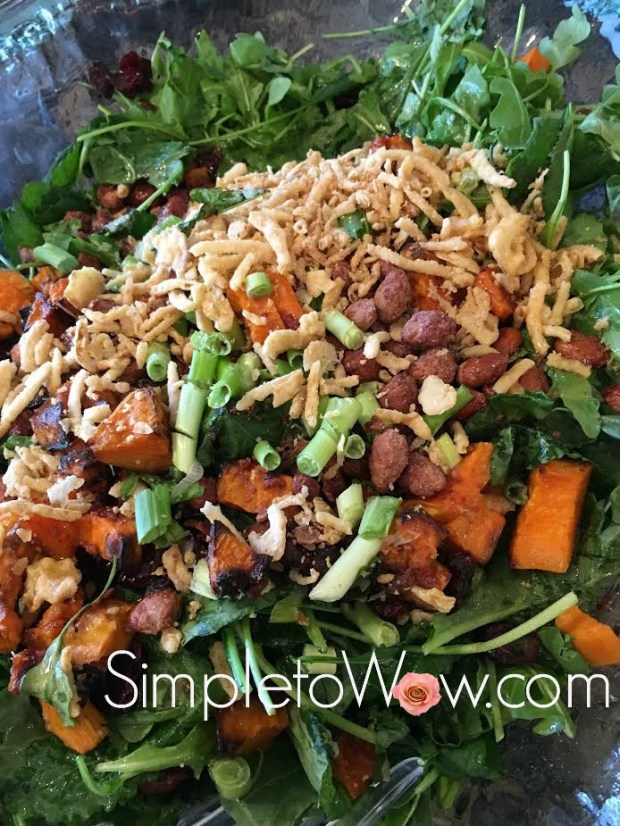
This salad took inspiration from a delicious battata (sweet potato) salad that I enjoyed at Cafe Greg in Rosh Pina in the Upper Galilee of Israel.  It combined the delicious colors, flavors and textures of roasted sweet potatoes, candied almonds and shredded fresh beets. All these were served atop a bed of arugula and baby kale and then tossed right before serving.

I prepared this salad as my feature salad, reserving my biggest salad bowl for this new recipe.

The only thing that took extra time was roasting the sweet potato cubes in advance.  It was well worth the effort.

It must have been delicious because it was the only item that I prepared for the seuda that was finished within the first hour.

INGREDIENTS

3 cups checked salad greens (see kosher notes)
2 cups roasted cubed sweet potatoes
2 cups shredded fresh beets
1/2 cup nuts
thinly sliced scallions
french fried onions (optional)

4 tablespoons olive oil
4 tablespoons cider vinegar or lemon juice
1 teaspoon Dijon mustard
1 teaspoon honey

DIRECTIONS

Preheat oven to 425 degrees F.  Line baking sheet with parchment paper or greased foil.

Peel sweet potato and cut into small cubes.  Place sweet potato cubes in a single layer on baking sheet. Drizzle with olive oil or spray with cooking spray and lightly sprinkle with kosher salt.

Roast for 35-55 minutes checking that sweet potato cubes are crisp on outside and soft on inside before removing from oven.  Cubes may be prepared in advance.  They may either be added to the salad warm or at room temperature.

Peel beets.  Using the shredder disk on the food processor, shred beets.

Combine, process or shake all dressing ingredients together.

Layer greens and shredded beets. Lightly drizzle dressing over the salad. Top with nuts, scallions and french fried onions.  Toss right before serving.


KOSHER NOTES

Kosher laws disallow the eating of  any whole insects and therefore most greens require a process of soaking, rinsing and in some cases, pureeing.  I have found that flat-leafed greens like baby spinach and flat-leaf  kale are much easier to check for insects than their curly-leaf counterparts.  Kashrut authorities differ on the proper checking of leafy vegetables and some disallow the use of spinach and kale altogether.  This blog was not designed to be your  kosher authority, so please consult your local rabbinic authority regarding using and preparing greens such as spinach and kale.


VARIATIONS

Cubed butternut squash or fresh pumpkin may be substituted for the sweet potatoes.


TIPS

When I prepare greens in advance, I place a few absorbent paper towels at the bottom of the bag or dish.  I then layer the greens over the paper towels.  These paper towels will absorb any extra moisture in the greens and will keep the green fresh. roasted sweet potato salad