Baked Goods

Pulled Beef Babka

pulled beef babka ready to eat.jpg

Today’s stormy and snowy weather in the Northeast was already predicted several days ago.  The first snow of the season is exciting, especially when it greets us before Thanksgiving.  Although Thursdays typically are spent in the car, I sorted out my day to start early and finish in the early afternoon, before the storm was to hit.

I arrived home just as the snow was beginning to accumulate and I headed to the kitchen.   My kitchen faces the backyard and as I cook,  I can enjoy the snowflakes and the changing landscape.   With my head full of new recipe ideas and the snowflakes arriving furiously, I began to cook in the snow.

snowy backyard.jpg

The idea of a savory pulled beef babka has been consuming me.  I had already prepared pulled beef to serve Friday night and I had been mulling over the simplest way to transform some of the pulled beef into a savory babka to serve for Shabbos lunch.  One of my favorite shortcuts is to prepare one dish and serve it in a multitude of different ways.  Pulled beef is that type of recipe.

I thought long and hard about how to prepare this simply with minimal cleanup.  And, I think I nailed it.  Because, it really was simple to prepare.  And, it was easy to clean up afterward.  Best of all, the pulled beef babka was delicious and gorgeous.

Now, let’s see what my fifteen Shabbos guests say!

INGREDIENTS

1 lb. pizza dough or challah dough
1/2 cup barbecue sauce
2 cups thinly shredded  Pulled Beef


DIRECTIONS

Preheat oven to 375 degrees.

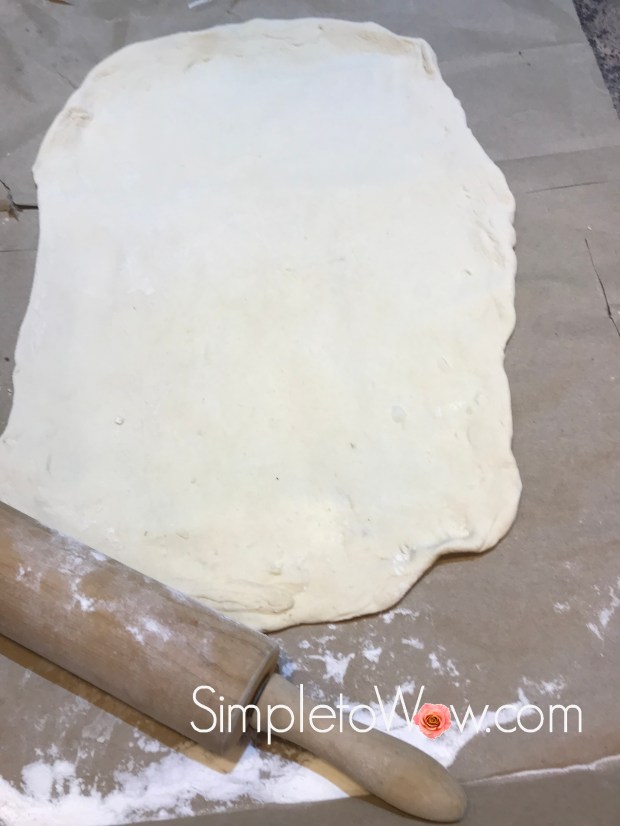
On a large piece of parchment paper, roll the pizza dough out into the thinnest rectangle that you can.

pulled beef dough rolled out.jpg

Spread the pulled beef onto the top of the rolled-out dough, leaving up to an inch of dough all around.

pulled beef babka spread over dough.jpg

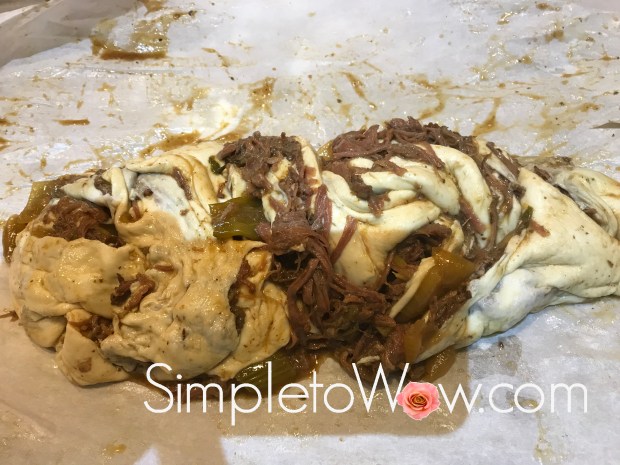
Roll the dough jelly-roll style until completely rolled up.

Cut the roll in two lengthwise down the center.

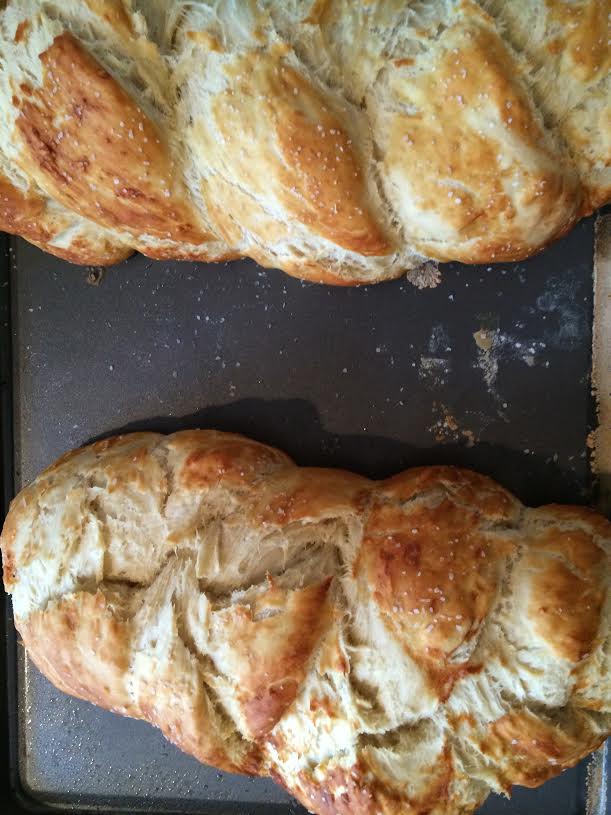
Carefully twist the two jelly roll logs together, trying to keep the twists together as much as possible.  If some of the pulled beef protrudes, don’t worry.  Those pulled beef pieces on the surface will caramelize during baking and will add extra flavor and texture.

pulled beef babka twisted and ready for loaf pan.jpg

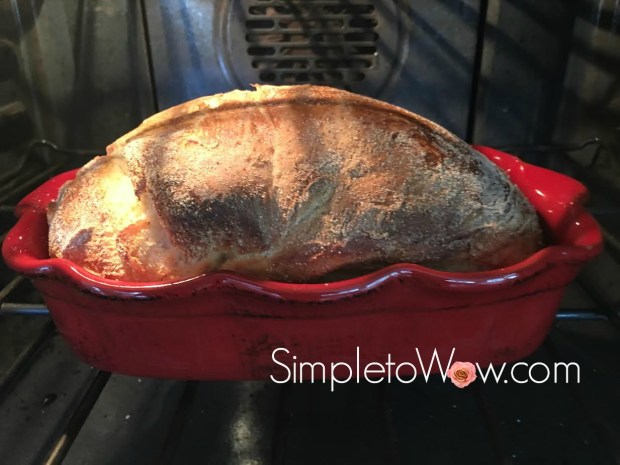
Carefully place the parchment paper into a loaf pan, trimming the edges if necessary.  Stick some extra pulled beef and brush extra barbecue sauce on top.

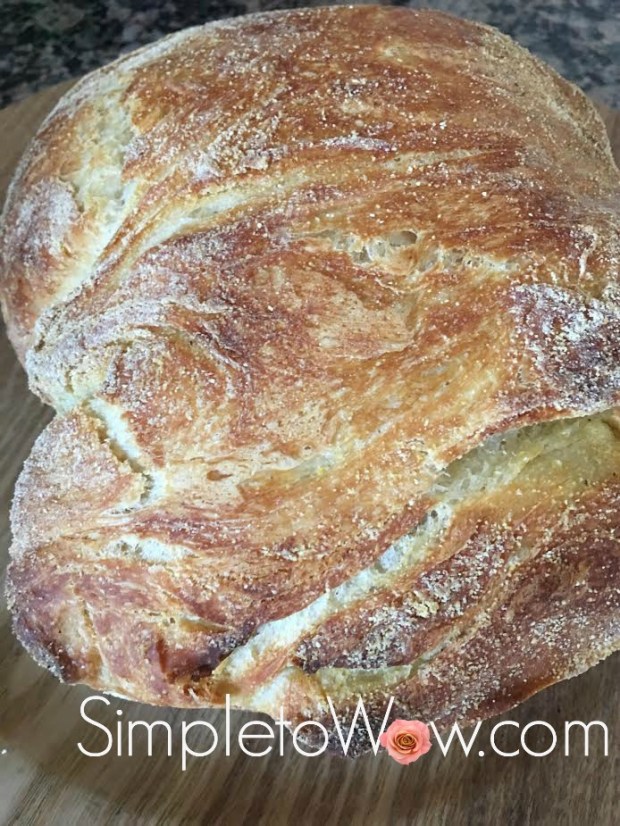
Bake until golden brown, about 40-50 minutes.

pulled beef babka ready to eat

Remove from the loaf pan and slice. Serve warm.

pulled beef babka slice.jpg

TIPS

Prepare a large batch of  Pulled Beef and serve the rest over rice or farfel

Tear open a paper bag and work over the inside of the bag.  Roll everything up after this messy preparation to save cleaning up loose flour and dough bits.


Pink Baby Carriage Cookies: Simple to Wow

For Charley’s kiddush, Davida prepared these adorable carriage cookies.

They really were Simple to Wow!

baby girl carriages

INGREDIENTS

Hadar-Tirosh chocolate half-moon biscuits
Paskesz mini Oreo cookies
frosting
Pink piping or frosting

DIRECTIONS

Using a small spatula coated with frosting, adhere two half-moon cookies together at right angles to create base of carriage.  Since these cookies are double-sided,  use the vanilla side for the base of the carriage and the chocolate-side for the carriage hood.

With a dab of frosting, adhere two wheels to front of cookie carriage.  Pipe lines on hood of carriage for additional decoration.

baby girl carriages

5-Ingredient Cheesecake Brownie Bites

cheesecake brownie bites.jpg

Cheesecake and brownies.  Brownies and cheesecake.  Two delicious and decadent desserts that deserve each other.

This recipe is simple and oh, so delicious.  It is the perfect combination of these two classic dessert flavors.  The recipe begins with brownie mix and end up as the perfect combination of brownies and cheesecake, marbled to perfection.  It is forgiving and memorable.  The texture is decadent and fudgey.  It will wow you in its simplicity and it will wow you in its delicious taste and texture.

INGREDIENTS
1 brownie mix
8 ounces cream cheese
1 teaspoon vanilla sugar
1/4 cup sugar
1 egg

DIRECTIONS

Preheat oven to 350 degrees F.

Prepare brownie batter according to package instructions and pour into individual cupcake papers or ramekins.

Using a mixer or the s-blade of the food processor, mix together cream cheese, sugar, and vanilla. Add the egg and beat  until creamy and smooth.

Add a dollop of  cheesecake batter on top of each of the brownie batter ramekins. Use a skewer, small knife or chopstick to swirl the cheesecake and brownie batter.

Bake for 20-30 minutes until the top of the cheesecake is turning golden brown.  Test with a toothpick inserted into the center of one ramekin.  If a bit of the batter sticks to the toothpick, you will have a fudgier end-product.  If you wait until the toothpick comes out clean, you will have a more cake-like end-product.

cheesecake brownie bites

Nearly No-Carb Cheesecake with Mom’s Voice

Next week, Don and I will be heading to Israel for my mother-in-law’s ninth Yahrzeit, (commemoration of the anniversary of death) of my mother-in-law, Devorah bas Yitzchok Ahron a’H.  I loved my mother-in-law dearly.  While her physical presence is no longer in this world, her neshoma (soul) endures.  And, the Yahrzeit is the time to reflect on the lessons that she has imparted and continues to impart to us, her children.

My mother-in-law was brutally honest.  She was definitely not subtle.  Not in any way.

She would tell me and everyone else exactly what she thought.  And, exactly what she thought we should do.  She would tell my children that we weren’t taking good enough care of my furniture.  And, that my sister-in-law’s couches were holding up better than mine.   She offered advice to me on how to raise my children.  She couldn’t hold back when she thought someone was too fat or wearing clothing that was not flattering.  And, she always brought me just the items from the dollar store that she thought that I needed in my life.

Mom was absolutely right about most everything.  Her advice was truthful and blunt.  I heard what she said and yet I often rejected her words as harsh and unfair.  Because, in Mom’s lifetime, it was just too much information and it felt so negative.

Now that only her soul and her legacy remains, I interpret her words differently.  I accept them more and push back less.  Honestly, I just needed to learn to accept the criticism and own it.

Now that her physical presence is gone, I still hear her whispering in my ear.  Most amazingly, her voice has merged with my own inner voice.  And, it feels right and only positive now.

“It’s time to lose weight.” “Close the front door.”  “Don’t let the grandchildren play with play dough on the floor.”  “That outfit isn’t flattering.”   These are Mom’s lessons with my own inner voice whispering them.

So, with Mom’s voice as the impetus, we decided to do something exciting, frightening and wonderful on our  Yahrzeit visit to Israel this year.   We decided to jump-start healthier eating habits on this trip with the hope that these habits will last.  And, I feel that Mom has whispered this daunting plan into my ear.  Because, she always wanted her family to be slimmer, more fit and healthier.

Don’s two brothers will be joining us on this trip.  Don’s brother, Yisroel, has been on a modified Atkin’s diet successfully for two years.    He volunteered to be the mentor and coach.  I volunteered to be the cook and menu planner.  Yisroel keeps reminding me that it will be hard work.  And, I am up to the challenge, Mom!

Don’s brother, Mordechai, is on board with this new plan.  For this trip, he will be traveling without the love of his life, Yael.  But, he doesn’t want to give up another love of his life.   Cheesecake.

Don told Mordechai that we will find a way for him to have his cheesecake and eat it, too.   And, since I am in charge of the cooking and meal planning, I was determined to bake a cheesecake with nearly no carbs.

Therefore, I made a simple, crust-free cheesecake with Neufchâtel cream cheese and SPLENDA® .  Although, I generally do not use diet sugars or diet products,  I made an exception here due to the circumstances.   I hope that you love the cheesecake, Mordechai.

Thanks Mom, for that new inner voice!  May your dear neshoma be bound with the souls of the living.

no-carb cheesecake

SUPPLIES

spatula
food processor
mixer

glass pie plate

INGREDIENTS

2 pounds Neufchâtel or light cream cheese
3 large eggs
10 SPLENDA® packets (or to taste)
1/2 teaspoon vanilla extract

cooking spray

DIRECTIONS

It is best to bring the ingredients to room temperature before baking to prevent cracking, although I have made this recipe effectively with ingredients right out of the refrigerator.

Preheat oven to 350°F.

Prepare pie plate by generously spraying with cooking spray or lining with parchment paper .

In food processor fitted with an S-blade, beat cream cheese, eggs, SPLENDA® and vanilla in a food processor or with a mixer, just until smooth and creamy. You can also use a whisk to incorporate and beat all these ingredients. You will have to scrape sides of bowl to incorporate everything well until combined, smooth and creamy.

Pour mixture into pie plate.

Bake for 40 minutes. Turn oven off and leave in oven to another half-hour.

Remove from the oven and cool completely.  Chill for at least 2 hours before serving.

TIPS

If you would rather use less SPLENDA® , I would suggest just sprinkling a bit on top of the cheesecake when serving.  A sprinkle of SPLENDA®  or powdered sugar on top fools the palate and imparts sweetness to the whole serving.

Sukkos No-Knead Ciabatta: Harvest and Humility

harvest ciabatta


The Autumn Jewish holiday of Sukkos is referred to as Zman Simchaseinu  (season of rejoicing) and Chag Ha’Asif (Festival of of Gathering).  It falls at the time of year in Israel that the grain, grapes and olives are ready to be harvested and brought to market.  The winter, spring and summer months of hard work in the field, orchards and vineyards have finally paid off.  For anyone in the agricultural sector, it is truly the season of rejoicing.

At the time of harvest, it is natural for us to feel proud of our material accomplishments and to attribute our success entirely to our efforts and good fortune.   It is precisely at this time that we are commanded to rejoice humbly within the context of the holiday of Sukkos and to give thought to all that G-d has contributed to the success of our bounty.   We are cautioned to maintain our humility, even through the bountiful harvest.

G-d has given us the gift of Sukkos to enjoy the material benefits of a rich bounty within the context of Torah and mitzvos (commandments).  During Sukkos, we read King Solomon’s  scroll of Koheles (Ecclesiastes).   King Solomon, who was the wisest of men, reflects upon the vanity of the pleasures of this world and sums it up in the last verse of .Koheles.  He declares, “the sum of the matter, when all is considered: Fear G‑d and keep His commandments, for this is the entire purpose of man.”

In keeping with the Sukkos themes of Zman Simchaseinu  (season of rejoicing) and Chag Ha’Asif (Festival of of Gathering), I created this wonderful ciabatta recipe.  It uses the basic no-knead dough that I introduced in Ciabatta Challah: a Simple No-Knead Solution with some technique simplifications and addition of pecans, chocolate and raisins.  It highlights the bounty of the season and is the perfect bread to serve at the first Sukkos meal.

It is best prepared in a covered dutch oven but can also be prepared in a heavy loaf pan or crock with a pot lid on top.  It has an absolutely wonderful crunchy crust and delicious interior dotted with nuts, craisins and chocolate.  Although it is best served within 12 hours of baking, my family enjoys it way past those 12 hours.

Happy Sukkos!

INGREDIENTS
3 cups all purpose flour
1 3/4 tsp salt
1/2 tsp active dry yeast
1 1/2 cups room temperature water

handful of craisins
handful of pecans, chopped
handful of chocolate chips
sprinkle of flour or cornmeal

DIRECTIONS

In a mixing bowl, combine flour, salt and yeast together.  Slowly add water and  mix very well with a wooden spoon or firm spatula to form a sticky dough.  If dough is not sticky, add a bit more water.  Fold in craisins, pecans and chocolate chips.

sukkos ciabatta.jpg

Cover the bowl with plastic wrap and let rise for 12 to 18 hours.

sukkos ciabatta covered

Preheat oven to 450 F degrees.   Place small covered dutch oven or heavy loaf pan with metal cover in the oven for at least 10 minutes.

Remove the pot or pan from oven and remove the lid.

Sprinkle a bit of flour or cornmeal on the top of the dough to ensure that dough does not stick.  Gently coax the dough from the bowl and shape into a rough ball.   Place dough ball upside down in the pot/pan and sprinkle a bit more flour or cornmeal on the top of the dough.

Bake for 30 minutes covered and then remove the lid and bake uncovered for 15 to 20 minutes more.  Dough should be golden brown when ready.

Streusel Topped Challah

Sometimes, just a simple topping can be a recipe-changer.  This simple streusel topping transforms my Simply the Best Challah Recipe…ever! into something extraordinary.  It adds a delicious sweetness and texture that is unique and oh, so decadent.

Since this streusel challah uses the same dough recipe, I can produce two different types of challah with the same dough.  I top some of the challah with the streusel topping and leave some of the challah dough as is.

Often, when I prepare a recipe of the streusel topping, I place the left-overs in a plastic zipper bag and freeze it on a freezer door shelf.  I then top next week’s Friday night challah with the leftover streusel.

streusel challah


INGREDIENTS

one recipe of  Simply the Best Challah Recipe…ever!

1/2 cup sugar
1/2 cup all-purpose flour
1/4 cup oil
1/2 teaspoon cinnamon
1/2 teaspoon vanilla sugar (optional)


DIRECTIONS

Combine streusel ingredients using a large fork, wooden spoon, pastry blender or food processor s-blade.  Texture of streusel should resemble coarse crumbs.  If crumbs are not coarse enough, add a few more drops of oil.  If crumbs are too coarse, add a bit more flour.

Prepare  Simply the Best Challah Recipe…ever! dough according to blog post instructions. Braid challah loaves or form pull-apart challah by creating challah roll twists and placing them side by side.

Press streusel topping into crevices between braided logs or challah roll twists.

German Chocolate Cake for Mordy

germman chcolate cake

Last week, my brother, Mordy, celebrated his birthday. Growing up, nobody made much of a deal about birthdays and that has become part of my DNA.  Most of the time, we forget each others birthdays and I have been know to forget my own birthday and anniversary.   Thankfully, my brother, Itzy, often calls, texts or emails us to remember someone’s special day.    Thank you, Itzy!

I do remember elementary school birthday parties from my childhood.  My mother would invite the entire class over on a Sunday afternoon for birthday cake.  My father would take down his huge and heavy polaroid camera from the top of the closet.  He would take exactly one picture of the birthday child.   We would be so excited in anticipation of that polaroid photo to develop and it would seem like an eternity until the photo was ready.  My father would watch the time on his watch carefully, holding us all at bay until the picture was finally revealed.  It was magical.

Many years ago, I discovered that Mordy enjoys two unusual foods: arugula and German chocolate cake.    Both foods are ones that most people either love or hate.  I prepare arugula most weeks and have a few wonderful arugula blog posts (see Crunchy Arugula and Jicama Salad and Arugula Salad Wrapped and Upright)

I have not prepared German chocolate cake in a very long time.

Years ago,  I would prepare German chocolate cake in a  10-11″ tart pan using the basic guidelines of  the recipe on the back of the Baker’s coconut bag.  This week, I bought coconut and discovered that the German chocolate cake icing recipe was no longer on the back of the bag.  I was determined to recreate that recipe.  Thankfully, I found another recipe and made some enhancements to adapt it to a pareve and less sweet menu.  Although I have not prepared German Chocolate cake in over a decade,  it did not disappoint.

Happy birthday, Mordy!


SUPPLIES

10-11″ tart pan


INGREDIENTS

1 chocolate cake or brownie recipe

12 ounces pareve milk or cream
1/4 cup coconut oil
1/4 cup honey or to taste
1 1/2 teaspoons vanilla extract or vanilla powder
2 egg yolks

1/2 cup chopped pecans, optionally toasted
2 cups flaked coconut
1 cup chocolate chips

Large coconut flakes for garnish (optional)

Using cooking spray, heavily grease bottom of each 10-11″ tart pan.  Prepare your favorite chocolate cake or brownie recipe and bake according to directions.  Allow to cool.   Gently coax cake from 10-11″ tart pan.

In a small saucepan over low-medium heat, cook  milk, coconut oil, honey, vanilla and and egg yolks, stirring constantly, for 3-4 minutes.  Reduce heat to low and add pecans, chocolate chips and coconut.  Mixture should be thick, but spreadable.

Remove from heat and add mixture to center of chocolate tart.  Optionally, garnish with flaked coconut.

Machzor Cupcakes

machzor cupcakes 2.jpg

So much of the Rosh Hashana (Jewish New Year) and Yom Kippur (Day of Atonement) holidays are spent in shul (synagogue).  The prayer service follows an order of prayers delineated in the respective machzor (prayer book) for each of these holidays.

In preparation for Rosh Hashana and Staci Segals’ charity bake sale, I prepared some cupcakes that are each decorated with a machzor (prayer book). The proceeds will benefit Yad Sarah, a very worthwhile organization that provides medical equipment to patients in need.

These cupcakes are available for sale among other delicious desserts at the Segal Home this Sunday, September 17th, 2017 from 12 noon-5 PM. The address is 475 FDR Drive #301 on the Lower East Side. For more information, please contact Staci at 917-295-7285 or stacisegal@aol.com

INGREDIENTS

Vanilla Cupcake recipe
sprinkles
White frosting

wafer cookie bites
chocolate frosting

INSTRUCTIONS

Use your favorite vanilla cupcake recipe. I baked mine as confetti cupcakes by mixing sprinkles into the dry ingredients before adding the wet ingredients. Bake cupcakes according to the recipe.

Frost cupcakes with white icing.

For the open machzor decoration, place two wafer cookie bites, side by side and place a line of chocolate frosting down the seam to hold them together. Decorate with the chocolate frosting.

For the closed machzor decoration, roll out fondant or a soft cookie and cut into a rectangle.  Surround a wafer bite with the fondant or cookie bookcover. Decorate with the chocolate frosting.

machzor cupcakes

Wishing you all a Kesiva Ve’Chasima Tova (a positive inscription and seal for the upcoming year).

Upside-Down Apple Nut Beehive

This cake is both creative and delicious.  The upside-down cake is simple to prepare and can be served as is.  For a Rosh Hashana twist, I surrounded the cake with a chocolate honeycomb and some candy bees.

This cake is available for sale among other delicious desserts at the Segal Home this Sunday, September 17th, 2017 from 12 noon until 5 PM.   The proceeds will benefit Yad Sarah, an excellent organization in Israel that provides medical equipment to patients in need.  The bake sale address is 475 FDR Drive #301 on the Lower East Side. For more information, please contact Staci at 917-295-7285 or stacisegal@aol.com

upside-down apple honey-pecan beehive

INGREDIENTS

Cake
1 cup flour
1 1/2 teaspoons baking powder
1/2 teaspoon salt
1/2 cup coconut oil, melted
2/3 cup sugar
2 tablespoons juice or nectar
1 teaspoon vanilla or vanilla sugar
2 eggs

4 small baking apples, diced small
1 1/2 teaspoons cinnamon
2 tablespoons sugar

Honey glaze
1/2 cup  honey
4 tablespoons coconut oil, melted
1/2 teaspoon vanilla or vanilla sugar
1/2 teaspoon cinnamon
pinch of salt
1 1/2 cups  chopped nuts (I used pecans)

DIRECTIONS

Preheat the oven to 350 °F.  Cover a round baking pan with foil and spray with cooking spray.  Cut a parchment paper circle to cover the foil on the bottom of the pan.

Honey glaze

In a small bowl, mix together the honey, coconut oil, vanilla, cinnamon and salt.  Fold in the nuts.

Spread the honey glaze over the bottom of the parchment-lined pan.  Place the pan with the honey glaze in the refrigerator or freezer while preparing the cake batter.  This will make the batter easier to add to the top of the glaze.

upside down honeycomb cake-glaze

Apple Honey Cake

In a medium bowl, combine flour, baking powder, and salt.  Add melted coconut oil, sugar, orange juice, vanilla and eggs and stir until just combined.  The consistency of the batter will be pasty.

In another bowl, toss diced apples with sugar and cinnamon and set aside.

Remove the honey glaze pan from the refrigerator or freezer and pour half of the cake batter (just a thin layer) over the honey sauce.

upside down honeycomb cake-batter

Sprinkle about half of the coated diced apples over the batter. Add the remaining cake batter and don’t worry if the thin layer blends with the apple layer.   Finally, add the remaining apples.  Although the cake looks flat, it will rise during the baking process.

upside down honeycomb cake-batter with apples.jpg

Bake for 45-50 minutes or until just lightly browned.

upside down honeycomb cake-before inverting

Allow the cake to cool for 10 minutes before inverting onto the serving plate lined with waxed or parchment paper.

This cake is easiest to serve after refrigeration.

Honeycomb and bees

For a stunning presentation, I surrounded the cake with a chocolate honeycomb and some edible bees, using the bubble wrap technique that I described last year in ..In the Honey: Rosh Hoshana Honeycomb Cupcakes.

Melt chocolate wafers or chips. I use the defrost feature on the microwave. I spread the chocolate out on a microwave-safe dinner plate and place it on defrost mode for 6-8 minutes.

Cut a piece of clean bubble wrap to match the height and circumference of the cake with just a bit of overlap for the length.

upside down honeycomb cake-with bubble wrap surround

Cut another small square of bubble wrap for the honeycomb shards.  Mark the size of the bubble wrap surround on a piece of parchment or wax paper and another for the small square.  Spread the chocolate out on the parchment or wax paper for the surround and the shards, keeping the chocolate thin but not translucent. Press bubble wrap with bubble side down onto melted chocolate.     Let the honeycomb square harden on a flat surface.

beehive-chocolate-with-bubble-wrap

While still warm and pliable, but firm enough to maintain its shape, place the chocolate side of the bubble wrap against the cake, surrounding the cake with the coated bubble wrap.


Break off portions of the honeycomb at the top of the cake to give it a natural honeycomb look.  Once chocolate has hardened, carefully peel bubble wrap off of the chocolate, revealing the honeycomb surround.

For the bubble wrap square, carefully remove the bubble wrap and break the chocolate into shards that resemble pieces of honeycombs.

Place slivered almonds on either side of each jellybean.

Fill two small ziploc or piping bags with chocolate and white frosting. To do this neatly, place the bag in a tall glass and fold the top of the bag over the edge of the glass like a collar and fill with frosting. Cut corner of bag with a tiny opening to pipe thin stripes on the jellybean bees. Carefully squeeze frosting to corner.

Pipe stripes of white frosting on black jellybeans. Pipe stripes of chocolate frosting on yellow jellybeans.

Use frosting to adhere the bees to the cake and to the honeycombs.

Voila!

upside-down apple honey-pecan beehive
.

Simply Perfect and Healthier Cheesecake

simply perfect cheesecake with fruitWe are counting the days until Shavuos (lit: weeks).

Yes.  Shavuos is the holiday that we literally count the days toward its arrival. We count 49 days (seven weeks) from Pesach (Passover) to Shavuos, blessing the sefira (counting) every evening from the second night of Pesach until Shavuos begins.

From a culinary perspective, many of us count the days until we can enjoy the delicious dairy foods that have become associated with Shavuos. We are commanded to eat dairy foods at our festive meals (Countdown to Shavuos: Floral Inspirations and Dairy Recipes) on Shavuos and cheesecake has become one of the iconic desserts associated with Shavuos.

Shavuos commemorates the receiving of the Torah by the Jewish nation. It also is the time that the wheat is harvested and the bikurim (first fruits) were brought to the Holy Temple in a lavish ceremony (Bekurim: First Fruits from Hollister).  So, this year’s cheesecake is decorated with fruits, so symbolic of the bikurim ceremony.

I have kept the preparation simple and have incorporated greek yogurt and light cream cheese into the recipe to make for a healthier cheescake.   The flavor and texture is still impeccably delicious.

Just like last year’s mini cheesecake recipe, this recipe does not require a springform pan or a water bath for baking.  It is best to bring the ingredients to room temperature just before preparation.   Preparation takes a few minutes and the baking is simple. It can be prepared as one round or rectangular cheesecake or in 12-16 mini ramekins.

simply perfect individual cheescake

SUPPLIES

spatula

food processor

mixer

INGREDIENTS

2 pounds light or regular cream cheese
2/3 cup sugar
8 ounce container of plain Greek yogurt
1 teaspoon vanilla extract
4 large eggs

2 cups cookies or graham crackers, crushed

4 tablespoons butter

cooking spray

DIRECTIONS

It is best to bring the ingredients to room temperature before baking to prevent cracking, although I have made this recipe effectively with ingredients right out of the refrigerator.

Preheat oven to 325°F.

Prepare cake pan or ramekins by generously spraying with cooking spray and/ or lining with parchment paper .

In food processor fitted with an S-blade, crush cookies and add butter, pulsing until mixture is fully incorporated.  You can also place cookies in a zipper bag and crush using a mallet or rolling pin, adding butter to the bag and kneading gently.  Gently press cookie-butter mixture into pan or ramekins.

Beat cream cheese, yogurt, sugar, eggs and vanilla in a food processor or with a mixer, just until smooth and creamy.  You can also use a whisk to incorporate and beat all these ingredients.  You will have to scrape sides of bowl to incorporate everything well until combined, smooth and creamy.

Pour mixture into pans or ramekins, filling 2/3 of the way to the top.  I find it easiest to pour the mixture from a glass measuring cup with a spout..

Bake mini ramekins for 15 minutes, 3-4″ ramekins for about 18-20 minutes and larger pan for 30 minutes.  Turn oven off and leave in oven to another hour.

Remove from the oven and cool completely.  Chill the ramekin cheesecakes for at least 2 hours and the larger cheesecake for at least 4 hours.  Gently remove cheesecake(s) from pan(s).

Garnish with fruit, berries, edible leaves and flowers. Dust with powdered sugar right before serving.


Same-Day Ciabatta is in the Bag

For those weeks when you remember to start the ciabatta the night before, my no-knead ciabatta recipe is perfect.  It requires no kneading, very little effort in preparation and produces a delicious ciabatta bread with a crusty exterior and large air pocket holes on the inside.  The only downside to this recipe is that it requires slow overnight rising of at least 12 hours.

Every once in a while, I intend to start the ciabatta the night before and life just gets in the way.   This past week was one of those weeks.

I woke up Friday morning and still wanted to prepare ciabatta, but just didn’t have enough time for the slow-rise method.

So, I had to adapt another recipe that would be ready in a lot less time.

Oh, and, while I was experimenting, I decided to prepare it in a zipper bag to eliminate most of the mess.

It worked out perfectly.

This original The Crepes of Wrath recipe was sent to me by Kaitlyn last year.  I simplified the preparation and adapted it to my measurement and temperature preferences.  Best of all, I adapted the recipe to be prepared in a zipper bag.

And, yes, without the overnight rise it still produces the enviable crust, so chewy inside with those oh, so wonderful air pockets.

Here it is.

ciabatta in the oven.jpg

(more…)

Simply Perfect Sufganiot in a Zipper Bag

I like to stay close to the latest trends in cooking and design.  One trendy and helpful technique in preparing dough is to use a zipper bag for preparing and kneading the dough.  It is a great idea for most dough and really reduces the cleanup.  Best of all, since the zipper bag can be discarded after use, this simple dough technique virtually eliminates those nasty dough-covered utensils and sponges that are so difficult to clean.

The ziploc bag eliminates the dusty mess of flour and allows all the dough crumbles to remain in the disposable ziploc bags.  Since the sufganiot in this recipe are amorphous and just dropped into oil, the ziploc bag can even be used  to dispense the doughnuts right into the frying pan.

I have adapted my favorite sufganiot recipe to use the ziploc bag.  I have tried it and it is just perfect!

sufganiot-in-a-bag-in-oil

INGREDIENTS
1/2 cup warm water
2 teaspoon sugar
1 teaspoon dry active yeast

1 cup flour

1/3 teaspoon salt
1/2 cup warm water
Olive oil, for frying

Powdered sugar (optional)

large zipper bag (1-2 gallon)


DIRECTIONS

In a ziploc bag, dissolve yeast and sugar in warm water.  To do this easily, I fold top of zipper bag over a small pan so that bottom of zipper bag is at bottom of pan and top of bag is folded over sides of the pan.    This ensures that the liquid contents do not spill over.

sufganiot zipper bag in pan.jpg

Wait until yeast mixture becomes bubbly or foamy.  If the yeast mixture does not bubble and foam, the yeast is not active and you will have to redo this step, making sure that the water used is warm but not too hot to touch.


Carefully add salt and flour to the yeast mixture, kneading the bag until all the flour has been incorporated, for several minutes.   The dough should resemble a thick, sticky cake batter.

sufganiot-in-a-bag-yeast-dough-before-rising-2


Spray your hands with oil spray or rub oil on your hands.  With your oiled hands, carefully rub the oil all over the dough. making sure to coat all sides of the dough.  Rub or spray oil on the entire inside of the zipper bag, too.

Allow dough to rise for 3-4 hours in the bag.  Open zipper and gently let the excess air out of the bag.  Gently push down the dough by pressing on the outside of the bag.

In a pot or sauce pan with a large opening, over medium heat, heat 1-2 inches of olive oil until sizzling.

Cut a corner into the side of the zipper bag to allow dispensing of the dough directly from the zipper bag corner.

sufganiot-in-a-bag-after-risen

Squeeze donuts into the oil by pushing dough into corner of bag and squeezing out small pieces of odd-shaped dough out of the zipper bag.  You may have to coax and pull donuts out of the bag into the oil using oiled hands.

Repeat until you have filled the oil with donuts without crowding, as the sufganiot will puff up during the ferrying process.


sufganiot-in-a-bag-in-oil


Turn them over once the bottom is golden brown.

Using a slotted spoon, carefully remove each doughnut from the oil and place on a plate lined with paper towels.

Sprinkle powdered sugar over the doughnuts and enjoy!

Happy Chanukah!

..In the Honey: Rosh Hoshana Honeycomb Cupcakes


beehive-cupcake

Rosh Hashana (Jewish New Year) is coming and our friend (and Davida’s superMom), Staci Segal, is sponsoring a pre-Rosh Hashana bake sale to benefit benefit Ohr Meir U’Bracha, The Terror Victims Support Center of Israel.

Last year, Davida baked delicious muffins for this bake sale.  This year Davida and Staci’s daughter, Chava, are  studying in Israel, so I offered to bake and send over some cupcakes for this important event.  Although Davida and Chava are the true masters in my kitchen, I felt that I needed to prove that I still had some kitchen prowess.

I decided to bake two sets of cupcakes to represent the important and symbolic tradition of dipping an apple in honey on Rosh Hashana.  The first set of cupcakes were Dip the Apple… Rosh Hashana Cupcakes.


Now, all we needed were the honey cupcakes.  For these, I decided to prepare cupcakes shaped like beehives, with edible chocolate honeycombs and adorable jelly bean bees.

We dip an apple into honey at our festive evening meals on Rosh Hashana to symbolize our hope and prayer for a “sweet” New Year.   Honey is one of the symbols for the Land of Israel as the Torah describes Israel as a land “flowing with milk and honey.”  It symbolizes the connection between G-d, the Jewish nation and the Land of Israel.

The honey referred to in the Torah is date honey.  Today,  date honey is sold in Israel, but most of the honey found is bee honey.  These cupcakes were shaped liked beehives to represent this sweet symbol.


These cupcakes are available for sale among other delicious desserts at the Segal Home this Sunday, September 25th, 2016 from 2-8 PM.  Their address is 475 FDR Drive #301 on the Lower East Side. For more information, please contact Staci at 917-295-7295 or stacisegal@aol.com


SUPPLIES

Cupcakes

Melting wafers (for honeycomb pieces)

Parchment or wax paper

Clean bubble wrap

White frosting

Chocolate frosting

Mini cup cones

Black and yellow jelly beans

Slivered almonds


INSTRUCTIONS

Bake your favorite cupcakes.

Melt chocolate wafers or chips.  I use the defrost feature on the microwave.  I spread the chocolate out on a microwave-safe dinner plate and place it on defrost for 6-8 minutes.

Spread the chocolate out on a piece of parchment or wax paper, keeping the chocolate thin but not translucent.    Press clean bubble wrap with bubble side down onto melted chocolate.

beehive-chocolate-with-bubble-wrap

Keep bubble wrap until chocolate has hardened and carefully peel off.  Break the chocolate into chards that resemble pieces of honeycombs.

beehive-shards


Place a mini cup cone upside down in the center of each cupcake, pressing down until it is set into place.

Fill a ziploc or piping bag with white or yellow frosting.  To do this neatly, place a bag in a tall glass and fold the top of the bag over the edge of the glass like a collar.  Using a spatula, fill the bag.  Cut corner of bag with an opening big enough to pipe thick frosting.  Squeeze frosting to corner carefully.

beehive-cupcakes-in-progress

Pipe frosting on each cupcake, surrounding upside down cone and piping to top of cone.

Place a chocolate honeycomb chard on the side of each cupcake.  Place one or two jellybeans on each cupcake.   Place slivered almonds on either side of each jellybean.

Fill two small ziploc or piping bags with chocolate and white frosting.  To do this neatly, place the bag in a tall glass and fold the top of the bag over the edge of the glass like a collar and fill with frosting.  Cut corner of bag with a tiny opening to pipe thin stripes on the jellybean bees.   Carefully squeeze frosting to corner.

beehive-cupcakes-decorating-ingredients-and-bags

Pipe stripes of white frosting on black jellybeans.  Pipe stripes of chocolate frosting on yellow jellybeans.

beehive-cupcakes-in-carrier


Wishing you all a Kesiva Ve’Chasma Tova (a positive inscription and seal for the upcoming year).

Dip the Apple… Rosh Hashana Cupcakes

Rosh Hashana is coming and our friend (and Davida’s superMom), Staci Segal, is sponsoring a pre-Rosh Hashana bake sale to benefit benefit Ohr Meir U’Bracha, The Terror Victims Support Center of Israel.

Last year, Davida baked glazed carrot muffins for this bake sale.  This year Davida and Staci’s daughter, Chava, are spending the year studying in Israel, so I offered to bake and send over some cupcakes for this important event.  I wanted to make sure that the Segal bake sale would have adequate Respler representation.

I sat down to think about what I could bake that would be unique and delicious.  It needed to be something easy to transport,  interesting and something appropriate for Rosh Hashanah.

The first thing that came to mind was an apple dessert.  The apple is such a strong symbol of Rosh Hashana.

During Rosh Hashana (Jewish New Year), we eat apples dipped in honey as a symbol for a sweet new year.   It is interesting that an apple is chosen as the fruit to dip.

One reason is that in King Solomon’s Shir Hashirim (Song of Songs), the nation of Israel is compared to an apple.  “As the apple is rare and unique among the trees of the forest, so is my beloved (Israel) amongst the maidens (nations) of the world.”  Furthernore, an apple is symbolic of the love between the nation of Israel and G-d as we read in Shir Hashirim , “Beneath the apple tree I aroused you.”

We are taught that an apple tree sprouts the tiny core of each apple before the leaves surround and protect the young fruit.  In the same way, the young Jewish nation accepted the Torah before understanding the myriad of details within.  The famous acceptance of our nation was verbalized as “we will do and we will understand”.  We committed to the holy observance of Torah commandments even before we understood the full extent of what this commitment entailed.  Therefore, the apple has become a symbol and remembrance of the commitment to our faith and acceptance of Torah at Mount Sinai.  We recall this on Rosh Hashana when our mission is to proclaim G-d as our King.

I decided to prepare cupcakes designed to look like red apples.  I baked vanilla cupcakes for this recipe.  Perhaps, next time, I will prepare honey cupcakes to fully represent the Rosh Hashana tradition of “dipping the apple in the honey”.

apple-cupcakes-in-carrier

These cupcakes are available for sale among other delicious desserts at the Segal Home this Sunday, September 25th, 2016 from 2-8 PM.  Their address is 475 FDR Drive #301 on the Lower East Side. For more information, please contact Staci at 917-295-7295 or stacisegal@aol.com

apple-cupcakes

SUPPLIES

Cupcakes

White frosting

Red sanding sugar or sugar and red food coloring

Brown licorice, brown taffy or small pretzel nub

Green taffy or gum


INSTRUCTIONS

Bake your favorite cupcakes.

Cut pieces of brown licorice, taffy or pretzels to resemble stems.

spple-cupcake-embellishments

Flatten green gum or taffy and use knife to cut out leaf shapes.  Use blunt knife to form leaf veins.

apple-cupcakes-leaves

To make red sanding sugar, combine 1 cup of sugar with red food coloring, adding food coloring until the desired depth of color is reached.  I pulsed this in my food processor.  Alternatively, you can combine the sugar and color in a ziploc bag or in your mixer.

apple-cupcakes-sanding-sugar-ingredients

apple-cupcakes-sanding-sugar


Frost cupcakes generously with a small knife or spatula, heaping frosting to form a mounded top for each cupcake.

Using spoon, sprinkle sanding sugar on top of each cupcake until well coated.  Gently shake off excess sanding sugar.

apple-cupcakes-in-sugar

Insert brown stem and green leaf.

apple-cupcake

apple cupcakes in carrier.jpg

Wishing you all a Kesiva Ve’Chasma Tova (a positive inscription and seal for the upcoming year).


Delicious Banana Muffins: Approved by Leah

As a Shabbos gift, one of my friends recently sent over some delicious banana muffins.

banana muffins

They were so banana-ey, moist and delicious, that my daughter, Leah, asked me to get the recipe. Leah rarely eats baked goods, so I knew that these muffins were special. I vividly remember that as a two-year old toddler, Leah took a swipe of the frosting on her birthday cake and then exclaimed, “Now may I have a clementine?”

At Leah’s urging, I asked my friend, Michal, for the recipe and she was more than willing to share it.  It is simple and filled with banana deliciousness.

(more…)

Simple and Chewy Chocolate Chunk Cookies

For Shabbos and Yom Tov, I always like to have some delicious and beautiful baked goods sitting under the dome of my pastry platters on my kitchen counter. Since I am still on the low-carb diet, I must discipline myself to enjoy my tea without the sweets.

Davida is our resident baker.  She has an extensive repertoire of cookie recipes that never fails to impress us.  She baked a delicious batch of fat chocolate chunk cookies tonight that made our mouths water.  Don and I had to enjoy them with our eyes (although I sometimes wonder if Don cheats and enjoys them by mouth when no one is looking).

chewy chocolate chunk cookies (more…)

Simple Mini Cheesecakes with Gorgeous Garnishes

Shavuos is on its way!  Cheesecake is one of the staples of the upcoming holiday of Shavuos, since we are commanded to eat dairy foods at our festive meals (Countdown to Shavuos: Floral Inspirations and Dairy Recipes) on Shavuos.

This year, Don and I are still on a low-carb diet.    We didn’t want to forego cheesecake, but I wanted to make sure to use a minimum of carbs in my cheesecake preparation.  I decided to create portion-size cheesecakes to keep the portion size well-controlled.  This will allow us to enjoy a taste of heaven without feeling deprived, but keeping our diet “cheating” to a minimum.

Best of all, I skipped the carb-heavy crust and created some beautiful and tasty garnishes to embellish these simple and delicious mini cheesecakes.  They are light, delicious, fresh-tasting, gluten-free and simply divine.

This recipe does not require a springform pan or a water bath for baking.  It is best to bring the ingredients to room temperature just before preparation.  Preparation takes a few minutes and the baking takes less than 20 minutes.  It is best made in disposable or porcelain ramekins.  It makes 6 medium size or 12 mini ramekins.


Supplies

3-4 inch ramekins Set of 6 three ounce ramekins or aluminum disposable mini ramekins 39mm


Ingredients

1 pound cream cheese
1/2 cup sugar
Pinch of salt
1 teaspoon vanilla extract
2 large eggs
1/3 cup sour cream
1/3 cup heavy whipping cream

mini cheese cakemini cheese cake with strawberry and chocolate garnishmini cheese cake with chocolate barkmini cheese cake with chocolate bark only

Directions

It is best to bring the ingredients to room temperature before baking to prevent cracking, although I have made this recipe effectively with ingredients right out of the refrigerator.

Preheat oven to 325°F.

Spray ramekins with cooking spray.

Beat  cream cheese with eggs with a whisk, in a food processor or with a mixer, just until smooth and creamy.  Add rest of ingredients, beating and incorporating well.  You may have to scrape sides of bowl to incorporate everything well until combined, smooth and creamy.

Pour mixture into ramekins, filling 2/3 of the way to the top.  I find it easiest to pour the mixture from a glass measuring cup with a spout..

Bake mini ramekins for 15 minutes, 3-4″ ramekins for about 18-20 minutes.  Cheesecake will rise slightly.  Centers should be set, although the cheese cake will appear to be slightly jiggly.

Remove from the oven and  cool completely.  Chill the cheesecakes in the ramekins for at least 2 hours or overnight.

The cheese cakes can be served directly  in the ramekins or can be removed from the ramekins and served upside side.  If removing from the ramekins, carefully turn over on a serving plate.  Allow cheese cake to rest for a few minutes before garnishing.

Garnish with fruit, berries, edible leaves and flowers, chocolate bark (Chards of Colorful Chocolate Bark: Whimsical and Delicious)or whole or crumbled cookies.


Variations

This recipe can be made as a small single cheesecake.  Generously grease a round baking pan.  Prepare ingredients as above and pour ingredients into greased round pan.  Increase baking time to 30 minutes or until center is set.  Garnish as above.


Prepare a crust by crumbling 1 cup of  your favorite cookies with 3 tablespoons of melted butter or coconut oil.  Press into the bottom of each ramekin and bake in a preheated 350 degrees F oven for 10 minutes.  Allow to cool before pouring cheesecake batter over the crust.  Continue to bake as above.  You may have to gently coax cheesecake out of ramekin or pan using a smooth knife to unseat the edges of the crust.

mini cheese cake with crust and edible pansies

Deliciously Simple Onion and Garlic Rolls

These onion and  garlic rolls are simple to prepare and delicious.  When I was first married, I prepared these onion/garlic rolls regularly.  Since the total rising time is less than two hours, I found that I was able to start these after work on Friday and still have them ready for Shabbos.

onion garlic rolls up front

(more…)

Pretzel Challah: Crusty and Salted

pretzel challah rolls

One challah recipe would never suffice in a family with many types of palates and personalities.   This pretzel challah recipe is unique, delicious and oh, so reminiscent of hot pretzels that you may just want to serve it with mustard.

Our youngest daughter, Davida, decided to try a new pretzel challah recipe. We were all skeptical, but it turned out to be delicious. This challah has a crusty, salty outside and a deliciously doughy inside. It is best enjoyed hot within 24 hours of baking. Unlike most challah recipes, it is not suitable for freezing.

She found the basic recipe in the Kosher by Design: Teens and 20-Somethings cookbook We made some minor changes and simplifications.


INGREDIENTS FOR EACH KITCHEN AID BOWL
(I use two bowls for a total of  five pounds of flour)

1 pkg  or 2 tablespoons yeast
2 1/2 cup warm water
1 tablespoon sugar

1 1/2 teaspoons kosher salt
1/4 cup oil
3 tablespoons sugar
2 1/2 pounds (6 cups) of bread or high-gluten flour

8 cups room-temperature water
2/3 cup baking soda
kosher salt or everything mix (see notes)
optional egg wash (a bit of egg mixed with a few drops of warm water)
sesame and  poppy seeds (optional)

INSTRUCTIONS (more…)

Simple and Delicious Challah to Wow your Shabbos Guests

I recently hosted a few boys for a friend’s son’s  Bar Mitzvah.  As a token of appreciation for hosting these teenage boys, my friend sent over some delicious baked goods and the most delicious challah ever. This challah was everything that one can imagine a challah to be.  It was beautiful.  It was moist.  It was just perfect.
zahtz challah
I asked her for the recipe and she gave it to me.  It may just become my new simply the best challah recipe!

(more…)

Kaitlyn’s Berry “Fresh” Muffins

Last week, Kaitlyn sent two-year old Avigail to playgroup with a muffin in her lunch bag. The muffin looked and smelled so delicious that Avigail’s teacher asked Kaitlyn for the recipe.

After school that afternoon, Kaitlyn and Avigail made another batch of muffins, wrapped a couple of them for the teacher along with the recipe.  Avigail arrived to playgroup the next morning and before anything else, she announced to her teacher.  “We made these fresh for you!”

Well, here is Avigail and Kaitlyn’s “fresh” recipe: (more…)