Home Crafts

Kate Spade Black Pink and Gold Armoire

Davida has finally arrived home from camp!

Her birthday was last Sunday.  Originally, the project was supposed to be a surprise for her birthday.  Instead, Davida surprised me by arriving home for her day off as I was in the throes of this messy project (A Bench Fit for Kate Spade (and Davida)). Davida arrived home to find her childhood pink and white furniture on the curb, her juvenile gymnast border half steamed off the walls and everything in the middle of  her bedroom. True to Davida, she took it all in stride.

After all, as the youngest child, Davida has learned the value of patience and resourcefulness.  She was the child who wrote her own yearbook ad when her delinquent parents kept forgetting to submit one for her.  She is the one who cooks, organizes and plans while I take all the credit (right, Davida?)

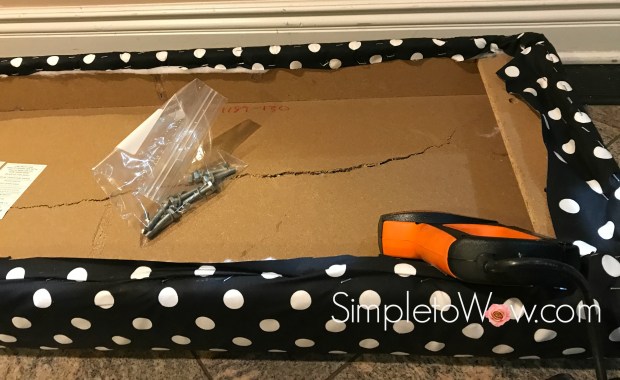
I have spent the past few weeks redecorating her room .  This project was truly a labor of love with much shlepping, (Yiddish for lugging things around) sanding, stapling and painting.

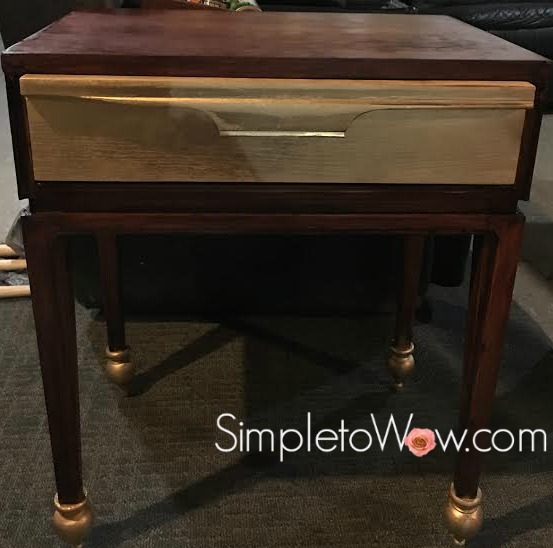
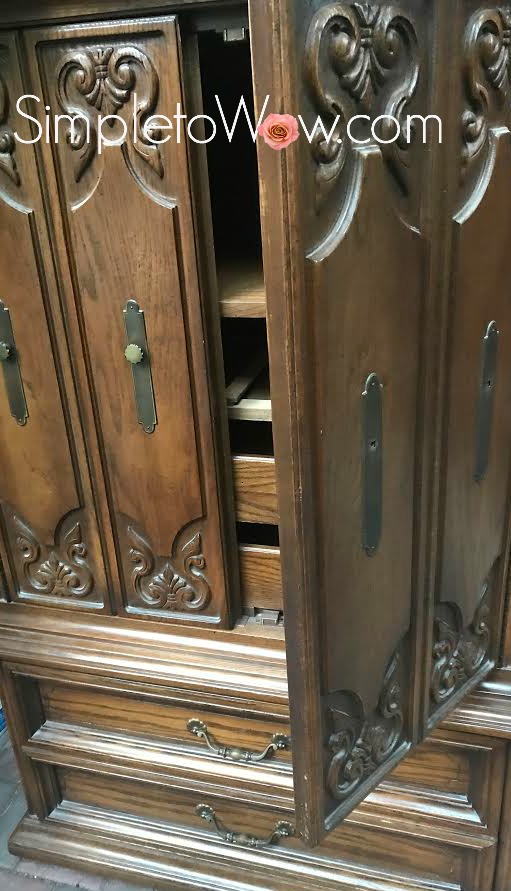
The centerpiece of the project is her new Kate Spade inspired armoire.  In its former life, it was a gorgeous antique walnut armoire owned by a lovely family in nearby Fair Lawn. I found it on CraigsList and fell in love with the vintage dovetailed drawers and lovely carving.  It had such good bones and was perfect for her new room.

kate spade armoire

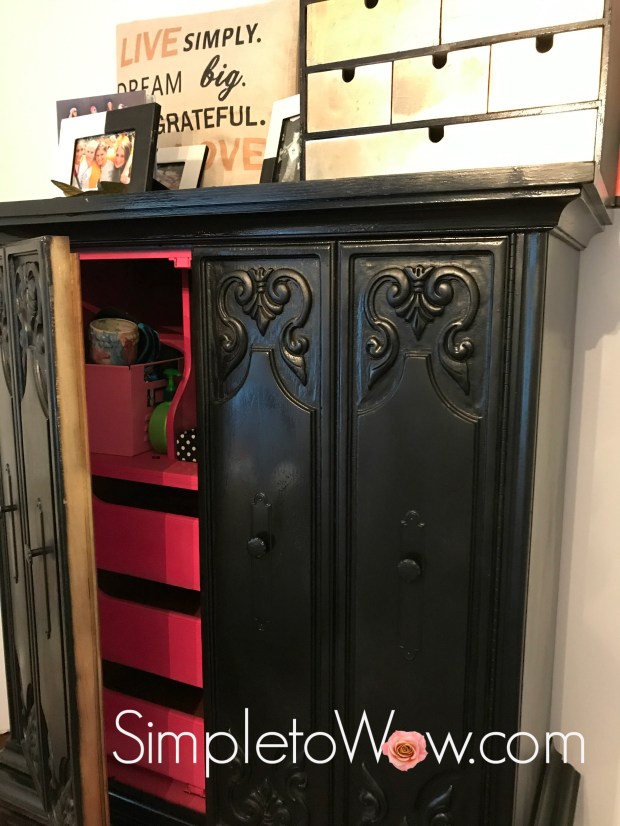
I sprayed the interior a hot pink color.  I then closed the doors and sprayed all the exterior surfaces in a metallic gold paint.  The finished product seemed a bit too gilded for the look that I was trying to achieve.  I left some gold accents around the edges of the doors, but sprayed the exterior black, instead.  That was a more perfect fit for the Kate Spade inspiration.

davidas new kate spade room.jpg

Best, of all, Davida came home and admired it.  She promptly showered and took a nap in her new Kate Spade inspired bedroom.  I’m so glad that even with all the changes, it still feels like home to her.
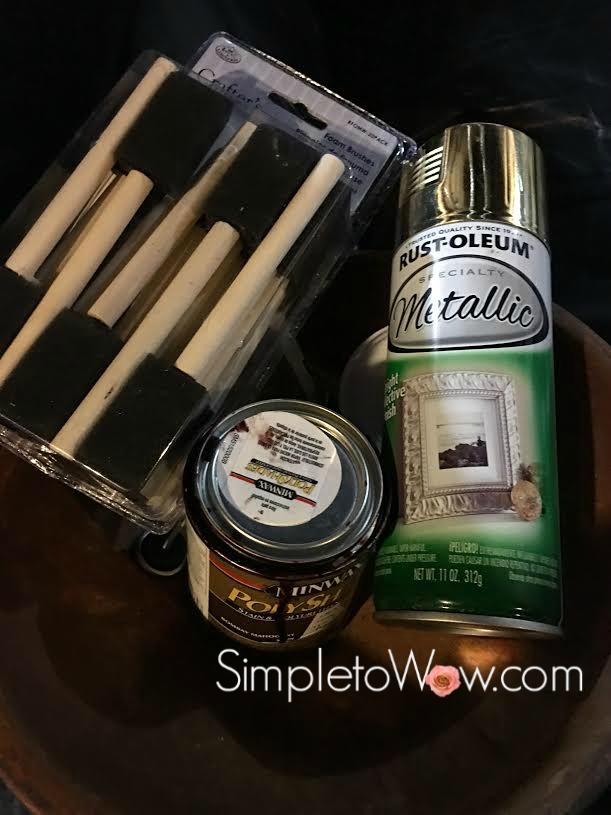
kate spade armoire

SUPPLIES and TOOLS

one solid-wood armoire

screwdriver
knobs and drawer pulls (optional)
hand sander
damp rag

metallic spray paint
hot pink spray paint

INSTRUCTIONS

Using a damp rag, clean the armoire. Make sure to clean all the nooks and crannies and insides and backs of the doors and drawers. Turn the unit over and clean the bottom and all sides.

Using a screwdriver, remove all hardware.   Using a hand sander, sand the nightstand and the wood until all the surfaces are smooth, paying special attention to the corners and edges of the armoire.

Remove the drawer(s) and sand separately. Using a damp rag, wipe the entire unit clean and allow to dry.

kste spade armoire after sanding and cleaning


Using painters tape, tape all metal surfaces, hinges and hardware that could not be removed.    Wrap edges of hardware very carefully so that paint does not bleed onto hardware.

Wrap exterior corners and edges so that interior paint does not affect the exterior.  Spray all interior surfaces with hot pink spray paint and allow to dry completely .  Remove the drawers from the armoire before spraying the interior of the drawers.

Wrap interior exterior corners and edges so that exterior paint does not affect the interior.   Spray all exterior surfaces of the nightstand with metallic spray paint.  Spray the exterior of the drawers separately and allow to dry completely before placing drawers back into the armoire.

kate spade armoire up close.jpg

A Bench Fit for Kate Spade (and Davida)

kate spade bench front view

I have always enjoyed using the summertime as the perfect season to reorganize and redecorate.  After all, when the kids are away at camp, the closets are a bit emptier and there is more time to get things done.

This summer is no exception.  Although the kids are no longer campers in summer camp, there is still more time on my hands. And, with Davida and Aaron away at camp as staff, the house really is quieter and there is less in their closets.

So, this summer, I decided to finally redecorate Davida’s room.  Davida has been dropping hints since she started high school that she would love to have her room upgraded to a more adult-inspired decor.  After all, we decorated her room last in 2001 when she was three years old!  The toddler gymnasts on her wall, the pink gingham valance and the baby pink and blue walls were no longer a match for Davida’s sophisticated personality.

I finally heard Davida’s pleas for upgrading her room.  And, I decided to surprise Davida for her birthday in August.   I removed all her pink and white formica furniture and my nephew, Andrew, and son-in-law, Scotty, helped remove everything to the curb.

And, so the surprise birthday  bedroom upgrade began.

Except, the biggest part of the surprise was mine.

Because, the morning after all of Davida’s pink and white furniture was moved to the curb, Davida decided to surprise me.  She had taken a day off from camp and decided to come home without telling me first.

Michelle arranged to pick her up from the dropoff point and brought her home.

Imagine her surprise when she saw all of her bedroom furniture at the curb!  Imagine my surprise when Davida showed up at the front door and her new furniture was in the throes of being “created”.  The black and pink armoire was on the front porch in the process of being sanded and painted.  Her gymnast wallpaper border had been partially removed and the gingham valance was in the process of being reincarnated as a leatherette window valance.   And, her room was a blessed mess.

Davida couldn’t have been happier.  Messes are an important part of her teenage life. And, this mess was an important part of rebuilding.

Davida loved it all.  The curbed furniture.  The glossy black and pink armoire.  The leatherette valance.  The half-steamed wallpaper border.

And, most of all, Davida was excited for the Kate Spade-inspired bench.  After all, it was the only thing that was completed.  It was cool.  And,  it served as a harbinger of a new age in Davida’s room.


The bench had been a torn nailhead vinyl covered bench with x-shaped legs that I had picked up from a local curb several years ago.  I had been using it as a luggage rack in the guest bedroom.  And, it was the perfect start for Davida’s Kate Spade inspired room.


SUPPLIES

hand sander

polka dot fabric

heavy duty staple gun

staples

batting

spray paint

spray paint handle


DIRECTIONS

Remove cushion from base of bench and set aside hardware.

Using hand sander, sand wooden bench legs and then spray paint the legs.

kate spade bench x legs sprayed hot pink.jpg

Remove old fabric from cushion and discard. Cover with several  layers of batting, taking care to keep batting flat with no wrinkles.  Bring an inch of batting to the back of cushion and turn cushion over.   Using heavy duty staple gun, staple batting in place to back of cushion.

kate spade bench stapling

Place fabric over batting, pulling fabric taut.  Turn cushion over and staple to back, pulling fabric taut before each staple.  so that the fabric is pulled tightly from front to back.  Using heavy duty staple gun, staple in place.  Cut corners and staple neatly in place.

kate spade bench -fabric stapling

kate spade bench


Reattach cushion to base.

kate spade bech side view


TIPS

spray paint handle is a very small investment and takes the stress and finger aches off of a large spray paint job.


Please Note:  This post contains affiliate links from Amazon, which means I earn a small commission if you click and make a purchase.


A Nightstand Workbench for Ju-Ju

I walk most mornings again with my friend, Linda.  The hour walk goes by quickly as we share ideas, inspirations and tidbits of each other’s lives.   Linda offers me lots of recipe and shopping tips and shortcuts and I cherish her sage advice.  I find the walks healthy for my body and inspiring for my mind.

My kids think that the daily walks have nothing to do with exercise or friendship.

They often tell me that the early morning walks are really about scouring the neighborhood for cast-off furniture and other treasures to be recycled and upcycled.

They may just be right.

I had been thinking of designing a workbench for two-year old Ju-Ju.   Two weeks ago, I came across the perfect solid wood nightstand on the curb while walking with Linda.  The white nightstand was covered in dust and cobwebs, but was solidly constructed.  The one drawer featured intact hardware and dovetail construction.  It was perfect for my project.

I was delighted!  After the walk, I drove back to where I had seen the nightstand and loaded into my car.  I placed it right next to my front door and I just couldn’t wait to begin my newest project.

JuJu's nightstand workbench-before pic 2

Leah arrived home that evening and wasn’t too happy to see another dusty, worn castoff adorning our front porch.  She reminded me once again that my morning walks are really all about the hunt to find garbage.

I couldn’t have agreed more.

I cleaned the piece with a damp rag and turned it upside down.  I cleaned all the nooks and corners of the nightstand until it was perfectly clean.  I looked around until I found a square-ish piece of plywood that was the same width as the nightstand to use as a backsplash for the nightstand.

Using my inexpensive hand sander, I sanded the nightstand and the plywood down until all the surfaces were smooth, then sprayed the surfaces with blue spray paint.  I removed the drawer and sprayed that with silver metallic spray paint.

juju's nightstand workbench metallic drawer 2

I then ordered a square 16″ plastic pegboard and assorted pegboard accessories.   Don screwed the finished backsplash into the nightstand workbench and installed the pegboard.  I added a few good hooks on the sides to hang additional workbench accessories.

juju's nightstand workbench

I checked the toy boxes and scoured the dollar store for some play tools, safe real tools and tool boxes.  I ordered some kid-friendly power-tools and even personalized a hardhat for Ju-Ju.

Ju-Ju and Avigail loved the workbench and Leah even quizzed me on what I was thinking for the next upcycled project would be.

I just smiled mysteriously.  Let the morning walks continue…

juju's nightstand workbench metallic drawer top view


SUPPLIES and TOOLS

one solid-wood nightstand

1 square-ish piece of plywood the same width as the nightstand

hand sander

blue spray paint

silver metallic spray paint.

square 16″ plastic pegboard

assorted pegboard accessories

1 1/4″ round screws with nuts

small adhesive hooks


INSTRUCTIONS

Using a damp rag, clean the nightstand.  Make sure to clean all the nooks and crannies and insides and backs of the doors and drawers.  Turn the unit over and clean the bottom and all sides.

Find or purchase a square-ish piece of wood that is the same width as the nightstand for a backsplash.

Using a hand sander, sand the nightstand and the wood down until all the surfaces are smooth, paying special attention to the corners and edges of the nightstand and backsplash.

Remove the drawer(s) and sand separately.  Using a damp rag, wipe the entire unit clean and allow to dry.

Spray all surfaces of the nightstand and backsplash with blue spray paint.   Spray the drawer with silver metallic spray paint.

Screw the backspash into the back of the nightstand and then screw the  square 16″ plastic pegboard into the backsplash.  For the pegboard, we used 1 1/4″ round screws with nuts screwed from the back to the front.

Adhere small adhesive hooks to the sides of he nightstand workbench to hang additional hardware accessories like measuring tape, goggles and helmet.

Place assorted pegboard accessories into the pegboard and hang toy tools and safe real tools.  Fill small toolboxes with additional toy hardware and store in the workbench.

Get to work!


Upcycled Chalkboard Chargers: Simple Placecard Alternative

chalkboard-charger-don-sample

I love the way chargers dress up a table.

It adds that extra flair to the table setting and makes the table look dressed even after the meal has begun.  It is one of the wonderful tools I implement in keeping my Pesach (Passover) seder table elegant and neat (see Seder Table Ideas and Inspirations).

Decades ago, I bought a set of gold chargers to use for Shabbos and special occasions. Then, gold was the only option and it matched the gold leaf border on my china.  The chargers were painted plastic and very heavy.

The top dozen of these chargers have been used over and over again and through constant use and cleaning, the gold has rubbed off and they have gotten just a bit grimy.   They have really been put to good use, but could really use a facelift.

Besides, nowadays chargers are much more common, much lighter and can be purchased at many discount stores.

I plan to purchase a new set of gold chargers and wanted a way to upcycle my faded and well-used chargers.

Enter….chalkboard spray paint.  It is one of those supplies that can be used in so many creative ways.  Among so many other projects, I used it to accent the  DIY Nightstand Play Kitchen for JuJu and it is so simple to apply.

While I was collecting the well-used chargers, I came across an oddball silver one that had been a gift, but had never matched the gold set.  I added it to my collection of soon-to-be-repurposed charges.

I washed the chargers with soapy water, dried them well and sprayed them with chalkboard paint.

blackboard-chargers

chalkboard-chargers-just-painted

I now have a new look that can even be easily personalized with chalk…voila!

A Homemade Warm Compress

I woke up earlier this week with a stiff neck that just seems to get achier.  Today, the pain radiated to my shoulder and down my arm. It seems like I may have pinched a nerve.

The pain and stiffness really needs some warm relief.  My husband, Don, suggested that I design a microwavable compress to ease the pain.

I did some internet research and found that it is quite simple to fashion a compress filled with uncooked rice, beans, oatmeal, barley or flaxseed.   The filler is placed into a cotton (non-synthetic) sack and tied, velcroed or sewn closed.

I looked around the house and found that I had plenty of raw beans, a brand new oven mitt and a variety of cotton socks.

With just a few moments of prep time, I was sitting at my desk writing this blog post with a warm compress soothing my neck and shoulder.


SUPPLIES

Cotton sock or oven mitt

Beans, uncooked rice or barley

Naturally dried herbs, essential oils, contents of an aromatic tea bags or spices for fragrance (optional)


DIRECTIONS

Fill a sock or oven mitt at least halfway with beans, rice or barley.  I found that it was easiest to use a stack of coffee filters to move the beans into my compress.

homemade-hot-compress-beans-in-coffee-filters

For a pleasant aroma, you can add a bit of dried herbs, fragrant powder or oils to your compress.

Seal the compress by tying a knot, placing a resealable velcro strip or sewing the ends shut.  For a firm compress, seal it with very little empty space.  For a looser compress, leave empty space before closing your compress.  A looser compress will allow for draping it around your neck and moving the beans to conform to your painful area.

Heat compress in microwave for about one minute, keeping an eye on the microwave during heating just in case the filler or compress starts to smoke.

Before applying compress, check that it is not too hot.  If it feels too hot, shake it and wait until it is just the right temperature for your aches and pains.


NOTES

Be careful!  Check that the compress is not too hot before applying it.  It is hard to tell how hot the microwaved compress will get, so please check before applying to your skin.

For extra safety against burns, place a layer of cloth (like a towel or t-shirt) between your skin and the compress.

Do not use heat therapy for acute injuries or if you are pregnant or have diabetes, poor circulation, high blood pressure or heart disease.   If you are not sure, consult with a doctor before using a warm compress to ease muscle or joint pain.

Burlap and Roses: Simple Yet Wow!

Burlap was never one of my favorite textures.  A few years ago, it seemed that everyone was decorating with burlap.  There were burlap tablecloths and table runners, burlap lampshades, burlap accents and flowers.  I was just burlapped out.

Although I love the idea of upcycling and using everyday objects in extraordinary ways, burlap just never made it to my list of favorites.

Until now.

This season, burlap has reappeared.  This time, I have seen it used sparingly and well-paired with other textures.  So, I thought, I would give it a try.

I purchased some burlap mesh on clearance and considered some ways to use it.

Here is the first.  I love the pairing of rough and tough, unsophisticated burlap and elegant, delicate roses.  I love the interplay between the textures of the different flowers, the recycled glass vase and the coarse burlap.  And, burlap kind of fits my decorating style. It works well with the earth tones in my home and matches the ecclectic nature of my decorating taste.  Yes, I have actually decided to embrace burlap.

burlap-arrangement-supplies

SUPPLIES

large square glass vase
three bunches of flowers in coordinating colors and differing textures
burlap mesh
wire,  pipe cleaner or floral tape
straight stick, skewer or chopstick
water


TOOLS

pruning shears or strong scissors Fiskars pruning shears

DIRECTIONS

Trim each of the bunches of flowers to a different height, leaving the fullest flowers to be the shortest and the sparsest flowers to be the tallest.  To keep flowers fresh, strip away all leaves that would be submerged in the water.

Arrange each bunch of flowers in the vase, setting each into a different corner of the square vase.

burlap arrangement-flowers only.jpg

Fill with water.

Cut a 6-8″ piece of the burlap mesh and roll.  Gather the center of the roll and tightly secure with wire, floral tape or pipe cleaner.  Secure to stick and place in the center of the arrangement.


Voila!


A Nightstand Castoff: Simply Upgraded and Gilded


gilded-nightstand
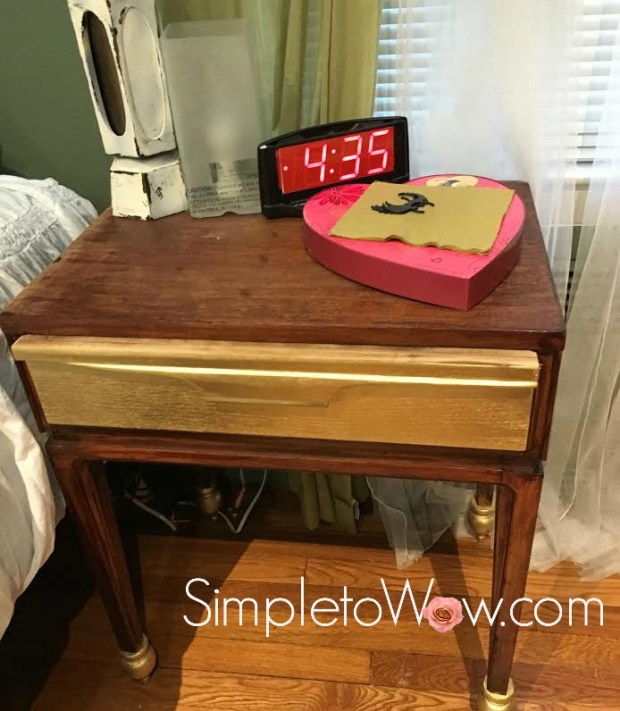
Kaitlyn has been wanting to find a new nightstand for quite a while.  Everything that she has found has just been too short and too ordinary for her height and taste.  She has been looking for something that has a retro feel with some originality in color and design.

A while back, she brought me an old maple nightstand that she had found on someone’s curb.  It had good bones in that it was in pretty good shape and had lovely wood details. The drawer had some damage, but had a built-in metal drawer pull.  The piece was a bit rickety and was a few inches too short to match the height of the beds in the bedroom.

This is basically what the nightstand looked like without the drawer:

nightstand sanded

I had purchased a hand sander last summer when I refinished two armoires for Michelle and Leah’s bedrooms.   It cost about $20 and is one of those indispensable tools for furniture refinishing. For this project, I also purchased foam brushes, metallic gold paint and I used a small can of mahogany stain that I had left from refinishing my sewing machine cabinet a few summers ago.

nightstand redo-materials

I spent about twenty minutes sanding all the surfaces with a hand sander.  I then wiped the sanded surfaces with a damp towel and let the surface dry.

With  1″ and 3″ foam brushes, I carefully applied Minwax mahogany stain to all the surfaces of the nightstand.  I used a small paintbrush to thin the paint out in the thin decorative recesses of the nightstand.  I applied about 3 coats of stain.

I covered the metallic drawer pull with painters tape and spray painted the drawer with metallic gold paint .

nightstand redo- drawer

I found some unfinished screw-in finials at Lowes to add height and interest to the bottom of the square legs of the nightstand:

nightstand redo-finials

I spray painted the tops and bottoms of the finials with metallic gold paint , being careful to keep the screws from getting painted.

Aaron drilled a hole in the bottom of each leg and then screwed the painted finials into them.

Voila!

nightstand redo-finished

Please Note: This post contains affiliate links from Amazon, which means I earn a small commission if you click and make a purchase.

Bobby’s Homemade Bubbles and Wands

Avigail and Juju are attending “Bobby Camp” and one of the favorite morning activities is playing with the water table on my front porch.  After breakfast and our morning walk, when the two of them are still in pajamas, we fill up the water table and have a good and messy time playing with all the water toys.  Best of all, when we are finished, everyone gets bathed and then changed and dressed for the day.

While we were outside playing, the kids asked Davida to blow bubbles or as seventeen month old Juju likes to say, “Bubboos”.  I did not have any bubbles or bubble wands, so we decided to make our own.  Davida fashioned some bubble wands out of pipe cleaners, straws and string.  Avigail was delighted that one of them was purple, her favorite color. We mixed water, dish detergent and pancake syrup, stirred gently…and voila.  The magic of bubbles was added to our messy water activities.

This was one of those simple things that created a wow of a time at the water table.

homemade bubbles for avigail and juju

We sang as we blew and popped bubbles…”Avigail is a bubble blower, bubble blower, bubble blower!”  “JuJu is a bubble popper, bubble popper, bubble popper…”

bubble supplies

SUPPLIES

container with a flat bottom

3 cup water

1/2 cup dish soap

drizzle of pancake or corn syrup (about 2-3 tablespoons)

scissors

straws

string

Pipe cleaners

bubbles with wands

DIRECTIONS

Place water in a bowl or container.  Carefully add soap and syrup, stirring gently, being careful not to foam up the bubble mixture.

Create bubble wands using pipe cleaners that are looped.  You can create different size loops to form differ size bubbles.

bubbles and bubble wands

Create large bubble wands by cutting straws in half and tying string around each of the straws, top and bottom.  To secure the string, cut a small slit near the end of each straw for the knotted string to rest.  This will keep the string from coming off the end of the straw.

bubble wand from straws and string.jpg


A Gallery Wall of Playgroup Art

Kaitlyn created a gallery wall for Avigail’s art.  Two-year old Avigail is a budding artist with so many art projects and pictures to display.   The gallery wall allows Kaitlyn a way to rotate all the different playgroup art that Avigail brings home from playgroup.

Kaitlyn used empty old frames and sprayed them all the same color blue to create a cohesive collection.  To each frame, she attached a thick string with a clothespin or two so that she can easily add and remove art as needed.

This gallery wall transformed the study area in their apartment and is the perfect spot for Avigail to display her art.

Here it is:

blue gallery wall for avigail's art

SUPPLIES

old frames

spray paint

Thick string or twine

small wooden clothespins

Assorted Command Strips for Picture Hanging

DIRECTIONS

Spray paint frames in well-ventilated area.  Allow to dry. Attach a length of twine using staple gun to backs of wood frames.

Use Command strips to attach frames to gallery wall, following directions on package. Attach clothespins to string.  Hang pictures using clothespins.

Voila!


Upcycled Glass Jar Floral Arrangement: Simply Stunning

My friend Marilyn, and her family joined us for a meal over Pesach (Passover). Since we were in a small apartment in Jerusalem with our extended family, we did not have enough room to host everyone in the dining room. Instead, we set up tables and ate in the courtyard. Marilyn sent flowers before Yom Tov (holiday) in the perfect arrangement. It was a gorgeous grouping of narrow clear bottles lined up side by side in a metal caddy spilling over with white garden roses. The arrangement was narrow and long, just perfect for our narrow outdoor tables.

It created a stunning visual impact without taking away from the table space needed for setting and serving. The white roses lasted for several days, but the centerpiece containers were so easy to fill that I refilled them for the last few days of our stay in Jerusalem with an array of other flowers. Both arrangements were simply stunning.

Over Pesach, I commented so many times about the beauty and the practicality of this centerpiece. I was determined to recreate it with upcycled materials for use back in the States. And….here it is!

upcycled square arrangement-top view (more…)