Desserts

Sara’s Zara Shower and Edible Handbags

sara shoes and handbags

Today is a wonderful day in the Respler family.  My niece, Sara, is getting married later this afternoon to Lawrence Rosenblum.  It is a wonderful opportunity for the family to celebrate, especially because Sara is surrounded by so many female cousins.  We love to party and this celebration will be one to remember.

Over the past few years, I have been trying to accumulate less “stuff” and instead, build more memories.  So, instead of getting another gift for Sara, Leah and I decided to go all out and host a memorable shower for Sara.

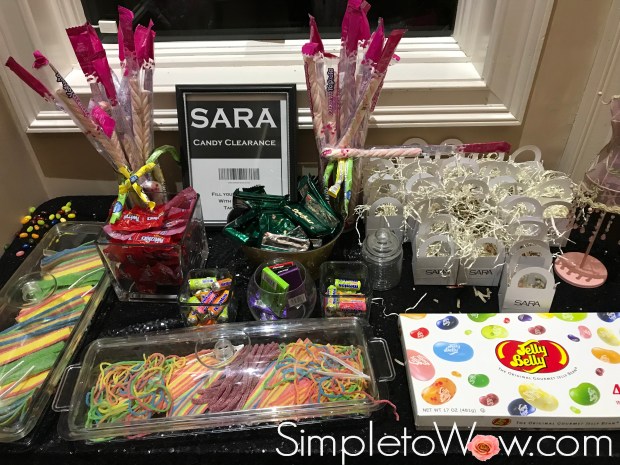
There was delicious food and drink, great camaraderie and even some dancing.  The shower began with a wonderful theme.  You see, Sara is the ghostwriter of ModestZara, an account dedicated to posting tznius (modest) finds at Zara.  Sara wears Zara, breathes Zara and embodies Zara’s classic and timeless style.

Leah scoured the house to find anything that could be used for the theme.  We found mannequins of all sizes, a shoe music box, rolls of kraft paper and lots of assorted bags and boxes.  I picked up some miniature tote bags and black and kraft paper goods at the local dollar stores.

I printed some Zara-inspired signs using bar codes and a Zara-inspired font.

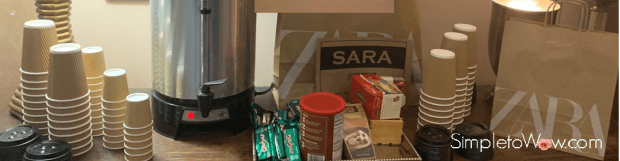
I thought up a clearance candy station and one of Sara’s friends organized a hot cocoa station replete with marshmallows, whipped cream and all types of cocoa and milk.  I created a menu and a to-go station near the front door.  I lined my granite countertops with kraft paper and brought up my dairy chafers.

sara candy clearancesara hot cocoa station.JPG

sara-menu-w-barcodes.jpg

sara buffet chafers

sara waters togo station

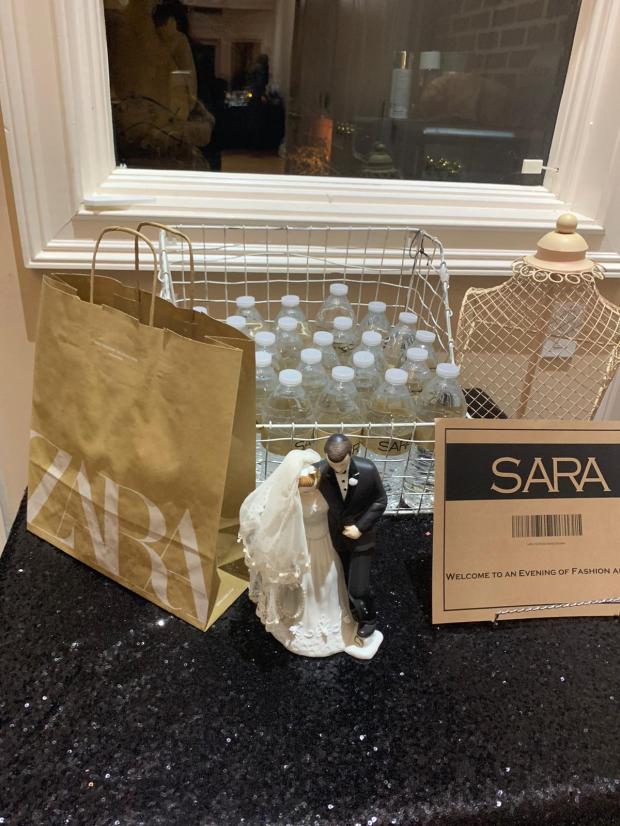
Leah kept insisting that we get dozens of Zara bags from our local Zara store so that the guests would understand the theme.  I thought that with everything we had designed, the Zara-reference was more than apparent.

But, Leah insisted.  She said that it would be great to put these bags on the buffets and the dining room table.  It would be great to put unwrapped gifts into these bags and that it was extremely important.

I did what any mother would do.  I called Zara and pleaded my case for the free bags.

I explained the Modest Zara connection.  I explained how Sara represents Zara’s classic style.  I emphasized that Sara captures a modest Zara population on social media.  I waited on hold.  I spoke to the manager.

And, I was told Zara does not give out any bags without a purchase.

So, I told Leah that I had valiantly tried to get free Zara bags, but that I had failed.

And, Leah did what any self-respecting daughter would do.   She took matters into her own hands.

I don’t exactly know how it happened.  But, later that week, Leah came home with a big smile and dozens of Zara shopping bags in all shapes and sizes.

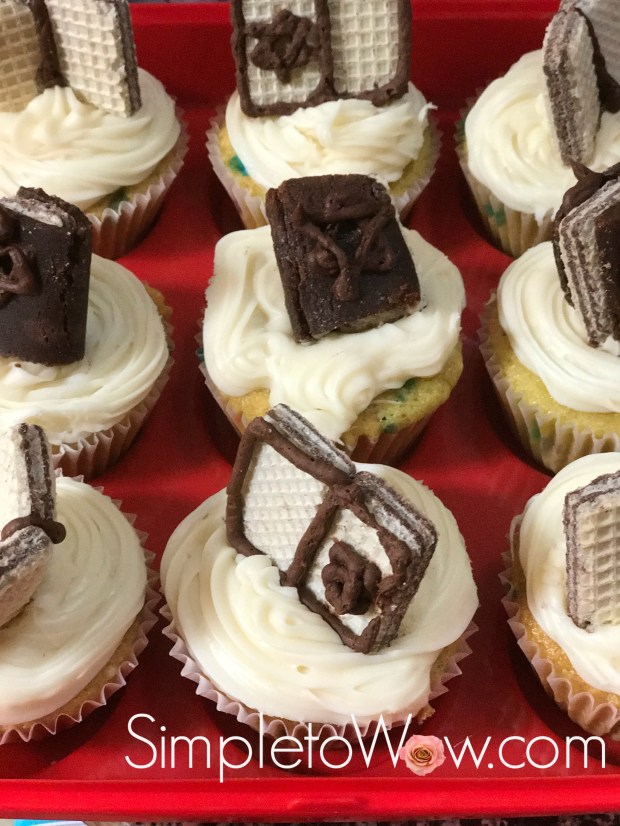
And, I set to work cooking and assembling.  Davida made her awesome cupcakes.  She tinted the frosting a kraft-brown color and frosted those cupcakes.  She then piped a thin S onto a chocolate fudge cookie to embellish the cupcakes.

sara cupcakes

I created my shoe and pocketbook station using a shoe-themed music box and handbags fashioned from cookies, frosting, and sour sticks.  For each pocketbook, I took two half-moon Tirosh cookies and put them together using frosting.  I placed a sour stick handle between the cookies.  I embellished the fronts of these pocketbooks with assorted sprinkles and edible gems.

sara shoes and handbags

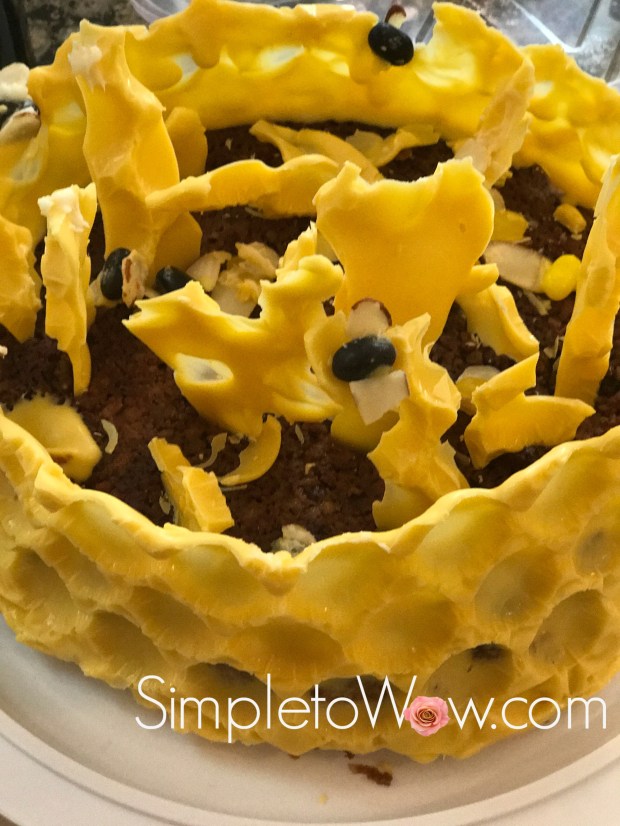
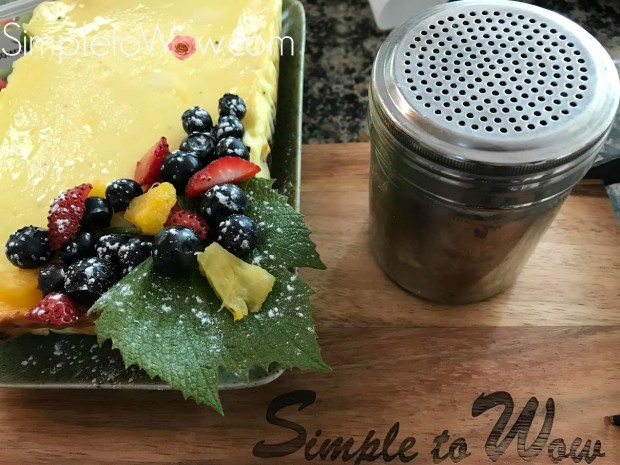
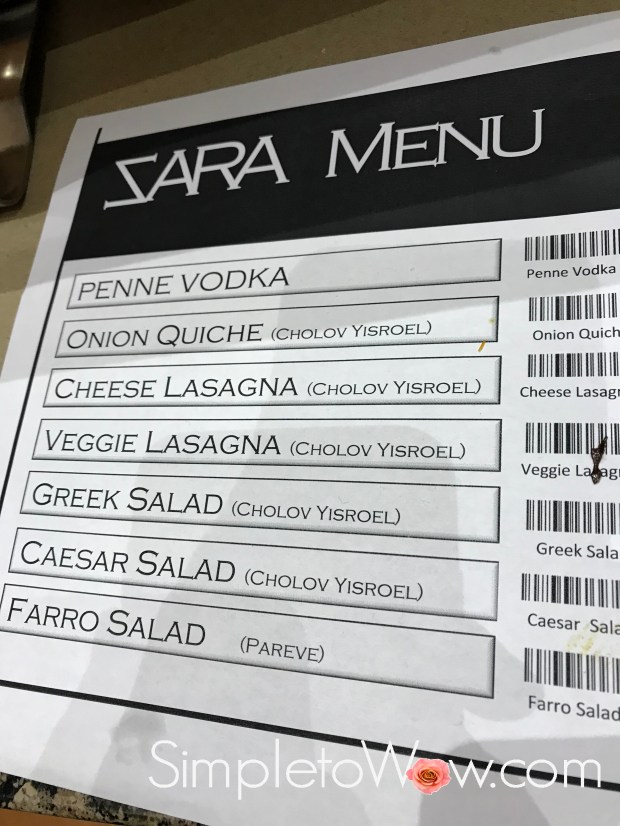
My niece, Orit, made a delicious Caesar Salad and one of Sara’s friends made an incredible Greek Salad.  I prepared orange soup.  One of Sara’s friends made Penne Vodka. I prepared lasagna and quiche. and Leah prepared cabbage salad and a fast-moving smartphone game.   My niece, Michal, and her daughters prepared warm brownies. 

We ate and we drank.  We laughed and we danced.  And, no one overlooked the Zara theme because we had plenty of Zara bags for decor.

Aufruf Rice Krispies Treat Cake

rice krispie cake with flowers

This past Erev Shabbos was a busy one.  My father’s chemo day has been moved to Thursday, so more of the Shabbos preparation has been piling up on Friday.  Aaron and Hindy were arriving for Shabbos.  Guests were coming for Seuda Shlishis (third meal) Shabbos afternoon.  I needed to run to Monsey for a nursing home visit.  Candle lighting was at 4:12 PM.   And, there was so much to get done.  Thankfully, we had an aufruf to look forward to attending Shabbos morning.

I woke up before 5 AM on a mission.   All the ingredients were on hand, but not much of the cooking had been started.  I had been too exhausted on Thursday to start my Shabbos cooking, but thank G-d, I had plenty of energy early Friday morning to accomplish all that I had to do.

I decided to start with the funnest part of the Shabbos preparation.  I used my large soup pot to make the Rice Krispies Treats batter for the Aufruf Cake and decorated the top with simple Marshmallow Tulips.  After turning the cake onto a doily, I placed it on one of my Upcycled Chalkboard Chargers and wrote a mazel tov wish in metallic marker right on the charger.

Now, off to the Shabbos cooking marathon:  chicken soupcholentBroccoli Kugelfarrogrilled chickenmeatballs, stuffed turkey breast, cranberry relish, Tomato Medley with Arugula Pestobaked apples and more!


Marshmallow Tulips

marshmallow flowers in arrangement.jpg

On Shabbos Bereishis (Genesis), we were still in Israel after spending Sukkos and Simchas Torah there.  Our favorite shul (synagogue) is located in the Jerusalem Municipality complex and is attended by a mix of neighborhood residents and guests.  It is such an awesome cross-section of the various types of Jews living and visiting nearby.  It is a potpourri of Chassidim, Yeshivish families and Modern Orthodox Jews and every type of Jew philosophically in-between.  Our shul hosts people from all parts of the world, all walks of life and all ages.  Best of all, there is a warm connection between all those who pray within.  It is a tiny oasis of tefilla (prayer) and friendship in the holy city of Jerusalem.

On that particular Shabbos, there was a Bar Mitzvah being hosted in the shul.  As the Bar Mitzvah boy was called to the Torah, his nine siblings stood at attention for his aliyah (calling to the Torah).  In the woman’s balcony rising above the bimah (Torah table) were his proud mother and six identically dressed sisters, ranging in age from two to twelve years old.  The older sisters brought candies which they showered down upon their brother.  Carefully displayed in plastic bags were candy flowers that were hand-designed and distributed to the young girls in the women’s balcony section.   They were simple colorful marshmallows, each skewered with a sour belt sepal.

The flowers were colorful and gorgeous.  They piqued my interest because they were so simple and yet so beautiful.   Their beauty belies the unity of the ingredients and the simplicity of their design. And, yet, these flowers transport me instantly to that special place in Jerusalem that, for me,  represents its own blend of unity and beauty.

marshmallow flower

INGREDIENTS AND SUPPLIES

colorful marshmallows

green sour belts

short wooden skewers


DIRECTIONS

On each skewer, fold each end of the sour belt toward the center, securing both ends on the pointy end of the skewer. leaving close to an inch at the top for the marshmallow.

Place a marshmallow at the tip of the pointed end of the skewer, gently pushing downward until secure.


Please Note: This post contains affiliate links from Amazon, which means I earn a small commission if you click and make a purchase.

Basic Rice Krispies Treats

INGREDIENTS
1 large jar of marshmallow fluff
2 tablespoons butter or margarine
1 box of  Rice Krispies cereal


DIRECTIONS

Over low heat in a large pot, melt butter or margarine.   Add marshmallow fluff and stir until completely melted.  Remove from heat.  Add Rice Krispies, 2 cups at a time.   Using a firm spatula, stir until well combined.


ALTERNATIVE MICROWAVE METHOD

Melt marshmallow fluff in microwave for 30 seconds.

If marshmallow fluff is melted enough to mix,  pour 1-2 cups of Rice Krispies into an extra-large bowl, add a large dollup of marshmallow fluff  and mix with a firm spatula until combined.  Return unused marshmallow fluff to microwave and melt for 20 second increments, adding a dollup at a time with more Rice Krispies until all the marshmallow fluff and Rice Krispies have been used and the mixture is evenly combined.


Please Note: This post contains affiliate links from Amazon, which means I earn a small commission if you click and make a purchase.

A No-Bake Wedding Cake


rice_krispies_cake

Mazel tov!

On Motzei Shabbos (Saturday night), we offered a L’Chaim to the newest couple in our Respler family.  Lawrence proposed to Sara on a rooftop in Manhattan.  The family gathered in Queens as the engagement became official.  The atmosphere was electric as we awaited the arrival of this new couple at Sara’s family home in Queens just a few hours after havdola (ceremony terminating Shabbos).

As Shabbos concluded in New Jersey,  we prepared to travel to Queens.  I didn’t want to arrive at the L’Chaim empty handed.  I thought long and hard about what I could bring that was festive, whimsical, simple to prepare and could safely anchor the love birds from Yitzchok Aaron and Hindy’s Floral Arrangement.

Davida had been home for Shabbos with two of her terrific friends, Alyssa and Elana.  All three had helped all Shabbos long with our Shabbos meals’ setup and cleanup and were on board for the task of preparing this cake.  I had showed them the package of  new chosson-kallah (bride and groom) embellishments that had just returned with me from my latest trip to Jerusalem.  I loved that the chosson was wearing a glittery kippa on his head and the kallah was wearing a wedding dress with sleeves.   I joked that since there were a dozen embellishments in the package, if each one of these young women were one of the next twelve friends and family to find their bashert (chosen spouse) soon, I would save an embellishment for each of them.

The task was simpler than expected.  I repurposed a rose-shaped silicone mold.  Davida prepared a batch of Rice Krispies Treats and I packed the batter firmly into the pan.  After a short few minutes, I inverted the mold onto some wax paper.  I pressed the love birds and the Chosson-Kallah skewers into the cake and the SimpletoWow wedding cake was ready to go.

Mazel tov!


Please Note: This post contains affiliate links from Amazon, which means I earn a small commission if you click and make a purchase.


Pink Baby Carriage Cookies: Simple to Wow

For Charley’s kiddush, Davida prepared these adorable carriage cookies.

They really were Simple to Wow!

baby girl carriages

INGREDIENTS

Hadar-Tirosh chocolate half-moon biscuits
Paskesz mini Oreo cookies
frosting
Pink piping or frosting

DIRECTIONS

Using a small spatula coated with frosting, adhere two half-moon cookies together at right angles to create base of carriage.  Since these cookies are double-sided,  use the vanilla side for the base of the carriage and the chocolate-side for the carriage hood.

With a dab of frosting, adhere two wheels to front of cookie carriage.  Pipe lines on hood of carriage for additional decoration.

baby girl carriages

Marshmallow Ballerinas for Kiddush

ballerina marshmallows

So many of you have remarked that they missed the blog posts over the summer.  I did too!

The summer was a hectic one and brought with it some exciting new house-mates and a brand new granddaughter.  Michelle and Scotty moved into our home in July, in preparation for the birth of their first child and their move to Atlanta.  Charlotte Jennifer בתי-ה  (Charlie) was born on August 6th and joined our family home, too, until after Yom Kippur.

charley barley

Charlie is named for Scotty’s maternal grandmother, Beverly בתי-ה (Batya) Deutsch of Los Angeles.  We have been regaled with the stories of Mrs. Deutsch’s delicious and generous cooking and her deliveries of massive amounts of sumptuous food to members of her community.  Although we never had the opportunity to meet Charlie’s namesake,  we feel like we have met Mrs. Deutsch through Scotty’s Mom,  June, as she embodies so many of her own mother’s virtues.

We hope and pray that our Charlie will fill the tall shoes of her namesake and open her own heart and home to others as her maternal great-grandmother has done.   It is a great legacy and we have great hopes and dreams for little Charlie.  After all, food is a universal symbol of love and Charlie’s life right now centers around her feeding schedule.

To welcome Charlie, we hosted a kiddush luncheon for our family and friends on the Shabbos that she was named.      It is a Jewish custom to host a Shabbos morning kiddush to honor the birth of a baby girl.  The concept of a kiddush for a baby girl is an opportunity to thank G-d for this enormous gift and for others to bless the new child that she be raised לַתּוֹרָה לָחֻפָּה וּלְמַעֲשִׂים טוֹבִים  (to Torah, wedding and good deeds)It is also to sanctify the importance of Jewish women and their vital role in Jewish learning and survival.

We learn throughout Tanach (Bible) and history that the Matriarchs and their female descendants graciously guided their families and ultimately, our nation through difficult family and historical challenges.   After all, Jewish identity follows matrilineal descent.   Jewish women were the ones who made seemingly small moves that changed the course of our nation’s history and who danced with Miriam at the Splitting of the Sea to celebrate the good that had been bestowed upon them.   In Jewish families, the mother is entrusted to feed and love her children physically and spiritually.  Her responsibility is to delicately instill faith in G-d and observance of mitzvos (good deeds) in her family.   We hope and pray that Charlie fulfills the potential in her name.  May she steer her own family through life’s travails and dance through  life’s simchas (joys).

To celebrate this special occasion, I created a stage of spinning ballerinas with the help of June, Scotty’s mother.  It was an adorable centerpiece that really was simple to create.

Let Charlie’s first act begin!

ballerina marshmallows

SUPPLIES

stryrofoam block
pink tablecloth
pink ribbon, matched to width of Styrofoam
gold ball toothpicks
white cupcake papers
stapler

INGREDIENTS

1 package large marshmallows
1 package mini marshmallows
pink sanding sugar
white or pink icing

DIRECTIONS

Place pink tablecloth underneath stryrofoam block and add a 6 inch perimeter all the way around Styrofoam.  Cut tablecloth to size and wrap tablecloth around Styrofoam, tucking in corners neatly as if wrapping a gift.  Staple tablecloth to bottom of Styrofoam in as many places as necessary to secure the tablecloth to the styrofoam, making sure to reinforce corners with extra staples.  Staple or glue ribbon around perimeter of the lined Styrofoam creating the ballerina stage.

For each ballerina, dab icing on the bottom of each large marshmallow.  Dip the marshmallow into the pink sanding sugar, creating the decorative collar.

Using icing as paste, glue one mini marshmallow to the top of each large marshmallow and a cupcake paper to the bottom of each large marshmallow.  Allow to dry.

Using the large end of each of the gold ball toothpicks, pierce each ballerina marshmallow carefully through the cupcake paper end.  set up each ballerina on the stage, opening up the cupcake paper tutus to move in different directions.

Please Note: This post contains affiliate links from Amazon, which means I earn a small commission if you click and make a purchase.

.

DIY Sanding Sugar

Sanding sugar adds a wow to so many of my simplest desserts.  While some recipes call for sanding sugar in colors that are impossible to find, others call for such minute or such immense quantity that it makes no sense to purchase.   And, sanding sugar is so simple to create in exactly the hue that you need using two simple ingredients.

Wow!


INGREDIENTS
1 cup sugar
food coloring

Combine 1 cup of sugar with food coloring, adding drops of food coloring until the desired hue and depth of color is reached.  Either pulse in food processor, using the s-blade or combine in a ziploc bag, kneading on outside of bag until well-combined.

Tisha B’Av: The Sour and the Sweet


The Hebrew date for this Shabbos is the Ninth of Av.   Tisha B’Av throughout history has been a day of Jewish national tragedy and great hope throughout the ages. Since Shabbos is designated as a day of joy rather than mourning, this year, we commemorate Tisha B’Av on Sunday, instead.

The calamities of Tisha B’Av began on this date in 1313 BCE with the pessimistic report of the twelve spies who returned from assessing the land of Israel.  Most of the spies reported that Israel would be impossible to conquer due to the giant inhabitants.  Only Caleb and Joshua spoke of the true beauty and blessing of the land of Israel.  That night, the Jewish nation cried, heeding the unfortunate pessimism of the spies.   On that fateful night, G-d warned us that this day would be one set aside for meaningful punishment and tears throughout the ages.

And so it has been.

As a nation, we have experienced so many Jewish tragedies on this fateful day:

The First Temple was destroyed by the Babylonians in 586 BCE

The Second Temple was destroyed by the Romans in 70 CE

The city of Beitar was destroyed by the Romans in 135 CE and the Jewish population of that city was annihilated.

Turnus Rufus, a Roman warrior, plowed the city of Jerusalem in 135 CE.

On this ominous date, the Jews were expelled from England in 1290, from France in 1306, and from Spain in 1492.

Germany entered World War I in 1914

SS commander Heinrich Himmler received formal approval for The Final Solution and thus began the Holocaust.

In 1942, the Jews were deported from the Warsaw Ghetto.

We cry for the pain of the losses, the devastation and  for the light of the connection to G-d. We shed tears over what we had and what we have lost.

However, we must find hope in our sadness, sweetness in the sourness of the past tragedies.  Our tears should not be the pessimistic tears cried by our ancestors on the night the spies returned.  They should be meaningful tears based upon the optimism and connection of Joshua and Caleb.  After all, pain indicates that we are alive and feeling.  Crying for so many centuries shows that we are still connected to the Holy Temple and the presence of G-d.  The month of Av means father and we must feel the embrace of G-d, our father, through the sour past and into the sweet future.

The Jewish nation looks to our leaders who taught us to find light, meaning and hope, even at the darkest times.   After the destruction of the Temple, Rabbi Akiva was walking in Jerusalem with three other great Rabbis.   They saw a fox running among the ruins of the Holy of Holies of the Holy Temple. The Rabbis began to cry at this sight of utter devastation.  Famously, Rabbi Akiva began to laugh.  He explained “The joyous prophecy of Zechariah is contingent upon the sad prophecy of Uriah. Uriah’s prophecy was that ‘Zion shall be plowed like a field.’ Zechariah’s prophecy was that ‘The old men and women will return and sit in the streets of Jerusalem…’ I see that the prophecy of Uriah has been fulfilled, and now I know with certainty that the prophecy of Zechariah will come to fruition…”.

Tisha B’Av has been a day of darkness and devastation and yet, we hope for the light.  As Leonard Cohen famously sang, “There is a crack, a crack in everything.  That’s how the light gets in. ”

May the darkness of Tisha B’Av be tempered by the laughter of Rabbi Akiva’s clarity of fate and faith.   May the light enter our lives from a clear understanding of  the cracks in the darkness.  May the sweet replace the sour as we feel G-d’s embrace and we hope for the  Final Redemption and the rebuilding of the Holy Temple.

kotel rice krispie treats

For Shabbos, I prepared Rice Krispies Treats to represent the Kotel (Western Wall) stones.  I placed green Sour Sticks between the stones for a sweet/sour flavor and to represent the live greenery growing in the cracks of the Kotel stones.

 INGREDIENTS
1 jar of marshmallow fluff
3 tablespoons margarine
6 cups Rice Krispies cereal

1 small bag of green sour sticks

cooking spray

DIRECTIONS

Line a baking sheet with parchment or waxed paper.  Cut sour sticks into small pieces.

Over low heat, melt margarine. Add marshmallow fluff and stir until completely melted. Remove from heat. Add Rice Krispies, 2 cups at a time. Stir until well combined.

Using a wooden spoon or a firm silicone spatula, press Rice Krispies treats evenly onto lined baking sheet.

Cut into brick-like pieces and display on a rectangular or square platter.  Intersperse green sour sticks pieces between the Rice Krispies Treats.

Baby Stroller Fruit Display

fruit.png


There are events that just make you stop and take note.  This past Shabbos, our family was part of one of those life events.

My best friend, Lori, welcomed her first grandchild into this world on Shabbos, Parshas (Torah portion)  Shelach.  Since the baby was born on Shabbos, the Shalom Zachor (festive gathering on first Friday night after birth of baby boy) and Bris (circumcision) were held back-to-back this past Shabbos, Parshas Korach.  To complicate matters, our shul’s social hall was already booked for a Bar Mitzvah, so Lori opted to host both events at her home.

I so wanted to help Lori pull this together because Lori is like the sister that I never had.  I called her daily asking for an assignment, but Lori assured me that the whole family was pulling together to prepare for these exciting and daunting celebrations.    So, I took matters into my own hands.  Actually, I took matters into the capable hands of my youngest daughter, Davida.  And, of course, I wasn’t disappointed.

Davida carved a watermelon into this baby stroller complete with a nectarine baby sipping his bottle.  It was not too complicated to prepare and it really created a wow at the celebration.

Thank you, Davida!

Mazel tov, Lori!

SUPPLIES

1″ baby bottle
Mini-skewers or heavy toothpicks
Permanent marker 
melon baller
paring knives

INGREDIENTS

one oval-shaped watermelon
honeydew or cantaloupe
peach or nectarine
4 oranges or clementines

DIRECTIONS

Using a heavy knife, cut watermelon in half to create base of stroller.

Using a melon baller, scoop out the two halves of the watermelon and other melon(s) and place in a large bowl.  Using melon baller and paring knives, clean out the cavity of the two watermelon halves so that cavities are smooth.

Reserve the larger watermelon half for the stroller cavity.

Using a heavy knife, cut the other half of the watermelon in two to create the stroller hood.  Cut v-shaped notches to create a decorative edge on the larger half.  On the smaller half, cut a small band to use as the stroller handle.  Discard the rest of the watermelon.

Carefully secure the hood to the stroller cavity using Mini-skewers or heavy toothpicks inserted into the middle of the rind of each section.  If skewers are too large,  trim so that they are the right length to secure the watermelon sections together.   Secure the stroller handle to the front of the stroller cavity in the same way.

Carefully secure citrus “wheels” to stroller using  Mini-skewers or heavy toothpicks.

Draw eyelashes on the nectarine or peach and carefully push the baby bottle into the “mouth”.

Refill the watermelon with the melon balls, leaving a small space for the nectarine baby.  Place the baby into the melon carriage.


5-Ingredient Cheesecake Brownie Bites

cheesecake brownie bites.jpg

Cheesecake and brownies.  Brownies and cheesecake.  Two delicious and decadent desserts that deserve each other.

This recipe is simple and oh, so delicious.  It is the perfect combination of these two classic dessert flavors.  The recipe begins with brownie mix and end up as the perfect combination of brownies and cheesecake, marbled to perfection.  It is forgiving and memorable.  The texture is decadent and fudgey.  It will wow you in its simplicity and it will wow you in its delicious taste and texture.

INGREDIENTS
1 brownie mix
8 ounces cream cheese
1 teaspoon vanilla sugar
1/4 cup sugar
1 egg

DIRECTIONS

Preheat oven to 350 degrees F.

Prepare brownie batter according to package instructions and pour into individual cupcake papers or ramekins.

Using a mixer or the s-blade of the food processor, mix together cream cheese, sugar, and vanilla. Add the egg and beat  until creamy and smooth.

Add a dollop of  cheesecake batter on top of each of the brownie batter ramekins. Use a skewer, small knife or chopstick to swirl the cheesecake and brownie batter.

Bake for 20-30 minutes until the top of the cheesecake is turning golden brown.  Test with a toothpick inserted into the center of one ramekin.  If a bit of the batter sticks to the toothpick, you will have a fudgier end-product.  If you wait until the toothpick comes out clean, you will have a more cake-like end-product.

cheesecake brownie bites

A Bouquet of Cupcakes with Purpose

cupcake bouquet.png

Davida volunteered to host a Shavuos bake sale at our home next Wednesday night, May 16th, 2018  from 8:00 PM to 10:30 PM.  It comes right on the heels of Mother’s Day and right before the Jewish holiday of Shavuos.


Screen Shot 2018-04-29 at 8.28.45 PM

Both Mother’s Day and Shavuos are days associated with flowers, so Davida and I prepared a few cupcake bouquets for the bake sale.  All proceeds will benefit families in need and will satisfy both the food and decorative aspects of the upcoming holiday.  

Davida is the go-to person in the family for any baking or cooking tasks.  She is a master at baking and decorating and her baked goods are both delicious and beautiful.  This one is no exception.  It uses items that you would have on hand and is simple to assemble.


SUPPLIES

7 cupcakes

7 cups
stapler
green cocktail napkins
green tissue paper

glue stick
ribbon
container

DIRECTIONS

Frost seven cupcakes with icing to resemble flowers.

Find plastic or paper cups that will allow each cupcake to fit snugly inside.

Staple the seven cups together in the following way to easily form a bouquet base with places to hold the flower cupcakes:

  • Staple three cups in a row.
  • Staple another two cups to each other.
  • Staple the last two cups to each other.
  • Staple the three cups to one pair of two stapled cups.  Staple the other pair of two cups to the three cups on the other side.  This will form a base for your seven cupcakes with one cup in the middle and six cups all around.

cupcake bouquet-cups only

Fit the plastic cup base into a basket or bowl that fits snugly.  I found a farmer’s market basket that fit perfectly.

Cut the green tissue paper in half and wrap around the basket, gluing it into place.  Tie a ribbon around the basket and secure with glue, if necessary.

Cut each cocktail napkin into a large circle.  Tuck the napkin remnants between each cup to fill in gaps.

cupcake bouquet assembled with greenery ready

Wrap each cupcake in a napkin circle and fit each floral cupcake snugly into each plastic cup.

Voila!

cupcake bouquet


Simple Cranberry Sorbet

cranberry sorbet

I’ll share a secret with you.

My Purim seuda (feast) menu is designed around the chametz (leavened products) that I must use up before Pesach (Passover).

This year, I found myself with lots of frozen challah, hence the stuffed chicken breasts and meatballs.  I found that I had three bags of fine egg noodles, and thus yerushalmi kugel was added to the menu. I found myself with way too many boxes of brownie mix, even after giving so many boxes away to the fastest respondents on our Cousins WhatsApp chat.  I created stunning pecan truffle cookies and made delicious Strawberry and Brownie Mini Trifles to use up the remaining boxes of brownie mix.

As I was sorting through the freezer, I found a few bags of frozen cranberries.  According to halacha (Jewish law),  cranberries are not chametz.  Therefore, they did not need to be consumed or discarded before Pesach, but after doing the math, I realized that they probably were already several months old.  After all, I usually buy fresh cranberries around Thanksgiving and then wash and freeze them in late November or early December.

I set a handful of cranberries aside to prepare Frosted Sugar-Coated Cranberries to be used as a garnish, but decided to prepare cranberry sorbet with the rest of the frozen cranberries.  I remember seeing a Cranberry Ice recipe posted by one of my favorite kosher bloggers, CookingfortheTimeChallenged and I used that as my inspiration for this recipe.

This recipe uses sweet soda or juice as the liquid base.  I found some flat soda left over from a Sheva Brochos that I recently hosted.  This is the perfect recipe to use up that leftover grape juice, orange juice or flat soda.

I love the sweet and savory flavor combination.  I garnished these ices with chives for a surprising bite, but other herbs like mint or basil may be blended right in for that stunning palate sensation.

INGREDIENTS

one can cranberry sauce, whole or jellied
1 cup soda or juice
1 bag frozen berries or 2 cups frozen grapes

herb garnish, such as basil, mint or chives (optional)

DIRECTIONS

Using the s-blade of the food processor, puree cranberry sauce, berries and liquid.

Freeze until solid or overnight.

Once frozen, remove from freezer and defrost just enough to scoop back into the food processor fitted with the s-blade.

Pulse sorbet in food processor just until smooth.  Refreeze.

To allow for simple entertaining, I usually defrost for 20-30 minutes before scooping.

Garnish with mint leaves and Frosted Sugar-Coated Cranberries

SUBSTITUTIONS

Any canned fruit may be substituted for the canned cranberry sauce.

Any frozen fruit may be substituted for the frozen berries.  Just make sure to taste puree and blend with enough soda or juice for optimal sweetness.  Honey may be added as well to sweeten the sorbet.

Blend your choice of fresh herbs like mint, basil or chives for that unusual sweet and savory flavor sensation.

TIPS

I scoop the sorbet into small cups in advance and freeze in the cups until ready to serve. That speeds up the serving of a frozen dessert and keeps everything tidy.    I add the garnish at the end so that the leaves stay fresh and green.

Belgian Waffles for a Crowd

waffles for a crowd-a la mode.jpg


This week, we hosted two Sheva Brochos  parties at our home.  Since Thursday night’s Sheva Brochos came out right at the conclusion of the fast of Asara Be’Teves, we decided to plan a dairy menu.

For this Sheva Brochos party, we had a wonderful group of hosts.  Each of the hosts prepared delicious food and we had quite a spectacular array of breads, soups, salads, pasta, vegetables and fish.  We had beautiful Divrei Torah (words of Torah) and creative and fun games planned and executed by our friends, Shira and Wendy.

For dessert, we had delicious cheesecake, brownies, apple pie a la mode and so many other delicious dairy delights.  Since it was a cold night, Davida convinced me to prepare waffle batter in advance  and to set up a waffle station for our guests.  I made three batches of our favorite waffle recipe and stored them in mason jars.  I set up the waffle maker, the waffle batter, a small measuring cup, cooking spray and an assortment of toppings.

It was simple to wow our guests with these delicious and fun waffles!

Nearly No-Carb Cheesecake with Mom’s Voice

Next week, Don and I will be heading to Israel for my mother-in-law’s ninth Yahrzeit, (commemoration of the anniversary of death) of my mother-in-law, Devorah bas Yitzchok Ahron a’H.  I loved my mother-in-law dearly.  While her physical presence is no longer in this world, her neshoma (soul) endures.  And, the Yahrzeit is the time to reflect on the lessons that she has imparted and continues to impart to us, her children.

My mother-in-law was brutally honest.  She was definitely not subtle.  Not in any way.

She would tell me and everyone else exactly what she thought.  And, exactly what she thought we should do.  She would tell my children that we weren’t taking good enough care of my furniture.  And, that my sister-in-law’s couches were holding up better than mine.   She offered advice to me on how to raise my children.  She couldn’t hold back when she thought someone was too fat or wearing clothing that was not flattering.  And, she always brought me just the items from the dollar store that she thought that I needed in my life.

Mom was absolutely right about most everything.  Her advice was truthful and blunt.  I heard what she said and yet I often rejected her words as harsh and unfair.  Because, in Mom’s lifetime, it was just too much information and it felt so negative.

Now that only her soul and her legacy remains, I interpret her words differently.  I accept them more and push back less.  Honestly, I just needed to learn to accept the criticism and own it.

Now that her physical presence is gone, I still hear her whispering in my ear.  Most amazingly, her voice has merged with my own inner voice.  And, it feels right and only positive now.

“It’s time to lose weight.” “Close the front door.”  “Don’t let the grandchildren play with play dough on the floor.”  “That outfit isn’t flattering.”   These are Mom’s lessons with my own inner voice whispering them.

So, with Mom’s voice as the impetus, we decided to do something exciting, frightening and wonderful on our  Yahrzeit visit to Israel this year.   We decided to jump-start healthier eating habits on this trip with the hope that these habits will last.  And, I feel that Mom has whispered this daunting plan into my ear.  Because, she always wanted her family to be slimmer, more fit and healthier.

Don’s two brothers will be joining us on this trip.  Don’s brother, Yisroel, has been on a modified Atkin’s diet successfully for two years.    He volunteered to be the mentor and coach.  I volunteered to be the cook and menu planner.  Yisroel keeps reminding me that it will be hard work.  And, I am up to the challenge, Mom!

Don’s brother, Mordechai, is on board with this new plan.  For this trip, he will be traveling without the love of his life, Yael.  But, he doesn’t want to give up another love of his life.   Cheesecake.

Don told Mordechai that we will find a way for him to have his cheesecake and eat it, too.   And, since I am in charge of the cooking and meal planning, I was determined to bake a cheesecake with nearly no carbs.

Therefore, I made a simple, crust-free cheesecake with Neufchâtel cream cheese and SPLENDA® .  Although, I generally do not use diet sugars or diet products,  I made an exception here due to the circumstances.   I hope that you love the cheesecake, Mordechai.

Thanks Mom, for that new inner voice!  May your dear neshoma be bound with the souls of the living.

no-carb cheesecake

SUPPLIES

spatula
food processor
mixer

glass pie plate

INGREDIENTS

2 pounds Neufchâtel or light cream cheese
3 large eggs
10 SPLENDA® packets (or to taste)
1/2 teaspoon vanilla extract

cooking spray

DIRECTIONS

It is best to bring the ingredients to room temperature before baking to prevent cracking, although I have made this recipe effectively with ingredients right out of the refrigerator.

Preheat oven to 350°F.

Prepare pie plate by generously spraying with cooking spray or lining with parchment paper .

In food processor fitted with an S-blade, beat cream cheese, eggs, SPLENDA® and vanilla in a food processor or with a mixer, just until smooth and creamy. You can also use a whisk to incorporate and beat all these ingredients. You will have to scrape sides of bowl to incorporate everything well until combined, smooth and creamy.

Pour mixture into pie plate.

Bake for 40 minutes. Turn oven off and leave in oven to another half-hour.

Remove from the oven and cool completely.  Chill for at least 2 hours before serving.

TIPS

If you would rather use less SPLENDA® , I would suggest just sprinkling a bit on top of the cheesecake when serving.  A sprinkle of SPLENDA®  or powdered sugar on top fools the palate and imparts sweetness to the whole serving.

Cranberry Pears on Blankets

The best desserts are simple ones, delicious bites that highlight beautiful ingredients prepared in spectacular ways.  Most recently, I have taken a liking to not-too-sweet desserts.  I love fruit dessert presentations that show off the natural beauty, unique shape and incredible character of the fruit itself.

This dessert is just that: simple, gorgeous and not too sweet. The contrast of flavors and textures between the pastry, pears, cranberries, and dates is incredible.  The puffed pastry outlines the natural shape of the pears and the pastry leaves add dimension and flair.

This dessert may be served at room temperature or warm.  It can be served a la mode with just a bit of ice cream to add a temperature contrast, as well.

pear on blanket before baking

SUPPLIES

melon baller
paring knives
rolling pin
cutting mats

INGREDIENTS

puffed pastry sheet
4 pears, ripe and soft to the touch
12 fresh or frozen cranberries
handful of chopped dates (optional)
egg wash (optional)

DIRECTIONS

Wash pears well and using paring knife, cut pears in half through each core,  keeping the stem intact.  With a melon baller, scoop the core out of the middle of each pear.

pear on blanket dessert with cores removed.jpg

Fill each scooped-out pear hole with 3 cranberries and a few chopped dates.

pear on blanket dessert filled with cranberries

Using rolling pin, roll out puffed pastry sheet on cutting mat.  Carefully place pears on pastry cut side down, making sure that cranberries and dates do not fall out.  Using  sharp paring knife, trace around the pears, leaving a 1/4″ border of pastry around the pear.  Cut 8 leaf shapes out of the pastry sheet and score each leaf with paring knife to resemble the veins of the leaf. Score the tops of each pair in a grid-like pattern.

Line a baking sheet with parchment and carefully place each pastry pear on the sheet.  Place two leaves on the top of each pear. Optionally, brush the pastry with egg wash.

Bake at 375 degrees F for 20 minutes.

pear on blanket

Serve with a dusting of powdered sugar and/or a dollop of whipped cream.

Thanksgiving Turkey Drumsticks for Dessert

This dessert is simple, adorable and delicious.  It is the perfect dessert to bring the turkey to your Thanksgiving table, even if you opt out of Thanksgiving turkey as we are this year.  This treat will add legitimacy to our Thanksgiving table, even though we are serving an Italian-style dairy feast.

It is a fun treat to prepare with children.  Davida and Avigail dipped the pretzel rods, while Avigail and I helped form the meaty end of each Rice Krispies drumstick.  Like most good recipes around our home,  most of these were devoured before they ever made it to our Thanksgiving table.

Happy Thanksgiving!

rice krispies turkey drumsticks in cage.jpg

INGREDIENTS
1 bag of pretzel rods
1 bag of white chocolate chips or wafers

1 jar of marshmallow fluff
3 tablespoons butter or margarine
6 cups Rice Krispies cereal

cooking spray

DIRECTIONS
Using the defrost mode in the microwave, melt chocolate for 6-9 minutes until chocolate is melted. Stir until smooth.

Break the pretzel rods in half or into 4-5″ lengths. Dip the rounded end into chocolate, rounding the bottom and dipping several times to form the bottom of the drumstick.

Cool dipped pretzel rods on wax or parchment paper.

Over low heat, melt butter or margarine. Add marshmallow fluff and stir until completely melted. Remove from heat. Add Rice Krispies, 2 cups at a time. Stir until well combined.

Spray gloved hands with cooking spray and form oval clumps of Rice Krispies mixture. Stick undipped end of pretzel rod into each oval clump or Rice Krispies mixtire, tightly forming the drumstick shape and adhering it to the pretzel rod.  Allow drumsticks to set on wax or parchment paper.


Happy Thanksgiving!

Avigail’s Simple Pilgrim Hats

This year we are hosting a dairy Thanksgiving feast.

The idea germinated when I realized that Thanksgiving this year falls out right after Michelle’s birthday.  Since Michelle loves Italian dairy foods, it just made sense to offer a dairy menu instead of the traditional Thanksgiving fare.  Since kosher dietary laws prevent the combination of milk and meat, once I chose to go dairy, it precluded having a turkey as the centerpiece of the meal.

Truth be told, I thought to create a vegetarian turkey.  I defrosted two bags of frozen broccoli and brussel sprouts and formed these green vegetables into the shape of a turkey.  I roasted the “green turkey” in the oven with just a drizzle of olive oil, Himalayan sea salt and a dash of balsamic vinegar.  The oven was set on a timed bake cycle while I set out to run some errands.  My plan was that once I returned, the green vegetable turkey would be ready and cooled down.  I would then cover the top of the green turkey with mozzarella cheese and strips of puffed pastry.  Once baked, I hoped that it would resemble a turkey and would make a great centerpiece to our dairy Thanksgiving table.

That seemed like a great plan.  Except, there were two problems: Leah had a day off from school and the roasted broccoli and brussel sprout turkey smelled so delicious once ready.

And, Leah claims that there was a third problem, too.  My green turkey really didn’t bear a close enough resemblance to a turkey.  When she came down for her morning coffee, the timed bake timer was ringing and the oven had just shut off as planned.  She peeked inside the oven and just couldn’t resist tasting the mound of broccoli and brussel sprouts.  And, the taste was so delicious that she ate nearly the whole pan of vegetables.  Leah claimed that she had no idea that this was the start of a vegetable turkey.

So, it was back to the drawing board.

With no green vegetables left to recreate the Thanksgiving turkey, I had to try something else.  So, I opted to reintroduce Thanksgiving to our dairy feast with these adorable Pilgrim hats.

The good news is..they are so simple that my four year old granddaughter made them with a bit of assistance from Davida, my youngest daughter.  It took only two simple ingredients and just a few minutes to prepare.

And, Leah is still busy taste-testing.

simple pilgrim hats by Avigail

INGREDIENTS

Chocolate OREO’s or chocolate sandwich cookies
Reese’s mini peanut butter cups

DIRECTIONS

Unwrap all the peanut butter cups, removing the outer foil wrap and the paper wrapper around the chocolate. Carefully separate the sandwich cookies, taking care to leave some cream o both cookies.

Gently press the peanut butter cup into the center of the cookie, using the cream from the center to help adhere the peanut butter cup.

Happy Thanksgiving!

Simple No-Bake Sorbet cakes

no-bake sorbet cake 2.JPG

Desperate times call for desperate measures.

A few weeks ago, I had finished preparing a simple Shabbos menu when we found out that we were about to have a houseful of Shabbos company.  I had plenty of real food, but I needed to create an impressive dessert for the next day…quickly and with ingredients already on hand.

I had been planning to serve some cut-up watermelon for dessert and that just wouldn’t do for this audience.  I looked around the house for dessert ingredients that required no baking.  I found a few  pints of  fruit sorbet, chocolate ices, pareve pizzelle cookies and whipped cream.  I had some beautiful variegated basil in the garden and  a pint of strawberries in my refrigerator.  And, this is what I created.

no-bake sorbet cake

SUPPLIES

cupcake pan

cupcake liners

rubber spatulas

INGREDIENTS

ice cream, sorbet or ices
whipped cream, whipped with some vanilla sugar

fresh mint, basil or other herb for garnish
fancy cookies
strawberries

pizzelle cookies or other fancy-shaped cookies


DIRECTIONS

Partially defrost ice cream, sorbet or ices on the counter or using the defrost mode on the microwave.  It should be thin enough to remove with rubber spatulas but not a drippy liquid.

Prepare whipped cream by whipping cream with a tablespoon of vanilla sugar until almost stiff.

Line cupcake pan with cupcake liners.  If the cupcake liners are thin, double them so that they will stand up to the sorbet filling.

With a teaspoon or  rubber spatulas, drop a small bit of each flavor of ices, sorbet, ice cream and whipped cream into the cupcake liners until they are almost  filled to the top. Freeze for several hours or overnight.

Remove sorbet cupcakes from freezer and peel away cupcake liners so that the ridges of the cupcake liners are visible.  Garnish with herbs, strawberries, whipped cream and pizzelle cookies cut in half.


TIPS

I peel away the cupcake liners in advance and refreeze the sorbet cakes until firm.  This allows for a faster and neater serving procedure.

To create a strawberry rose, cut thin slices on the strawberry without cutting through the bottom.  Fan the cut strawberry out to create a rose effect.

I garnish the plates before placing the sorbet cakes.  They melt quickly!

Please Note:  This post contains affiliate links from Amazon, which means I earn a small commission if you click and make a purchase.

German Chocolate Cake for Mordy

germman chcolate cake

Last week, my brother, Mordy, celebrated his birthday. Growing up, nobody made much of a deal about birthdays and that has become part of my DNA.  Most of the time, we forget each others birthdays and I have been know to forget my own birthday and anniversary.   Thankfully, my brother, Itzy, often calls, texts or emails us to remember someone’s special day.    Thank you, Itzy!

I do remember elementary school birthday parties from my childhood.  My mother would invite the entire class over on a Sunday afternoon for birthday cake.  My father would take down his huge and heavy polaroid camera from the top of the closet.  He would take exactly one picture of the birthday child.   We would be so excited in anticipation of that polaroid photo to develop and it would seem like an eternity until the photo was ready.  My father would watch the time on his watch carefully, holding us all at bay until the picture was finally revealed.  It was magical.

Many years ago, I discovered that Mordy enjoys two unusual foods: arugula and German chocolate cake.    Both foods are ones that most people either love or hate.  I prepare arugula most weeks and have a few wonderful arugula blog posts (see Crunchy Arugula and Jicama Salad and Arugula Salad Wrapped and Upright)

I have not prepared German chocolate cake in a very long time.

Years ago,  I would prepare German chocolate cake in a  10-11″ tart pan using the basic guidelines of  the recipe on the back of the Baker’s coconut bag.  This week, I bought coconut and discovered that the German chocolate cake icing recipe was no longer on the back of the bag.  I was determined to recreate that recipe.  Thankfully, I found another recipe and made some enhancements to adapt it to a pareve and less sweet menu.  Although I have not prepared German Chocolate cake in over a decade,  it did not disappoint.

Happy birthday, Mordy!


SUPPLIES

10-11″ tart pan


INGREDIENTS

1 chocolate cake or brownie recipe

12 ounces pareve milk or cream
1/4 cup coconut oil
1/4 cup honey or to taste
1 1/2 teaspoons vanilla extract or vanilla powder
2 egg yolks

1/2 cup chopped pecans, optionally toasted
2 cups flaked coconut
1 cup chocolate chips

Large coconut flakes for garnish (optional)

Using cooking spray, heavily grease bottom of each 10-11″ tart pan.  Prepare your favorite chocolate cake or brownie recipe and bake according to directions.  Allow to cool.   Gently coax cake from 10-11″ tart pan.

In a small saucepan over low-medium heat, cook  milk, coconut oil, honey, vanilla and and egg yolks, stirring constantly, for 3-4 minutes.  Reduce heat to low and add pecans, chocolate chips and coconut.  Mixture should be thick, but spreadable.

Remove from heat and add mixture to center of chocolate tart.  Optionally, garnish with flaked coconut.

Machzor Cupcakes

machzor cupcakes 2.jpg

So much of the Rosh Hashana (Jewish New Year) and Yom Kippur (Day of Atonement) holidays are spent in shul (synagogue).  The prayer service follows an order of prayers delineated in the respective machzor (prayer book) for each of these holidays.

In preparation for Rosh Hashana and Staci Segals’ charity bake sale, I prepared some cupcakes that are each decorated with a machzor (prayer book). The proceeds will benefit Yad Sarah, a very worthwhile organization that provides medical equipment to patients in need.

These cupcakes are available for sale among other delicious desserts at the Segal Home this Sunday, September 17th, 2017 from 12 noon-5 PM. The address is 475 FDR Drive #301 on the Lower East Side. For more information, please contact Staci at 917-295-7285 or stacisegal@aol.com

INGREDIENTS

Vanilla Cupcake recipe
sprinkles
White frosting

wafer cookie bites
chocolate frosting

INSTRUCTIONS

Use your favorite vanilla cupcake recipe. I baked mine as confetti cupcakes by mixing sprinkles into the dry ingredients before adding the wet ingredients. Bake cupcakes according to the recipe.

Frost cupcakes with white icing.

For the open machzor decoration, place two wafer cookie bites, side by side and place a line of chocolate frosting down the seam to hold them together. Decorate with the chocolate frosting.

For the closed machzor decoration, roll out fondant or a soft cookie and cut into a rectangle.  Surround a wafer bite with the fondant or cookie bookcover. Decorate with the chocolate frosting.

machzor cupcakes

Wishing you all a Kesiva Ve’Chasima Tova (a positive inscription and seal for the upcoming year).

Upside-Down Apple Nut Beehive

This cake is both creative and delicious.  The upside-down cake is simple to prepare and can be served as is.  For a Rosh Hashana twist, I surrounded the cake with a chocolate honeycomb and some candy bees.

This cake is available for sale among other delicious desserts at the Segal Home this Sunday, September 17th, 2017 from 12 noon until 5 PM.   The proceeds will benefit Yad Sarah, an excellent organization in Israel that provides medical equipment to patients in need.  The bake sale address is 475 FDR Drive #301 on the Lower East Side. For more information, please contact Staci at 917-295-7285 or stacisegal@aol.com

upside-down apple honey-pecan beehive

INGREDIENTS

Cake
1 cup flour
1 1/2 teaspoons baking powder
1/2 teaspoon salt
1/2 cup coconut oil, melted
2/3 cup sugar
2 tablespoons juice or nectar
1 teaspoon vanilla or vanilla sugar
2 eggs

4 small baking apples, diced small
1 1/2 teaspoons cinnamon
2 tablespoons sugar

Honey glaze
1/2 cup  honey
4 tablespoons coconut oil, melted
1/2 teaspoon vanilla or vanilla sugar
1/2 teaspoon cinnamon
pinch of salt
1 1/2 cups  chopped nuts (I used pecans)

DIRECTIONS

Preheat the oven to 350 °F.  Cover a round baking pan with foil and spray with cooking spray.  Cut a parchment paper circle to cover the foil on the bottom of the pan.

Honey glaze

In a small bowl, mix together the honey, coconut oil, vanilla, cinnamon and salt.  Fold in the nuts.

Spread the honey glaze over the bottom of the parchment-lined pan.  Place the pan with the honey glaze in the refrigerator or freezer while preparing the cake batter.  This will make the batter easier to add to the top of the glaze.

upside down honeycomb cake-glaze

Apple Honey Cake

In a medium bowl, combine flour, baking powder, and salt.  Add melted coconut oil, sugar, orange juice, vanilla and eggs and stir until just combined.  The consistency of the batter will be pasty.

In another bowl, toss diced apples with sugar and cinnamon and set aside.

Remove the honey glaze pan from the refrigerator or freezer and pour half of the cake batter (just a thin layer) over the honey sauce.

upside down honeycomb cake-batter

Sprinkle about half of the coated diced apples over the batter. Add the remaining cake batter and don’t worry if the thin layer blends with the apple layer.   Finally, add the remaining apples.  Although the cake looks flat, it will rise during the baking process.

upside down honeycomb cake-batter with apples.jpg

Bake for 45-50 minutes or until just lightly browned.

upside down honeycomb cake-before inverting

Allow the cake to cool for 10 minutes before inverting onto the serving plate lined with waxed or parchment paper.

This cake is easiest to serve after refrigeration.

Honeycomb and bees

For a stunning presentation, I surrounded the cake with a chocolate honeycomb and some edible bees, using the bubble wrap technique that I described last year in ..In the Honey: Rosh Hoshana Honeycomb Cupcakes.

Melt chocolate wafers or chips. I use the defrost feature on the microwave. I spread the chocolate out on a microwave-safe dinner plate and place it on defrost mode for 6-8 minutes.

Cut a piece of clean bubble wrap to match the height and circumference of the cake with just a bit of overlap for the length.

upside down honeycomb cake-with bubble wrap surround

Cut another small square of bubble wrap for the honeycomb shards.  Mark the size of the bubble wrap surround on a piece of parchment or wax paper and another for the small square.  Spread the chocolate out on the parchment or wax paper for the surround and the shards, keeping the chocolate thin but not translucent. Press bubble wrap with bubble side down onto melted chocolate.     Let the honeycomb square harden on a flat surface.

beehive-chocolate-with-bubble-wrap

While still warm and pliable, but firm enough to maintain its shape, place the chocolate side of the bubble wrap against the cake, surrounding the cake with the coated bubble wrap.


Break off portions of the honeycomb at the top of the cake to give it a natural honeycomb look.  Once chocolate has hardened, carefully peel bubble wrap off of the chocolate, revealing the honeycomb surround.

For the bubble wrap square, carefully remove the bubble wrap and break the chocolate into shards that resemble pieces of honeycombs.

Place slivered almonds on either side of each jellybean.

Fill two small ziploc or piping bags with chocolate and white frosting. To do this neatly, place the bag in a tall glass and fold the top of the bag over the edge of the glass like a collar and fill with frosting. Cut corner of bag with a tiny opening to pipe thin stripes on the jellybean bees. Carefully squeeze frosting to corner.

Pipe stripes of white frosting on black jellybeans. Pipe stripes of chocolate frosting on yellow jellybeans.

Use frosting to adhere the bees to the cake and to the honeycombs.

Voila!

upside-down apple honey-pecan beehive
.

Simply Perfect and Healthier Cheesecake

simply perfect cheesecake with fruitWe are counting the days until Shavuos (lit: weeks).

Yes.  Shavuos is the holiday that we literally count the days toward its arrival. We count 49 days (seven weeks) from Pesach (Passover) to Shavuos, blessing the sefira (counting) every evening from the second night of Pesach until Shavuos begins.

From a culinary perspective, many of us count the days until we can enjoy the delicious dairy foods that have become associated with Shavuos. We are commanded to eat dairy foods at our festive meals (Countdown to Shavuos: Floral Inspirations and Dairy Recipes) on Shavuos and cheesecake has become one of the iconic desserts associated with Shavuos.

Shavuos commemorates the receiving of the Torah by the Jewish nation. It also is the time that the wheat is harvested and the bikurim (first fruits) were brought to the Holy Temple in a lavish ceremony (Bekurim: First Fruits from Hollister).  So, this year’s cheesecake is decorated with fruits, so symbolic of the bikurim ceremony.

I have kept the preparation simple and have incorporated greek yogurt and light cream cheese into the recipe to make for a healthier cheescake.   The flavor and texture is still impeccably delicious.

Just like last year’s mini cheesecake recipe, this recipe does not require a springform pan or a water bath for baking.  It is best to bring the ingredients to room temperature just before preparation.   Preparation takes a few minutes and the baking is simple. It can be prepared as one round or rectangular cheesecake or in 12-16 mini ramekins.

simply perfect individual cheescake

SUPPLIES

spatula

food processor

mixer

INGREDIENTS

2 pounds light or regular cream cheese
2/3 cup sugar
8 ounce container of plain Greek yogurt
1 teaspoon vanilla extract
4 large eggs

2 cups cookies or graham crackers, crushed

4 tablespoons butter

cooking spray

DIRECTIONS

It is best to bring the ingredients to room temperature before baking to prevent cracking, although I have made this recipe effectively with ingredients right out of the refrigerator.

Preheat oven to 325°F.

Prepare cake pan or ramekins by generously spraying with cooking spray and/ or lining with parchment paper .

In food processor fitted with an S-blade, crush cookies and add butter, pulsing until mixture is fully incorporated.  You can also place cookies in a zipper bag and crush using a mallet or rolling pin, adding butter to the bag and kneading gently.  Gently press cookie-butter mixture into pan or ramekins.

Beat cream cheese, yogurt, sugar, eggs and vanilla in a food processor or with a mixer, just until smooth and creamy.  You can also use a whisk to incorporate and beat all these ingredients.  You will have to scrape sides of bowl to incorporate everything well until combined, smooth and creamy.

Pour mixture into pans or ramekins, filling 2/3 of the way to the top.  I find it easiest to pour the mixture from a glass measuring cup with a spout..

Bake mini ramekins for 15 minutes, 3-4″ ramekins for about 18-20 minutes and larger pan for 30 minutes.  Turn oven off and leave in oven to another hour.

Remove from the oven and cool completely.  Chill the ramekin cheesecakes for at least 2 hours and the larger cheesecake for at least 4 hours.  Gently remove cheesecake(s) from pan(s).

Garnish with fruit, berries, edible leaves and flowers. Dust with powdered sugar right before serving.


Charoset Ices

charoset ices

Last year in Israel, we discovered that Ben and Jerry’s manufactures Charoset ice cream for Pesach (Passover).  We bought it at the Israel supermarket for its Passover-themed value but we devoured it for its delicious taste.

charoset ice cream.png

After all,  charoset is a traditional dip consumed at the Passover Seder. It is typically prepared with chopped apples, nuts, cinnamon and red wine or grape juice.   The charoset is a  gritty dip for the Maror (bitter herbs) that symbolizes the mortar used by the Jews to fashion bricks while they were enslaved in Egypt.

The apples and grape juice or wine lend a sweet taste to this dish and make for the perfect combination of ingredients to prepare charoset ices.  This will make the perfect dessert for your Pesach meal.


INGREDIENTS

3-4 apples, cut into large chunks
1 cup wine or grape juice
dash of cinnamon
1/4 cup nuts
1 cup frozen grapes
small romaine heart (optional, for garnish)

DIRECTIONS

Using the s-blade of the food processor, puree all ingredients except romaine heart until just combined.

Freeze until solid or overnight.

Once frozen, remove from freezer and defrost just enough to scoop back into the food processor fitted with the s-blade.

Pulse sorbet in food processor just until smooth.  Refreeze.

To allow for simple entertaining, I usually defrost for 20-30 minutes before scooping.

Garnish with a small piece of romaine lettuce.

SUBSTITUTIONS

Any frozen fruit may be substituted for the frozen grapes.  Just make sure to taste puree and blend with enough wine or  juice for optimal sweetness.  Honey may be added as well to sweeten the sorbet.

TIPS

I scoop the sorbet into small cups in advance and freeze in the cups until ready to serve. That speeds up the serving of a frozen dessert and keeps everything tidy.    I add the garnish at the end so that the leaves stay fresh and green.charoset ices.jpg

Pomegranate Truffles

pomegranate-truffles

There is something about pomegranate seeds that are oh, so delicious and create such a taste and texture sensation.  The soft outside and the pop in your mouth juiciness is something so unique and so wonderful.  The bright red color is reminiscent of a red heart and what better ingredient to pair with pomegranate seeds than chocolate?

As we just celebrated Tu Beshvat over the past weekend, we took time to pause and reflect on the vast assortments of fruit that grace our world.  The pomegranate, whose seed bursts are the only edible part of the fruit truly symbolize the dormant and vast potential in each one of us.

This simple recipe is quite a palate sensation.  It combines the decadence of chocolate with the juiciness of pomegranate.  It takes moments to prepare and will simply wow you.

INGREDIENTS
seeds of one pomegranate
6 ounces of good chocolate
sea salt (optional)

INSTRUCTIONS

Line a baking sheet with parchment paper.  Melt chocolate and with a spoon or spatula, place mounds of chocolate on the parchment paper, reserving a small amount of melted chocolate.  Place a small mound of pomegranate seeds atop each chocolate mound.  Drizzle the rest of the chocolate over the truffles using a fork or a piping bag.

Optionally, garnish each pomegranate truffle with a few sea salt crystals.

These may be prepared a day in advance, but should be stored in the refrigerator.