Breakfast Foods

Belgian Waffles for a Crowd

waffles for a crowd-a la mode.jpg


This week, we hosted two Sheva Brochos  parties at our home.  Since Thursday night’s Sheva Brochos came out right at the conclusion of the fast of Asara Be’Teves, we decided to plan a dairy menu.

For this Sheva Brochos party, we had a wonderful group of hosts.  Each of the hosts prepared delicious food and we had quite a spectacular array of breads, soups, salads, pasta, vegetables and fish.  We had beautiful Divrei Torah (words of Torah) and creative and fun games planned and executed by our friends, Shira and Wendy.

For dessert, we had delicious cheesecake, brownies, apple pie a la mode and so many other delicious dairy delights.  Since it was a cold night, Davida convinced me to prepare waffle batter in advance  and to set up a waffle station for our guests.  I made three batches of our favorite waffle recipe and stored them in mason jars.  I set up the waffle maker, the waffle batter, a small measuring cup, cooking spray and an assortment of toppings.

It was simple to wow our guests with these delicious and fun waffles!

Nearly No-Carb Cheesecake with Mom’s Voice

Next week, Don and I will be heading to Israel for my mother-in-law’s ninth Yahrzeit, (commemoration of the anniversary of death) of my mother-in-law, Devorah bas Yitzchok Ahron a’H.  I loved my mother-in-law dearly.  While her physical presence is no longer in this world, her neshoma (soul) endures.  And, the Yahrzeit is the time to reflect on the lessons that she has imparted and continues to impart to us, her children.

My mother-in-law was brutally honest.  She was definitely not subtle.  Not in any way.

She would tell me and everyone else exactly what she thought.  And, exactly what she thought we should do.  She would tell my children that we weren’t taking good enough care of my furniture.  And, that my sister-in-law’s couches were holding up better than mine.   She offered advice to me on how to raise my children.  She couldn’t hold back when she thought someone was too fat or wearing clothing that was not flattering.  And, she always brought me just the items from the dollar store that she thought that I needed in my life.

Mom was absolutely right about most everything.  Her advice was truthful and blunt.  I heard what she said and yet I often rejected her words as harsh and unfair.  Because, in Mom’s lifetime, it was just too much information and it felt so negative.

Now that only her soul and her legacy remains, I interpret her words differently.  I accept them more and push back less.  Honestly, I just needed to learn to accept the criticism and own it.

Now that her physical presence is gone, I still hear her whispering in my ear.  Most amazingly, her voice has merged with my own inner voice.  And, it feels right and only positive now.

“It’s time to lose weight.” “Close the front door.”  “Don’t let the grandchildren play with play dough on the floor.”  “That outfit isn’t flattering.”   These are Mom’s lessons with my own inner voice whispering them.

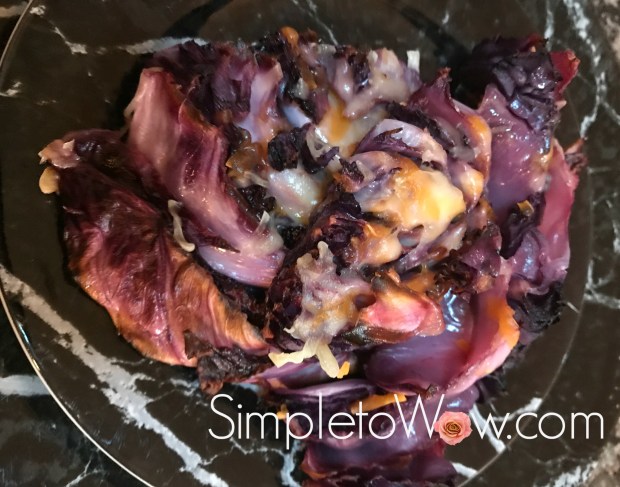
So, with Mom’s voice as the impetus, we decided to do something exciting, frightening and wonderful on our  Yahrzeit visit to Israel this year.   We decided to jump-start healthier eating habits on this trip with the hope that these habits will last.  And, I feel that Mom has whispered this daunting plan into my ear.  Because, she always wanted her family to be slimmer, more fit and healthier.

Don’s two brothers will be joining us on this trip.  Don’s brother, Yisroel, has been on a modified Atkin’s diet successfully for two years.    He volunteered to be the mentor and coach.  I volunteered to be the cook and menu planner.  Yisroel keeps reminding me that it will be hard work.  And, I am up to the challenge, Mom!

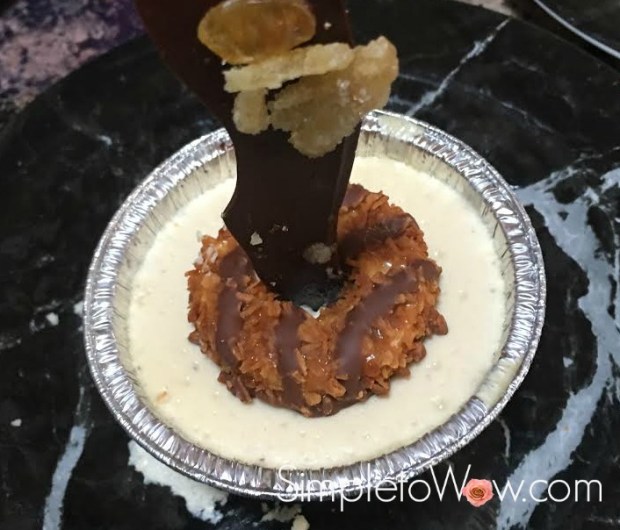
Don’s brother, Mordechai, is on board with this new plan.  For this trip, he will be traveling without the love of his life, Yael.  But, he doesn’t want to give up another love of his life.   Cheesecake.

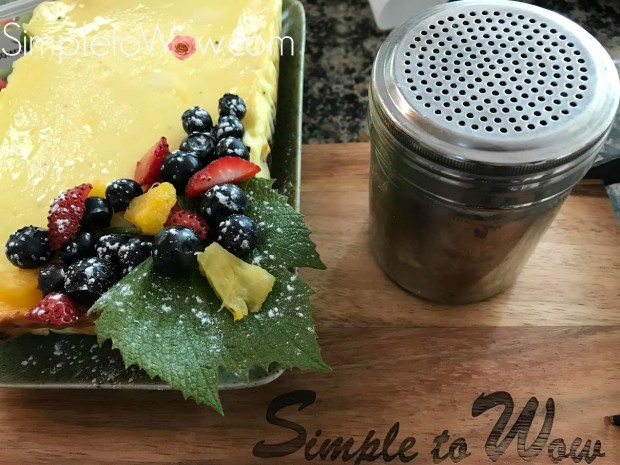
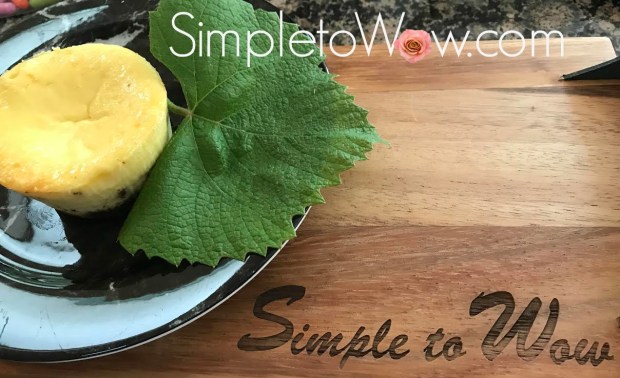
Don told Mordechai that we will find a way for him to have his cheesecake and eat it, too.   And, since I am in charge of the cooking and meal planning, I was determined to bake a cheesecake with nearly no carbs.

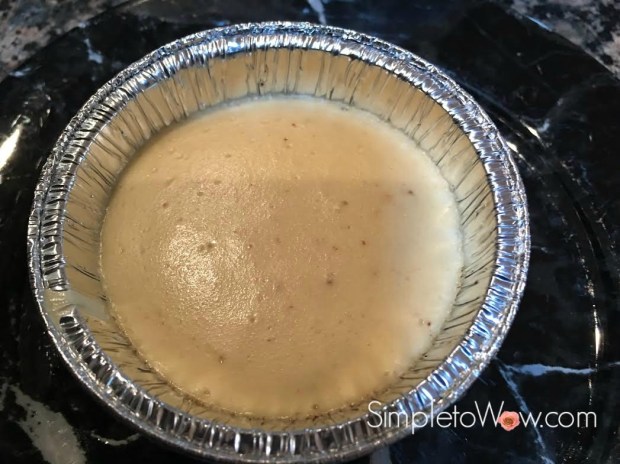
Therefore, I made a simple, crust-free cheesecake with Neufchâtel cream cheese and SPLENDA® .  Although, I generally do not use diet sugars or diet products,  I made an exception here due to the circumstances.   I hope that you love the cheesecake, Mordechai.

Thanks Mom, for that new inner voice!  May your dear neshoma be bound with the souls of the living.

no-carb cheesecake

SUPPLIES

spatula
food processor
mixer

glass pie plate

INGREDIENTS

2 pounds Neufchâtel or light cream cheese
3 large eggs
10 SPLENDA® packets (or to taste)
1/2 teaspoon vanilla extract

cooking spray

DIRECTIONS

It is best to bring the ingredients to room temperature before baking to prevent cracking, although I have made this recipe effectively with ingredients right out of the refrigerator.

Preheat oven to 350°F.

Prepare pie plate by generously spraying with cooking spray or lining with parchment paper .

In food processor fitted with an S-blade, beat cream cheese, eggs, SPLENDA® and vanilla in a food processor or with a mixer, just until smooth and creamy. You can also use a whisk to incorporate and beat all these ingredients. You will have to scrape sides of bowl to incorporate everything well until combined, smooth and creamy.

Pour mixture into pie plate.

Bake for 40 minutes. Turn oven off and leave in oven to another half-hour.

Remove from the oven and cool completely.  Chill for at least 2 hours before serving.

TIPS

If you would rather use less SPLENDA® , I would suggest just sprinkling a bit on top of the cheesecake when serving.  A sprinkle of SPLENDA®  or powdered sugar on top fools the palate and imparts sweetness to the whole serving.

Cheesy Cabbage Steaks

This week, I decided to prepare a delicious, colorful and low-carb dairy dinner.  Since I had just returned from an overseas trip, I found my refrigerator and pantry low-stocked. With very few ingredients to choose from, I opted to use the head of cabbage that I found in the refrigerator to prepare these of, so wonderful cheesy cabbage steaks.

Cabbage has many health benefits.  It is low in calories and carbs and high in fiber and vitamins. Cabbage is low in saturated fat and boasts high levels of vitamin C and vitamin K.  Best of all, it is inexpensive and available year-round.

I used red cabbage for this recipe, but any cabbage may be used.  In this simple recipe, the red cabbage creates a stunning purple backdrop to the velvety melted cheese on top. It may be used to Passover and is gluten free, too.

Cheesy cabbage steaks

INGREDIENTS

Red cabbage, cleaned and cut into steaks

4 minced garlic cloves or granulated garlic
coarse salt
coarse ground black pepper
olive oil or cooking spray

shredded cheese


DIRECTIONS

Preheat oven to 375 degrees F.  Line baking sheets with parchment paper or greased foil.

Remove first 4-5 tough outer leaves of cabbage.  Clean cabbage and cut into 1/2 inch to 3/4 thick steaks.  Place cabbage steaks in a single layer on lined cookie sheets.   Drizzle with olive oil or generously spray with cooking spray.   Lightly sprinkle with salt, garlic and black pepper.

Roast for 40-45 minutes, checking that cabbage steaks are soft and just starting to brown before removing from oven.


Sprinkle shredded cheese over the cooked cabbage steaks.  Return to the oven for 10-15 minutes more until cheese is melted and gooey.

Enjoy!

Simply Perfect and Healthier Cheesecake

simply perfect cheesecake with fruitWe are counting the days until Shavuos (lit: weeks).

Yes.  Shavuos is the holiday that we literally count the days toward its arrival. We count 49 days (seven weeks) from Pesach (Passover) to Shavuos, blessing the sefira (counting) every evening from the second night of Pesach until Shavuos begins.

From a culinary perspective, many of us count the days until we can enjoy the delicious dairy foods that have become associated with Shavuos. We are commanded to eat dairy foods at our festive meals (Countdown to Shavuos: Floral Inspirations and Dairy Recipes) on Shavuos and cheesecake has become one of the iconic desserts associated with Shavuos.

Shavuos commemorates the receiving of the Torah by the Jewish nation. It also is the time that the wheat is harvested and the bikurim (first fruits) were brought to the Holy Temple in a lavish ceremony (Bekurim: First Fruits from Hollister).  So, this year’s cheesecake is decorated with fruits, so symbolic of the bikurim ceremony.

I have kept the preparation simple and have incorporated greek yogurt and light cream cheese into the recipe to make for a healthier cheescake.   The flavor and texture is still impeccably delicious.

Just like last year’s mini cheesecake recipe, this recipe does not require a springform pan or a water bath for baking.  It is best to bring the ingredients to room temperature just before preparation.   Preparation takes a few minutes and the baking is simple. It can be prepared as one round or rectangular cheesecake or in 12-16 mini ramekins.

simply perfect individual cheescake

SUPPLIES

spatula

food processor

mixer

INGREDIENTS

2 pounds light or regular cream cheese
2/3 cup sugar
8 ounce container of plain Greek yogurt
1 teaspoon vanilla extract
4 large eggs

2 cups cookies or graham crackers, crushed

4 tablespoons butter

cooking spray

DIRECTIONS

It is best to bring the ingredients to room temperature before baking to prevent cracking, although I have made this recipe effectively with ingredients right out of the refrigerator.

Preheat oven to 325°F.

Prepare cake pan or ramekins by generously spraying with cooking spray and/ or lining with parchment paper .

In food processor fitted with an S-blade, crush cookies and add butter, pulsing until mixture is fully incorporated.  You can also place cookies in a zipper bag and crush using a mallet or rolling pin, adding butter to the bag and kneading gently.  Gently press cookie-butter mixture into pan or ramekins.

Beat cream cheese, yogurt, sugar, eggs and vanilla in a food processor or with a mixer, just until smooth and creamy.  You can also use a whisk to incorporate and beat all these ingredients.  You will have to scrape sides of bowl to incorporate everything well until combined, smooth and creamy.

Pour mixture into pans or ramekins, filling 2/3 of the way to the top.  I find it easiest to pour the mixture from a glass measuring cup with a spout..

Bake mini ramekins for 15 minutes, 3-4″ ramekins for about 18-20 minutes and larger pan for 30 minutes.  Turn oven off and leave in oven to another hour.

Remove from the oven and cool completely.  Chill the ramekin cheesecakes for at least 2 hours and the larger cheesecake for at least 4 hours.  Gently remove cheesecake(s) from pan(s).

Garnish with fruit, berries, edible leaves and flowers. Dust with powdered sugar right before serving.


Simply Perfect Sufganiot in a Zipper Bag

I like to stay close to the latest trends in cooking and design.  One trendy and helpful technique in preparing dough is to use a zipper bag for preparing and kneading the dough.  It is a great idea for most dough and really reduces the cleanup.  Best of all, since the zipper bag can be discarded after use, this simple dough technique virtually eliminates those nasty dough-covered utensils and sponges that are so difficult to clean.

The ziploc bag eliminates the dusty mess of flour and allows all the dough crumbles to remain in the disposable ziploc bags.  Since the sufganiot in this recipe are amorphous and just dropped into oil, the ziploc bag can even be used  to dispense the doughnuts right into the frying pan.

I have adapted my favorite sufganiot recipe to use the ziploc bag.  I have tried it and it is just perfect!

sufganiot-in-a-bag-in-oil

INGREDIENTS
1/2 cup warm water
2 teaspoon sugar
1 teaspoon dry active yeast

1 cup flour

1/3 teaspoon salt
1/2 cup warm water
Olive oil, for frying

Powdered sugar (optional)

large zipper bag (1-2 gallon)


DIRECTIONS

In a ziploc bag, dissolve yeast and sugar in warm water.  To do this easily, I fold top of zipper bag over a small pan so that bottom of zipper bag is at bottom of pan and top of bag is folded over sides of the pan.    This ensures that the liquid contents do not spill over.

sufganiot zipper bag in pan.jpg

Wait until yeast mixture becomes bubbly or foamy.  If the yeast mixture does not bubble and foam, the yeast is not active and you will have to redo this step, making sure that the water used is warm but not too hot to touch.


Carefully add salt and flour to the yeast mixture, kneading the bag until all the flour has been incorporated, for several minutes.   The dough should resemble a thick, sticky cake batter.

sufganiot-in-a-bag-yeast-dough-before-rising-2


Spray your hands with oil spray or rub oil on your hands.  With your oiled hands, carefully rub the oil all over the dough. making sure to coat all sides of the dough.  Rub or spray oil on the entire inside of the zipper bag, too.

Allow dough to rise for 3-4 hours in the bag.  Open zipper and gently let the excess air out of the bag.  Gently push down the dough by pressing on the outside of the bag.

In a pot or sauce pan with a large opening, over medium heat, heat 1-2 inches of olive oil until sizzling.

Cut a corner into the side of the zipper bag to allow dispensing of the dough directly from the zipper bag corner.

sufganiot-in-a-bag-after-risen

Squeeze donuts into the oil by pushing dough into corner of bag and squeezing out small pieces of odd-shaped dough out of the zipper bag.  You may have to coax and pull donuts out of the bag into the oil using oiled hands.

Repeat until you have filled the oil with donuts without crowding, as the sufganiot will puff up during the ferrying process.


sufganiot-in-a-bag-in-oil


Turn them over once the bottom is golden brown.

Using a slotted spoon, carefully remove each doughnut from the oil and place on a plate lined with paper towels.

Sprinkle powdered sugar over the doughnuts and enjoy!

Happy Chanukah!

When Pancakes Meet Sprinkles…

When Avigail and JuJu (the grandchildren) come to visit Bobby (that’s me), they  look forward to breakfast. Usually, I bring them downstairs and serve breakfast before Kaitlyn wakes up.  Avigail likes to watch the birds at the bird feeders eating “birdie food”.  JuJu just barks at the birds.

Both grandchildren’s favorite breakfast is pancakes.  When time is short, I just buy frozen pancakes, microwave them and then serve them with whipped cream and sprinkles.   When Davida is around, she makes delicious, fluffy pancakes from scratch.  She adds chocolate chips and sprinkles to make them sweet, colorful and irresistible.

Here is Davida’s recipe:

INGREDIENTS

1 1/2 cups flour
dash salt
2 tablespoons sugar
1 tablespoon baking powder

1 1/2 cups milk
2 eggs

a few tablespoons chocolate chips, chocolate chunks and/or sprinkles

3 tablespoons butter or oil

DIRECTIONS

Pour flour, sugar, salt, sugar and baking powder in bowl and use a dry whisk to combine well.  Add milk and eggs until just combined, using a wooden spoon or heavy rubber spatula.  Do not overmix.  Gently stir in chocolate chips, chunks and/or sprinkles.

Heat butter or oil in large fry pan or spray griddle with cooking spray and preheat.  Reduce heat to medium and carefully ladle out pancake batter onto pan in small circles, leaving some room between pancakes.  Flip each pancake over when bubbles start to form.  Remove each pancake batch when both sides of the pancakes are golden-brown.

If making many batches, you may have to carefully wipe out the fry pan and refresh the butter/oil, so that the butter/oil does not burn.


VARIATIONS

You can substitute a ripe banana for some of the milk .  Just mash the banana well and use 3/4 cup of milk together with the banana in place of the full 1 1/2 cups of milk.

pancakes with sprinkles 2

A Month of Perfect Low-Carb Omelet Choices

I never enjoyed eating breakfast until I started a low-carb diet a couple of months ago.  In the past, I would skip breakfast because eating an early morning meal just never agreed with me.   I would feel nauseous after eating early and the nausea would linger, affecting my entire day.

Breakfast is important and especially so, if one is dieting.  It is essential to set aside time and place to enjoy each meal and snack throughout the day.   It is equally important to feel satiated and not deprived when dieting.  Breakfast is an essential piece of that wholesome feeling while dieting.

To compensate for  my nauseous relationship with breakfast, I now opt to eat breakfast only after my day has begun.  Nowadays, I start my day with an hour-long walk and then eat breakfast after my walk is complete. It is simply a wonderful morning routine.

Because my diet stresses low-carbs, cereals are not an option.  Most mornings, I opt to eat a two-egg omelet.  Of course, it is not in my nature to eat the same type of omelet all week long.  Therefore, I have been experimenting with different types of omelet toppings or fillings and I have listed some of my favorites.

Here is the recipe for the perfect omelet: (more…)

Simple and Easy 5-Ingredient No-Boil Lasagna


no-boil-lasagna-before-cooking


This is the simplest and most delicious lasagna recipe that you will ever make.  It requires one mixing bowl and one baking lasagna pan with no boiling .  It creates a firm and easy to slice lasagna with minimal effort and mess.  It takes only a few minutes to prepare and one hour of oven time.

You can use either no-boil lasagna noodles or regular lasagna noodles.  For the no-boil lasagna noodles,   I prefer the ones that are wavy.   If you opt to use regular lasagna noodles, just add more watered-down sauce in the last step to the corners of your pan.  That way, the regular lasagna noodles will soften sufficiently during the baking process.

It is one of our family favorites and it will become yours, too.

lasagna-portion (more…)

Simple Mini Cheesecakes with Gorgeous Garnishes

Shavuos is on its way!  Cheesecake is one of the staples of the upcoming holiday of Shavuos, since we are commanded to eat dairy foods at our festive meals (Countdown to Shavuos: Floral Inspirations and Dairy Recipes) on Shavuos.

This year, Don and I are still on a low-carb diet.    We didn’t want to forego cheesecake, but I wanted to make sure to use a minimum of carbs in my cheesecake preparation.  I decided to create portion-size cheesecakes to keep the portion size well-controlled.  This will allow us to enjoy a taste of heaven without feeling deprived, but keeping our diet “cheating” to a minimum.

Best of all, I skipped the carb-heavy crust and created some beautiful and tasty garnishes to embellish these simple and delicious mini cheesecakes.  They are light, delicious, fresh-tasting, gluten-free and simply divine.

This recipe does not require a springform pan or a water bath for baking.  It is best to bring the ingredients to room temperature just before preparation.  Preparation takes a few minutes and the baking takes less than 20 minutes.  It is best made in disposable or porcelain ramekins.  It makes 6 medium size or 12 mini ramekins.


Supplies

3-4 inch ramekins Set of 6 three ounce ramekins or aluminum disposable mini ramekins 39mm


Ingredients

1 pound cream cheese
1/2 cup sugar
Pinch of salt
1 teaspoon vanilla extract
2 large eggs
1/3 cup sour cream
1/3 cup heavy whipping cream

mini cheese cakemini cheese cake with strawberry and chocolate garnishmini cheese cake with chocolate barkmini cheese cake with chocolate bark only

Directions

It is best to bring the ingredients to room temperature before baking to prevent cracking, although I have made this recipe effectively with ingredients right out of the refrigerator.

Preheat oven to 325°F.

Spray ramekins with cooking spray.

Beat  cream cheese with eggs with a whisk, in a food processor or with a mixer, just until smooth and creamy.  Add rest of ingredients, beating and incorporating well.  You may have to scrape sides of bowl to incorporate everything well until combined, smooth and creamy.

Pour mixture into ramekins, filling 2/3 of the way to the top.  I find it easiest to pour the mixture from a glass measuring cup with a spout..

Bake mini ramekins for 15 minutes, 3-4″ ramekins for about 18-20 minutes.  Cheesecake will rise slightly.  Centers should be set, although the cheese cake will appear to be slightly jiggly.

Remove from the oven and  cool completely.  Chill the cheesecakes in the ramekins for at least 2 hours or overnight.

The cheese cakes can be served directly  in the ramekins or can be removed from the ramekins and served upside side.  If removing from the ramekins, carefully turn over on a serving plate.  Allow cheese cake to rest for a few minutes before garnishing.

Garnish with fruit, berries, edible leaves and flowers, chocolate bark (Chards of Colorful Chocolate Bark: Whimsical and Delicious)or whole or crumbled cookies.


Variations

This recipe can be made as a small single cheesecake.  Generously grease a round baking pan.  Prepare ingredients as above and pour ingredients into greased round pan.  Increase baking time to 30 minutes or until center is set.  Garnish as above.


Prepare a crust by crumbling 1 cup of  your favorite cookies with 3 tablespoons of melted butter or coconut oil.  Press into the bottom of each ramekin and bake in a preheated 350 degrees F oven for 10 minutes.  Allow to cool before pouring cheesecake batter over the crust.  Continue to bake as above.  You may have to gently coax cheesecake out of ramekin or pan using a smooth knife to unseat the edges of the crust.

mini cheese cake with crust and edible pansies