Creamy Mushroom Tortellini Soup

This blog is about preparing simple things that create a wow.  Simplifying recipes and preparations without sacrificing taste and presentation has really become an art form for me.

One of the “aha” things that I have discovered is that simple really is better.  It really is best to prepare a few delicious signature dishes with just enough variations to keep things interesting.  And, sometimes, a memorable meal can be created from just one recipe.

It creates less mess.  It creates less stress. And, it creates less waste.

This recipe is just that.  It is simple enough.  It is delicious and hearty.  And, the wow factor is that it is an entire meal in one bowl.

Enjoy!

INGREDIENTS
2 tablespoons oil or butter
2-3 onions, diced
2 cloves garlic, chopped
1-2 cartons mushrooms, sliced
1/2 cup wine
4-6 cups water
1/2 cup milk or cream
4-6 ounces frozen cheese tortellini
1 tablespoon salt
dash black pepper
directions

DIRECTIONS
Over medium-high heat, heat oil in a heavy-bottom stock pot. Add onions and garlic and cook until just starting to turn golden brown. Add sliced mushrooms and cook until mushrooms have softened and are releasing some liquid, about 10-15 minutes. Add wine and water and stir until combined and soup is just beginning to boil. Reduce heat to low and add milk or cream and stir until slightly thickened, a few minutes.

Carefully add tortellini and turn heat to high. Once tortellini float to top, lower heat to medium and cook for several minutes more, until tortellini are cooked through. Shut heat and cover pot until ready to serve.

Farro: The New Farfel

My son, Aaron, loves farfel.  It is his go-to Shabbos side dish and he looks forward to it every Shabbos.  Aaron likes it not too soggy with just the right amount of fried onions.  Most Friday mornings, Aaron offers to prepare farfel for himself.  Most Fridays, I rush to make it for him because his idea of a cleaned-up kitchen and mine are very different.

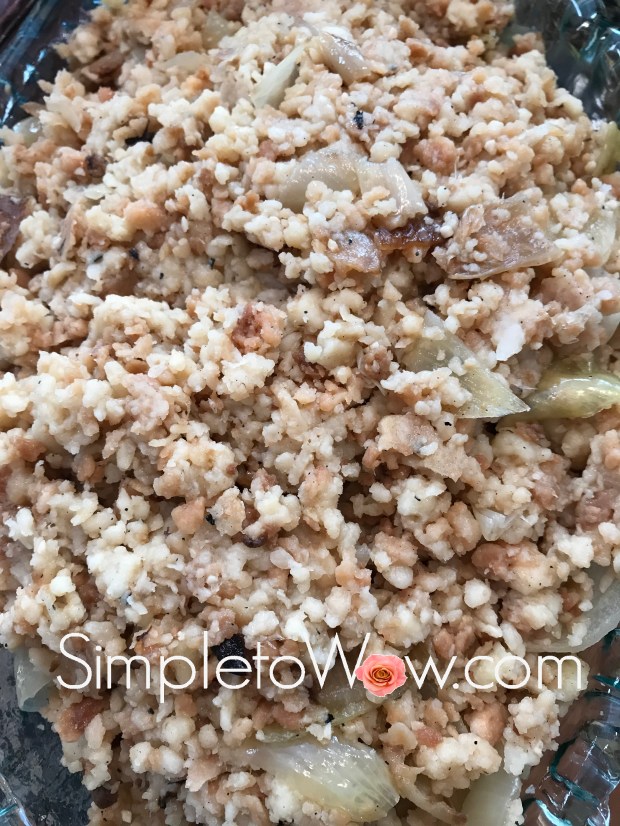
A few months ago, I prepared farro with sauteed onions in the rice cooker.  After running some errands, I discovered that the farro had been nearly finished.  Both Aaron and Leah sheepishly told me that they couldn’t resist “tasting” the farro and that it tasted just like farfel.    So, farro has now become the not-so-heimishe farfel.

And, cooking it in the rice cooker has taken the time, effort and guesswork out of preparing our not-so-heimeshe farfel.

 INGREDIENTS

1 1/2 tablespoons oil
1 onion
1 cup farro
2 1/2 cups water
1 teaspoon salt
dash of black pepper

DIRECTIONS

In a saute or fry pan, saute onion in oil, until soft and just turning brown.  Using a rubber spatula, scrape onions with oil into a rice cooker, reserving a spoonful for garnish.

Add farro, water and seasonings to rice cooker. gently stir to combine.  Cook until ready. All the water should be absorbed and the farro will be soft and golden-brown when ready.  Garnish with remaining onions.

farro the new farfel.jpg

Pulled Beef Babka

pulled beef babka ready to eat.jpg

Today’s stormy and snowy weather in the Northeast was already predicted several days ago.  The first snow of the season is exciting, especially when it greets us before Thanksgiving.  Although Thursdays typically are spent in the car, I sorted out my day to start early and finish in the early afternoon, before the storm was to hit.

I arrived home just as the snow was beginning to accumulate and I headed to the kitchen.   My kitchen faces the backyard and as I cook,  I can enjoy the snowflakes and the changing landscape.   With my head full of new recipe ideas and the snowflakes arriving furiously, I began to cook in the snow.

snowy backyard.jpg

The idea of a savory pulled beef babka has been consuming me.  I had already prepared pulled beef to serve Friday night and I had been mulling over the simplest way to transform some of the pulled beef into a savory babka to serve for Shabbos lunch.  One of my favorite shortcuts is to prepare one dish and serve it in a multitude of different ways.  Pulled beef is that type of recipe.

I thought long and hard about how to prepare this simply with minimal cleanup.  And, I think I nailed it.  Because, it really was simple to prepare.  And, it was easy to clean up afterward.  Best of all, the pulled beef babka was delicious and gorgeous.

Now, let’s see what my fifteen Shabbos guests say!

INGREDIENTS

1 lb. pizza dough or challah dough
1/2 cup barbecue sauce
2 cups thinly shredded  Pulled Beef


DIRECTIONS

Preheat oven to 375 degrees.

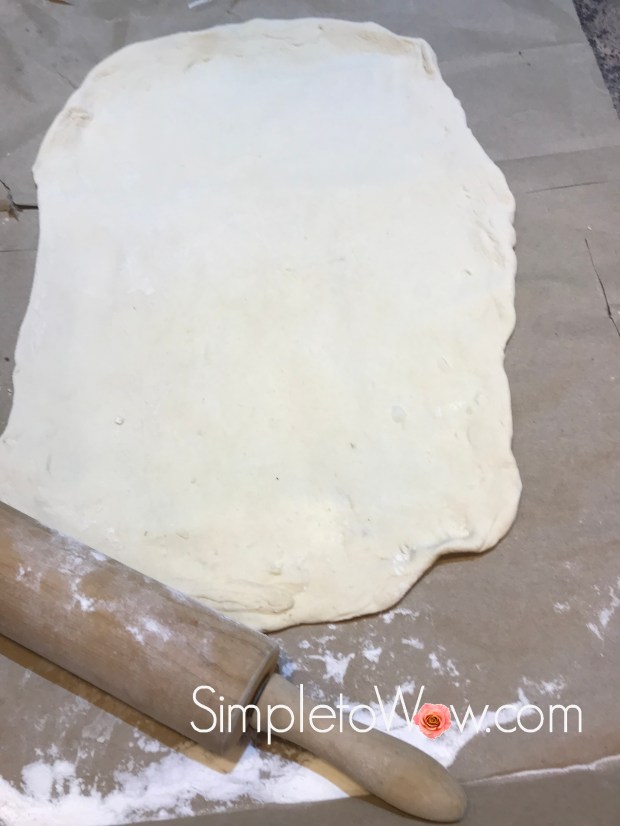
On a large piece of parchment paper, roll the pizza dough out into the thinnest rectangle that you can.

pulled beef dough rolled out.jpg

Spread the pulled beef onto the top of the rolled-out dough, leaving up to an inch of dough all around.

pulled beef babka spread over dough.jpg

Roll the dough jelly-roll style until completely rolled up.

Cut the roll in two lengthwise down the center.

Carefully twist the two jelly roll logs together, trying to keep the twists together as much as possible.  If some of the pulled beef protrudes, don’t worry.  Those pulled beef pieces on the surface will caramelize during baking and will add extra flavor and texture.

pulled beef babka twisted and ready for loaf pan.jpg

Carefully place the parchment paper into a loaf pan, trimming the edges if necessary.  Stick some extra pulled beef and brush extra barbecue sauce on top.

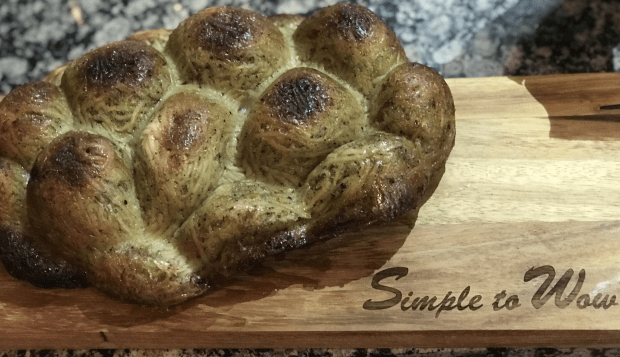
Bake until golden brown, about 40-50 minutes.

pulled beef babka ready to eat

Remove from the loaf pan and slice. Serve warm.

pulled beef babka slice.jpg

TIPS

Prepare a large batch of  Pulled Beef and serve the rest over rice or farfel

Tear open a paper bag and work over the inside of the bag.  Roll everything up after this messy preparation to save cleaning up loose flour and dough bits.


Yerushalmi Kugel Reinvented

yerushami kugel reinvented.jpg

Kaitlyn’s husband, Aaron, joined the family six years ago.  On our first Shabbos together, I prepared Susie Fischbein’s Yerushalmi Kugel from her Kosher by Design cookbook.  Aaron, always the gentleman, complimented the kugel profusely, telling me that it reminded him of a delicious kugel he had tasted in the Geula neighborhood of Jerusalem years ago.  Trying to impress my new son-in-law, I prepared that same kugel for him each and every time he would come for Shabbos.

I served him Yerushalmi kugel every Shabbos for the first four years they were married.

Yes, four years.

To be fair,  when I joined the Respler family, my father-in-law a’h would bring a bottle of Ginger Ale to the Shabbos table every time I visited.  He knew how much I enjoyed Ginger Ale.  And, I noticed.  And, thirty years later I no longer savor Ginger Ale, though Ginger Ale still makes me think of Dad.

Over time and with a gentle comment from Kaitlyn, I came to realize that although delicious,  this kugel needed a break.

I guess times have changed.  And, just maybe, Yerushalmi Kugel is different than my favorite soda.

I stopped preparing Yerushalmi Kugel for Aaron.  And, I let it go.

That is, I let it go until the last time Kaitlyn and Aaron visited.  After all, it was nearly two years since I stopped the Yerushalmi Kugel barrage.

I reinvented the Yerushalmi Kugel recipe.  It is now simpler.  It does not use margarine.  It has less sugar.  And, it looks like a challah.

I served it once again.  Aaron just smiled.

yerushami kugel reinvented.jpg


INGREDIENTS

4  cups water
1/2 cup oil
2/3 cup sugar
1  tablespoon freshly ground black pepper
2 teaspoons salt
12 ounces fine egg noodles, uncooked
2 eggs
4 tablespoons  brown sugar
2 tablespoons vegetable oil

SUPPLIES

silicone challah mold

DIRECTIONS

In a large pot, bring the water, oil, sugar, pepper and salt to a boil.  Turn off the heat and add the uncooked egg noodles. Stir. Cover the pot and let stand for at least 15 minutes.
In a separate bowl,  combine eggs, brown sugar and oil.  Add mixture to the noodle mixture and stir until well combined.

Generously grease pan or silicone challah mold with nonstick spray.  Brush generously with oil or coat with parchment paper.  Pour batter into prepared pan and bake at 375 degrees F for 1-1/2 hours.

Remove kugel from the pan immediately when done.

Enjoy!

Please Note: This post contains affiliate links from Amazon, which means I earn a small commission if you click and make a purchase.

Pink Baby Carriage Cookies: Simple to Wow

For Charley’s kiddush, Davida prepared these adorable carriage cookies.

They really were Simple to Wow!

baby girl carriages

INGREDIENTS

Hadar-Tirosh chocolate half-moon biscuits
Paskesz mini Oreo cookies
frosting
Pink piping or frosting

DIRECTIONS

Using a small spatula coated with frosting, adhere two half-moon cookies together at right angles to create base of carriage.  Since these cookies are double-sided,  use the vanilla side for the base of the carriage and the chocolate-side for the carriage hood.

With a dab of frosting, adhere two wheels to front of cookie carriage.  Pipe lines on hood of carriage for additional decoration.

baby girl carriages

Marshmallow Ballerinas for Kiddush

ballerina marshmallows

So many of you have remarked that they missed the blog posts over the summer.  I did too!

The summer was a hectic one and brought with it some exciting new house-mates and a brand new granddaughter.  Michelle and Scotty moved into our home in July, in preparation for the birth of their first child and their move to Atlanta.  Charlotte Jennifer בתי-ה  (Charlie) was born on August 6th and joined our family home, too, until after Yom Kippur.

charley barley

Charlie is named for Scotty’s maternal grandmother, Beverly בתי-ה (Batya) Deutsch of Los Angeles.  We have been regaled with the stories of Mrs. Deutsch’s delicious and generous cooking and her deliveries of massive amounts of sumptuous food to members of her community.  Although we never had the opportunity to meet Charlie’s namesake,  we feel like we have met Mrs. Deutsch through Scotty’s Mom,  June, as she embodies so many of her own mother’s virtues.

We hope and pray that our Charlie will fill the tall shoes of her namesake and open her own heart and home to others as her maternal great-grandmother has done.   It is a great legacy and we have great hopes and dreams for little Charlie.  After all, food is a universal symbol of love and Charlie’s life right now centers around her feeding schedule.

To welcome Charlie, we hosted a kiddush luncheon for our family and friends on the Shabbos that she was named.      It is a Jewish custom to host a Shabbos morning kiddush to honor the birth of a baby girl.  The concept of a kiddush for a baby girl is an opportunity to thank G-d for this enormous gift and for others to bless the new child that she be raised לַתּוֹרָה לָחֻפָּה וּלְמַעֲשִׂים טוֹבִים  (to Torah, wedding and good deeds)It is also to sanctify the importance of Jewish women and their vital role in Jewish learning and survival.

We learn throughout Tanach (Bible) and history that the Matriarchs and their female descendants graciously guided their families and ultimately, our nation through difficult family and historical challenges.   After all, Jewish identity follows matrilineal descent.   Jewish women were the ones who made seemingly small moves that changed the course of our nation’s history and who danced with Miriam at the Splitting of the Sea to celebrate the good that had been bestowed upon them.   In Jewish families, the mother is entrusted to feed and love her children physically and spiritually.  Her responsibility is to delicately instill faith in G-d and observance of mitzvos (good deeds) in her family.   We hope and pray that Charlie fulfills the potential in her name.  May she steer her own family through life’s travails and dance through  life’s simchas (joys).

To celebrate this special occasion, I created a stage of spinning ballerinas with the help of June, Scotty’s mother.  It was an adorable centerpiece that really was simple to create.

Let Charlie’s first act begin!

ballerina marshmallows

SUPPLIES

stryrofoam block
pink tablecloth
pink ribbon, matched to width of Styrofoam
gold ball toothpicks
white cupcake papers
stapler

INGREDIENTS

1 package large marshmallows
1 package mini marshmallows
pink sanding sugar
white or pink icing

DIRECTIONS

Place pink tablecloth underneath stryrofoam block and add a 6 inch perimeter all the way around Styrofoam.  Cut tablecloth to size and wrap tablecloth around Styrofoam, tucking in corners neatly as if wrapping a gift.  Staple tablecloth to bottom of Styrofoam in as many places as necessary to secure the tablecloth to the styrofoam, making sure to reinforce corners with extra staples.  Staple or glue ribbon around perimeter of the lined Styrofoam creating the ballerina stage.

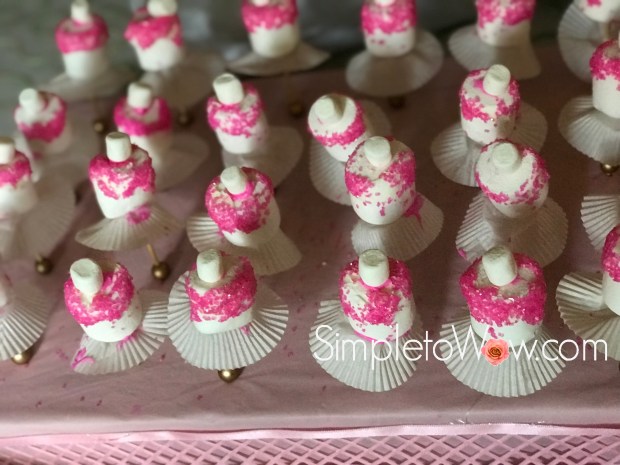
For each ballerina, dab icing on the bottom of each large marshmallow.  Dip the marshmallow into the pink sanding sugar, creating the decorative collar.

Using icing as paste, glue one mini marshmallow to the top of each large marshmallow and a cupcake paper to the bottom of each large marshmallow.  Allow to dry.

Using the large end of each of the gold ball toothpicks, pierce each ballerina marshmallow carefully through the cupcake paper end.  set up each ballerina on the stage, opening up the cupcake paper tutus to move in different directions.

Please Note: This post contains affiliate links from Amazon, which means I earn a small commission if you click and make a purchase.

.

DIY Sanding Sugar

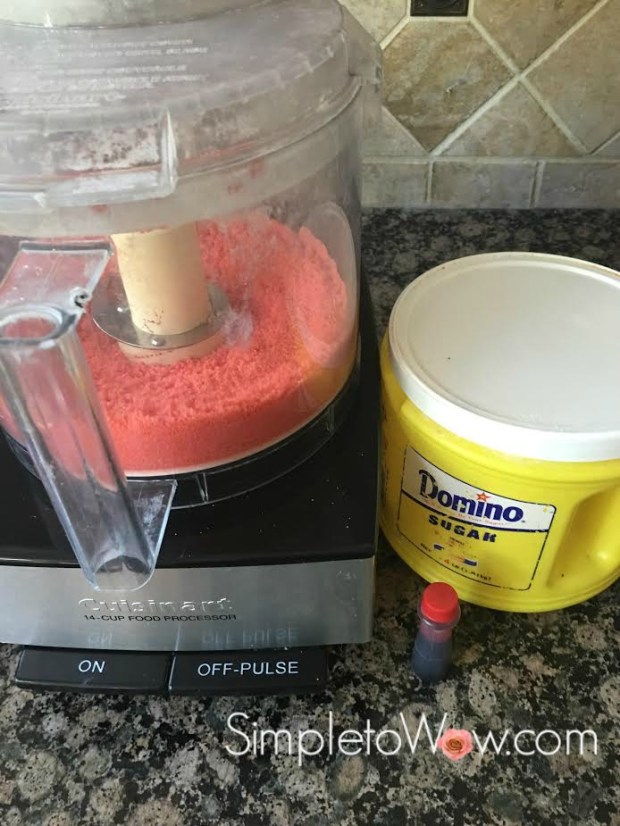
Sanding sugar adds a wow to so many of my simplest desserts.  While some recipes call for sanding sugar in colors that are impossible to find, others call for such minute or such immense quantity that it makes no sense to purchase.   And, sanding sugar is so simple to create in exactly the hue that you need using two simple ingredients.

Wow!


INGREDIENTS
1 cup sugar
food coloring

Combine 1 cup of sugar with food coloring, adding drops of food coloring until the desired hue and depth of color is reached.  Either pulse in food processor, using the s-blade or combine in a ziploc bag, kneading on outside of bag until well-combined.

Sukka Clouds of Glory

IMG_4857.jpg

Sunday night is the beginning of the holiday of Sukkos,  סוכות.  We are preparing for the holiday in Jerusalem amid a flurry of shopping, building and cooking.  To commemorate Sukkos, we constructed a temporary home called a Sukka that we use during this week-long holiday.   Our Sukka is built to commemorate the protective clouds of glory provided by G-d for the Jews in their sojourn in the desert after leaving Egypt.   These clouds of glory were miraculous in that they protected the jewish nation on all sides as they traveled through the inhospitable desert for forty years.

It is customary to decorate the Sukka by hanging decorations.   Every year, I add to my Sukka decoration repertoire.   This year, I decided to decorate the Sukka with clouds of glory.   The implementation really was simple.   And, I think the symbolic significance is a wow.

IMG_4856

SUPPLIES

12″ clear balloons
white cotton balls
fish line or twine

DIRECTIONS

For each balloon, take 7-10 cotton balls and stretch them to make them look cloud-like.

Holding the balloon at the neck, stretch the balloon neck and stuff the stretched-out cotton into the base of the balloon.

Blow up the cotton-stuffed balloon to the desired size.   Tie at the neck and secure to the Sukka..

Happy Sukkos!

My Grilled Chicken Mentor

My mother is one of the most persistent and resourceful people that I know. Nowadays, when I look in the mirror, I see my mother. And, I’ve learned so much from her determination.

During my childhood, my mother went back to college and then to law school. We grew up eating cereal for dinner most nights and we were okay with that, because that was our reality. My mother had never taken algebra or writing classes before college and my father tutored her along the fourteen year path from Math 101 to LSAT’s until her graduation from Law School.

It all started years before when she appeared in court for a traffic violation. As she explained the position of her car and the related facts, the judge was visibly impressed. He asked what her line of work was. She replied, “I’m a Hebrew school teacher.” The judge then asked, “And, what does your husband do?” My mother answered, “He’s a rabbinic student.” The judge then gave her a life-altering piece of advice before waiving the ticket. He simply said, “When you are done pulling your husband through Rabbinic school, ask him to pull you through Law School. You have the underpinnings of a great lawyer.”

That judge’s understanding of law was infinitely better than his comprehension of the Torah lifestyle that my parents had chosen.    After all, Torah is a lifetime pursuit and my mother never stopped “pulling my father through Rabbinic school”.  But, my mother listened carefully to his encouraging words and put the wheels in motion.   Her own father had been studying in Law School before the Holocaust and never completed his education. His dream was that one of his children would carry on that legacy.  Until the judge’s comment, my mother had never imagined that she would be the child to fulfill her father’s dream.

Fourteen years of education pursuing that dream as a working mother of four lively children had its challenges. And, it was not the typical course for a kollel (Rabbinic student) wife, especially in those days.   There were many nights where we attended college and law school with my mother.  And, there were those snarky comments from those that just didn’t understand or agree with the dream.  But, with G-d’s help, we all persevered and celebrated when my mother passed the Ohio Bar on the first try, after those long and difficult years of study.

And, then we began worrying.  How would my mother, the perennial student, manage as a self-employed attorney?  The fourteen years began when I was in fourth grade and now I was newly married and living elsewhere.   How would my mother transition from the theoretical to the practical?  How would she find the practical expertise to help her clients?

And, the worries persisted for only a short while.  Because, my mother was vested in the transition from school to practice.  My mother was determined to become the expert in certain aspects of law and she lacked the practical know-how.  Law school had taught her so much of the theoretical, but there were gaping holes in her practical application of the law.  And, her persistence, creativity  and resourcefulness were up to this new challenge.

My mother found mentors.   And, not just any mentors.  She sought out the experts in Cleveland in the areas of law in which she needed help.

She called the top Cleveland lawyers in each area of law expertise.  She introduced herself, gave a brief description of her background and asked if they would be willing to do a good deed and mentor her.  When they asked how she had found them, she told them that they were well-known as the experts in that area of law and she would be honored to have them as her mentors.

Just about every one of these top-notch attorneys agreed to mentor my mother.  They were kind, helpful and attentive to her and she was most appreciative of their assistance.  When she felt that she knew enough to manage on her own, she sent each one of these lawyers a small gift with a handwritten thank you note in her large scrawl.

That is mentoring done right.

It had worked so well for my mother that I tried it on my best friend, Lori.  In our house, she is the grilled chicken guru.  I had a long way to go to preparing the perfect grilled chicken.  So, I called Lori before Purim  and asked if she would mentor me by helping me prepare the grilled chicken for our Purim seuda (feast) on our grill so that I could watch and learn.

I learned how to grill chicken properly.  Mostly, I learned that I would never be able to match Lori’s meticulousness.  She had a cutting board and special knife set up for slicing each piece of chicken down the middle and a stopwatch for timing everything perfectly.

There was one important take-away from our backyard mentoring session that I have been implementing.  I never leave the backyard while anything is on the grill.  Although I skip the cutting board and stopwatch, I watch the grill fastidiously, making sure to turn and remove everything in the right time.  There are occasions that will test the doneness of my grilled chicken by slicing the thickest one open to check that there is no pink in the middle.  I leave the perfection to Lori and I thank her because the mentoring paid off immeasurably.

grilled chicken.jpg

Now, for some grilling tips:

(1) Use a great marinade and marinate for at least a few hours or overnight.  The marinade will tenderize and flavor the chicken.

(2) Clean your grill and spray with cooking spray before placing the chicken on the grill.

(3) Use your hot spots on the grill for the thickest pieces of chicken and cooler spots for the smallest pieces.

(4) Stay vigilant!  Do not leave your backyard until the chicken is ready.  Turn and remove pieces as they are ready.

(5) Make the grilled chicken yours by serving with torn fresh herbs, salsa or a homemade sauce.

Happy grilling!

Tisha B’Av: The Sour and the Sweet


The Hebrew date for this Shabbos is the Ninth of Av.   Tisha B’Av throughout history has been a day of Jewish national tragedy and great hope throughout the ages. Since Shabbos is designated as a day of joy rather than mourning, this year, we commemorate Tisha B’Av on Sunday, instead.

The calamities of Tisha B’Av began on this date in 1313 BCE with the pessimistic report of the twelve spies who returned from assessing the land of Israel.  Most of the spies reported that Israel would be impossible to conquer due to the giant inhabitants.  Only Caleb and Joshua spoke of the true beauty and blessing of the land of Israel.  That night, the Jewish nation cried, heeding the unfortunate pessimism of the spies.   On that fateful night, G-d warned us that this day would be one set aside for meaningful punishment and tears throughout the ages.

And so it has been.

As a nation, we have experienced so many Jewish tragedies on this fateful day:

The First Temple was destroyed by the Babylonians in 586 BCE

The Second Temple was destroyed by the Romans in 70 CE

The city of Beitar was destroyed by the Romans in 135 CE and the Jewish population of that city was annihilated.

Turnus Rufus, a Roman warrior, plowed the city of Jerusalem in 135 CE.

On this ominous date, the Jews were expelled from England in 1290, from France in 1306, and from Spain in 1492.

Germany entered World War I in 1914

SS commander Heinrich Himmler received formal approval for The Final Solution and thus began the Holocaust.

In 1942, the Jews were deported from the Warsaw Ghetto.

We cry for the pain of the losses, the devastation and  for the light of the connection to G-d. We shed tears over what we had and what we have lost.

However, we must find hope in our sadness, sweetness in the sourness of the past tragedies.  Our tears should not be the pessimistic tears cried by our ancestors on the night the spies returned.  They should be meaningful tears based upon the optimism and connection of Joshua and Caleb.  After all, pain indicates that we are alive and feeling.  Crying for so many centuries shows that we are still connected to the Holy Temple and the presence of G-d.  The month of Av means father and we must feel the embrace of G-d, our father, through the sour past and into the sweet future.

The Jewish nation looks to our leaders who taught us to find light, meaning and hope, even at the darkest times.   After the destruction of the Temple, Rabbi Akiva was walking in Jerusalem with three other great Rabbis.   They saw a fox running among the ruins of the Holy of Holies of the Holy Temple. The Rabbis began to cry at this sight of utter devastation.  Famously, Rabbi Akiva began to laugh.  He explained “The joyous prophecy of Zechariah is contingent upon the sad prophecy of Uriah. Uriah’s prophecy was that ‘Zion shall be plowed like a field.’ Zechariah’s prophecy was that ‘The old men and women will return and sit in the streets of Jerusalem…’ I see that the prophecy of Uriah has been fulfilled, and now I know with certainty that the prophecy of Zechariah will come to fruition…”.

Tisha B’Av has been a day of darkness and devastation and yet, we hope for the light.  As Leonard Cohen famously sang, “There is a crack, a crack in everything.  That’s how the light gets in. ”

May the darkness of Tisha B’Av be tempered by the laughter of Rabbi Akiva’s clarity of fate and faith.   May the light enter our lives from a clear understanding of  the cracks in the darkness.  May the sweet replace the sour as we feel G-d’s embrace and we hope for the  Final Redemption and the rebuilding of the Holy Temple.

kotel rice krispie treats

For Shabbos, I prepared Rice Krispies Treats to represent the Kotel (Western Wall) stones.  I placed green Sour Sticks between the stones for a sweet/sour flavor and to represent the live greenery growing in the cracks of the Kotel stones.

 INGREDIENTS
1 jar of marshmallow fluff
3 tablespoons margarine
6 cups Rice Krispies cereal

1 small bag of green sour sticks

cooking spray

DIRECTIONS

Line a baking sheet with parchment or waxed paper.  Cut sour sticks into small pieces.

Over low heat, melt margarine. Add marshmallow fluff and stir until completely melted. Remove from heat. Add Rice Krispies, 2 cups at a time. Stir until well combined.

Using a wooden spoon or a firm silicone spatula, press Rice Krispies treats evenly onto lined baking sheet.

Cut into brick-like pieces and display on a rectangular or square platter.  Intersperse green sour sticks pieces between the Rice Krispies Treats.

Crunchy Broccoli Kugel

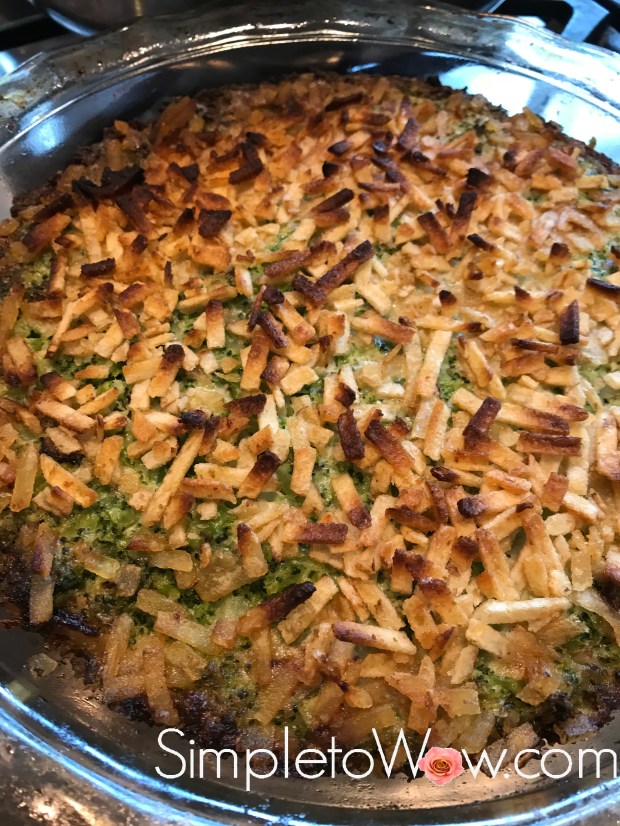
broccoli kugel with chips.jpg


By the time the three weeks rolls around, you, I no longer want to see bags of leftover Pesach (Passover) products.

Even if the bags are sealed.  And, especially if they have been flattened.

As I’m always trying to upcycle, the bag of Pesach potato sticks offered a new challenge.  I needed a way to use them in a way that would enhance my Shabbos menu.

Enter broccoli kugel.   We were hosting a mostly women’s Shabbos with two of my favorite of Leah’s friends joining us for Shabbos.  And, when that happens, we try to offer lots of vegetarian menu choices.

And, the gears started turning.  What if…I just used the potato sticks as a simple and crunchy topping to a broccoli kugel?  And this recipe was born.

My guests approved this simple, delicious and crunchy kugel for your viewing and tasting pleasure.

I’m sure you will love this recipe for its simplicity, texture and taste.

INGREDIENTS

1 bag (24 oz) chopped broccoli (see kosher notes)
1 large onion, sautéed
3 eggs
1 tablespoon mayonnaise
1/4 cup oil
1/2 cup seltzer
1 1/3 teaspoon salt
dash of black pepper

1/2 cup crushed potato sticks or chips

DIRECTIONS

Steam broccoli in microwave until soft. Preheat oven 425 degrees F. Combine all ingredients except potato sand pour into a 9″ round pie dish. Crush potato sticks and sprinkle on top. Bake for 35-45 minutes, until golden brown on top.

KOSHER NOTES

Kosher laws disallow the eating of any whole insects and therefore broccoli requires a process of soaking, rinsing and in some cases, pureeing, unless purchased with a reputable kosher hashgacha (certification).  Kashrut authorities differ on the proper checking of broccoli.  This blog was not designed to be your kosher authority, so please consult your local rabbinic authority regarding using and preparing broccoli.

Simplest Friday Ciabatta Ever

ciabatta-in-a-bag

For those who have eaten at our home on Friday night, you most likely have tasted Davida’s delicious no-knead ciabatta.   Since Davida will be spending the next few weeks in Israel, I decided that it was high time to take the ciabatta preparation back and make it my own.

Making something my own usually means taking some shortcuts and simplifying the whole process.  It also means using fewer bowls and utensils because I hate the clean-up. Cleaning sticky dough off of counters, bowls, spoons and towels can really be a nightmare.  And, truth be told, I do not have Davida’s baking precision or patience, anyway.

This ciabatta is almost as good as Davida’s with a lot less fuss.  It can be made on the same day, although it requires a minimum of six hours of rising time.  It still has the trademark thick crust and dough full of air bubbles inside.

INGREDIENTS

3 cups of high-gluten or bread flour
1 1/2 teaspoons dry yeast
1 1/2 teaspoons of kosher salt
1 teaspoon brown sugar
1 3/4- cups of warm water
olive oil

a sprinkling of additional bench flour or cornmeal

DIRECTIONS

In a large bowl,  toss flour, yeast, salt, and sugar.  Slowly pour in warm water, and knead with your hands or a large spoon until a soft sticky dough has formed without any spots or noticeable lumps.

Line a heavy loaf pan or narrow casserole dish with parchment paper and sprinkle a bit of bench flour or cornmeal.  Stretch dough out a few times to create air bubbles and place dough in parchment-lined loaf pan.  Drizzle a bit of olive oil on top of the dough and allow the dough to rise in a warm spot for at least six hours.

Lift dough with the parchment paper out of  the loaf pan and carefully leave on the counter or on a baking sheet.  Preheat the empty loaf pan in a 425 degree F oven for fifteen minutes.

Carefully remove preheated pan from oven (it will be very hot) and lift the waiting dough in its parchment paper back into loaf pan.   Bake uncovered for 30-40 minutes or until top is a light golden brown.

Remove ciabatta from pan and allow to cool before slicing.

Enjoy!


Peach Velvet Salmon

peach velvet salmon

I’ll share a little secret with you.

Last week’s leftover homemade dip or dressing becomes this week’s favorite marinade.  The reason is simple.  Dips have all the components needed in a marinade.  They have an oil base for moisture,  a flavor profile for taste and usually some acid for tenderizing.

I also like to use whatever seasonal items are on hand.  This week, peaches are plentiful and flavorful at the market and my planters are bursting with fresh chives.  These early summer flavors inspired this dish and my hungry family and friends approved it for publishing on the blog.

I used leftover Simple and Creamy Lemon Vinaigrette to coat the salmon fillets, but any dip, sauce or dressing will work.  I pressed freshly ripened peach slices and torn chives on top.

The salmon is simple and delicious with a taste of summer.  Enjoy!

INGREDIENTS

salmon fillets
Simple and Creamy Lemon Vinaigrette
1 ripe peach, scrubbed and sliced thin
Chives, torn for garnish

DIRECTIONS

Line cooking sheet with parchment paper or foil.

Brush salmon fillets generously with Simple and Creamy Lemon Vinaigrette or your favorite dressing or dip.   Press thin peaches slices and a few torn chives into salmon.

Bake at 350 degrees F for 45-55 minutes, until fish flakes easily with fork. Sprinkle some more fresh chives over salmon.

Baby Carriage Cookies for a Shalom Zachor

baby carriage cookies.jpg

Last week, Michelle’s friend, Daniella, gave birth to an adorable baby boy.  To welcome the baby to the world,  the family hosted a Shalom Zachor (lit: Peaceful welcome male).  Michelle prepared these adorable cookies for the Shalom Zachor, held this past Shabbos.

I was sitting next to my friend, Carol, at the Shalom Zachor.  She recommended that I try these delicious and adorable cookies, not knowing that Michelle had prepared them in my kitchen right before Shabbos!

The Shalom Zachor is such a beautiful tradition.  It is a wonderful opportunity to gather friends, family and community for desserts and drinks at the home of the new baby.  There are many reasons given for this delightful Jewish tradition:

  1. We simply welcome the baby to the first Shabbos of life outside the womb.
  2. We thank G-d on the first Shabbos for the baby surviving the birth.
  3. Since we know that all blessings for the upcoming week emanate from the preceding Shabbos, we open our home to the blessing of family and friends before the upcoming bris (circumcision).  
  4. While in the womb, an angel teaches the baby the entire Torah.   At birth, the teaching angel touches the baby near the mouth and the baby forgets all that he has learned.  The baby’s lifetime duty is to relearn his Torah and family and friends gather to console the baby on having lost his Torah knowledge and study partner.
  5. Shabbos and the birth of a baby boy are auspicious times for peace and we invite our community to our homes in the hope of the creation and continuity of peace between family and community

INGREDIENTS

Hadar-Tirosh chocolate  half-moon biscuits

Paskesz mini oreo cookies

frosting

blue/pink piping or frosting


DIRECTIONS

Using a small spatula coated with frosting, adhere two half-moon cookies together at right angles to create base of carriage.  Since these cookies are double-sided,  use the vanilla side for the base of the carriage and the chocolate-side for the carriage hood.

With a dab of frosting, adhere two wheels to front of cookie carriage.  Pipe lines on hood of carriage for additional decoration.

Leah’s Smelly Drunken Bridesmaid Dress

Who knew that a gown could benefit from a few shots of vodka?

Leah was asked to be a bridesmaid recently and she asked my opinion if she should accept.  Personally,  I am not a fan of bridesmaids for so many reasons.  I don’t like the stress, drama, cost and showiness inherent in having bridesmaids at weddings.  So, I expressed my rather strong opinions on the matter to Leah.

And, Leah countered my negative bridesmaids views with arguments like, “it’s important for the bride”, “this one is an easy color to find and useful for future weddings” and “it should not create any stress at all.”

To which I conceded and told her that the final decision was hers.  And, that I would stand by whatever decision she made.

But, I knew from the beginning that was not going to be as easy as she led me (and herself) to believe.

The color scheme was metallic.  Leah already had a gorgeous gold dress given to her one of her friends.  The gown was expensive and heavily beaded with classic styling.  She asked me what I thought.  “Beautiful,” “classic”  and “free” were some of the adjectives that I used to describe the gown.  I thought the gold gown fit Leah beautifully and that we were done.

Leah disagreed.  And, I knew we were in trouble.

Leah asked her cohorts to advise her on the gold gown.  They all agreed with Leah that the gold gown was just not right for her.

So, Leah found two more gowns to try.  The first gown was an Amazon special in just the right color.  The second gown was a rose gold beaded bridesmaid gown in her size being sold by a former bridesmaid in the Midwest.  She worked out a price and shipping and a few days later both the Midwest gown and the Amazon gown arrived.

The Amazon gown was constructed of slinky cheap material and the Midwest gown was perfect except that it was a tad short for Leah’s 5’9″ height.  After some more consultation with friends and co-workers,  Leah decided to keep the Midwest gown and chose the perfect shoes to wear with the dress.  Everything seemed right in the world of bridesmaid gowns.

Often, there is the calm before the storm.  And, sure enough, the winds started up again on the morning of the wedding.  I woke up and Leah was right there with an offer.  “If you can help me with this challenge, I’ll let you write it up on your blog.”

Now, that was an offer I couldn’t refuse.

It seemed that Leah hadn’t noticed that the Midwest gown arrived with a stench that was unbearable.  Somehow, with all the try-ons and consultations, no one had noticed that the gown had an odor.  Overnight, Leah had already tried everything she knew to remove the odor unsuccessfully.

So, I did some research.  And, the research came up with the following diluted suggestions: lemon juice, baking soda and vodka.  I tried them incrementally.  First, I tried a solution of lemon juice and water.  That helped a bit.  Then, I added some baking soda to the solution.  That helped a bit more.  Finally, I soaked the armpits of the lining in a  solution of vodka.  I pinned a few dryer sheets on the armpits and put the dress outside to dry.

And, thankfully, the tale of the Smelly Drunken Bridesmaid Dress was over after a few shots of diluted vodka.


INSTRUCTIONS:

To remove smell from clothing without washing, try any combination of the following steps.  Test a small unnoticeable area first to ascertain how it will affect the color of the garment.

(1) Create a solution of equal parts of lemon juice and water.  Use a brush to apply to smelly area or dip the garment in the lemon juice solution.

(2) Add a teaspoon of baking soda to the lemon juice solution created in #1.  Use a brush to apply to smelly area or dip the garment in the solution.

(3) Combine 3 parts of vodka and  2 parts of water.  Use a brush to apply to smelly area or dip the garment in the solution.

(4) Pin dryer sheets to the affected area.


Baby Stroller Fruit Display

fruit.png


There are events that just make you stop and take note.  This past Shabbos, our family was part of one of those life events.

My best friend, Lori, welcomed her first grandchild into this world on Shabbos, Parshas (Torah portion)  Shelach.  Since the baby was born on Shabbos, the Shalom Zachor (festive gathering on first Friday night after birth of baby boy) and Bris (circumcision) were held back-to-back this past Shabbos, Parshas Korach.  To complicate matters, our shul’s social hall was already booked for a Bar Mitzvah, so Lori opted to host both events at her home.

I so wanted to help Lori pull this together because Lori is like the sister that I never had.  I called her daily asking for an assignment, but Lori assured me that the whole family was pulling together to prepare for these exciting and daunting celebrations.    So, I took matters into my own hands.  Actually, I took matters into the capable hands of my youngest daughter, Davida.  And, of course, I wasn’t disappointed.

Davida carved a watermelon into this baby stroller complete with a nectarine baby sipping his bottle.  It was not too complicated to prepare and it really created a wow at the celebration.

Thank you, Davida!

Mazel tov, Lori!

SUPPLIES

1″ baby bottle
Mini-skewers or heavy toothpicks
Permanent marker 
melon baller
paring knives

INGREDIENTS

one oval-shaped watermelon
honeydew or cantaloupe
peach or nectarine
4 oranges or clementines

DIRECTIONS

Using a heavy knife, cut watermelon in half to create base of stroller.

Using a melon baller, scoop out the two halves of the watermelon and other melon(s) and place in a large bowl.  Using melon baller and paring knives, clean out the cavity of the two watermelon halves so that cavities are smooth.

Reserve the larger watermelon half for the stroller cavity.

Using a heavy knife, cut the other half of the watermelon in two to create the stroller hood.  Cut v-shaped notches to create a decorative edge on the larger half.  On the smaller half, cut a small band to use as the stroller handle.  Discard the rest of the watermelon.

Carefully secure the hood to the stroller cavity using Mini-skewers or heavy toothpicks inserted into the middle of the rind of each section.  If skewers are too large,  trim so that they are the right length to secure the watermelon sections together.   Secure the stroller handle to the front of the stroller cavity in the same way.

Carefully secure citrus “wheels” to stroller using  Mini-skewers or heavy toothpicks.

Draw eyelashes on the nectarine or peach and carefully push the baby bottle into the “mouth”.

Refill the watermelon with the melon balls, leaving a small space for the nectarine baby.  Place the baby into the melon carriage.


End Of Year Gifts

end-of-year gifts

Now that the end of the school year is fast approaching, it is the time to show appreciation to those who have helped our children through the school year.  Many schools collect money through a class parent or the PTA to offer a more substantial gift to the teachers, but there is still a special place for a personal gift and card expressing appreciation for a job well done.

There were years that I took the time to create personal gifts and there were years that I opted to just go with the class gift.  Now that my children have all graduated from elementary, middle and high school (phew!), I regret that I didn’t take the personal route more often.

And, here is why.

A personal display of appreciation really is important.  Words and gestures really do matter.  And, they last for a very long time, sometimes a lifetime.  This is a lesson I should have learned earlier, but it is an important lesson imparted to me by my daughter, Michelle.

One year, on the first day of school, Michelle came home with a big smile on her face.  “I have the meanest teacher in the school,” she delighted in telling me.

Most parents would worry.  I knew to trust Michelle because I understood why she was smiling.  Michelle was up to the challenge of taming the “meanest teacher in the school.”

It was hard for me to believe that this teacher really was the ogre that Michelle and her friends believed.  After all, she was a well-coiffed woman with the sweetest smile ever.  Michelle assured me that the smile meant nothing and that this teacher smiled even as she made snarky comments to the class.

I waited patiently.

Over the course of the school year, Michelle seemed to have gotten used to this teacher.  Even as her friends complained, Michelle worked at finding favor in the eyes of Mrs. Mean and almost begrudgingly, Mrs. Mean took a liking to Michelle.

In those days, I would write a poem as part of the year-end gift for those teachers that really went the extra mile.  I wasn’t sure that this teacher had really been extraordinary and I was not planning to write that poem.  Michelle thought differently.

A few days before school ended, Michelle asked me if I had written a poem for Mrs. Mean.  I came up with a long list of excuses.  “I’m too busy.”  “I just can’t find the time to do it.”  “I’m not sure your teacher would even care.”

Michelle countered with “what are you so busy with?” “It’s as important as anything else on your to-do list.”  “You don’t know what a handwritten poem will do for this teacher.”  And, finally, “Whatever is on your to-do list, I will do for you so that you can write the poem for my teacher.”

Now, that was an offer that I couldn’t refuse.  So, Michelle cleaned the kitchen, set the table and did everything else that I was supposed to do.  And, I sat down begrudgingly to write the poem.  Of course, I encountered writer’s block.  The words just wouldn’t flow because I really didn’t have much to say.

But, Michelle had a whole year’s worth of material.  And, she was armed with the conviction that this poem was so vital to her teacher.  So, after she completed all my chores, Michelle fed me the material.  And, I wrote that poem.  And, Michelle cheerfully delivered that poem to her teacher.

And, years later, I encountered that teacher.  She was still so well-coiffed and smiley and I still had a hard time believing that she was a monster teacher.  She remembered Michelle so vividly and asked about her.  And, she told me that the gift and the poem are still on her windowsill where she reads the poem often.  And, that the poem written by my pen and Michelle’s heart is one of her most treasured items.

Mrs. Mean would never know that the challenge that year was not in reading, writing, science or spelling.  It was for Michelle to take on the meanest teacher.  And, we all know that Michelle nailed the challenge in so many ways.

So, take the time to create a memorable gift that shows appreciation for a job well done.

Here are some helpful tips:

(1) Include something personal that shows you paid attention.  Choose items in the recipient’s favorite color or theme.  Include a personalized item, a gift card to their favorite store or favorite magazines, candy or food items.

(2) Find an interesting basket or box to contain multiple items.  Find a container that matches the theme and is the right size to include all the items selected.

(3) Use clear cellophane wrap or cellophane bag to wrap items and secure corners with clear packing tape.

(4) Shred brown paper grocery bags in paper shredder to use as filler.

(5) Secure with a thick ribbon and trim top of cellophane wrap .

(6) Always include a personal note.  Reference something that made your experience with this teacher or mentor unique and memorable.  You never know if yours will be the note that your recipient treasures for a lifetime.


Blood-Orange Glazed Salmon

blood orange glazed salmon 1.png


When I was a little girl visiting my grandparents in Willamsburg, Brooklyn, I remember my Oma and Opa bringing home blood oranges as a special treat for Yom Tov (Jewish holiday). I was traumatized by these small oranges tinged with bloodish red coloration throughout.  I really believed that there was blood inside these oranges and no matter how much my grandparents tried to convince me that there was no blood inside these oranges, I was still horrified by the thought of blood oranges.  Of course, I refused to eat them and was repulsed by the mere sight of these oranges with the red-tinged flesh.

I had forgotten about this aversion to blood oranges.  Until a few years ago.

I cannot even remember exactly when Trader Joe’s began stocking blood oranges regularly.  And, blood-orange became a flavor sensation in sorbet and drinks.

And, I decided that it was time to give blood oranges another chance.  Thankfully, my adult self became fascinated with the tropical flavor and tye-dye whimsy of these oranges.

This simple salmon dish highlights the unique flavor and beautiful coloration of these oranges.

blood orange glazed salmon 2.png

INGREDIENTS

salmon fillets
⅓ cup packed brown sugar
1 teaspoon Worcestershire sauce
2-3 tablespoons orange juice
2 garlic cloves, minced
1 blood orange, sliced thin for garnish
Scallions, sliced thin for garnish

DIRECTIONS

Line cooking sheet with parchment paper or foil.

Brush salmon fillets with just enough Worcestershire sauce and orange juice to be absorbed by the salmon fillets. Sprinkle with brown sugar. Drizzle a bit more Worcestershire sauce and orange juice over brown sugar. Sprinkle minced garlic and sliced scallions over salmon.

Bake at 375 degrees F for 40-50 minutes, until fish flakes easily with fork. Serve with sliced scallions and thin blood orange slices.

Heimeshe Farfel

heimeshe farfel.jpg

My son, Aaron, loves farfel (flake-shaped pasta popular in Jewish cuisine).

When he was younger, Aaron used to love to visit Bubby and Zaidy in Kew Gardens Hills, Queens.  While he enjoyed spending time with his grandparents, he was excited by the fact that there was nearly a dozen places where he could buy prepared farfel within a short radius of  Bubby and Zaidy‘s home.  That meant something back then.

Some things haven’t changed.

When Aaron comes home for Shabbos, I try to prepare heimeshe (home-style) farfel.  Nowadays, there are not many stores in our hometown that sell Heimeshe farfel.  Most sell egg barley, which is more like orzo than like farfel.  Heimeshe farfel is typically made from an egg noodle dough and/or matzo and is toasted before being cooked.  It has trademark light and dark coloration, reminiscent of the color of matzo.

Farfel is something that reminds me of my childhood.  That uniquely hemishe side dish evokes images of a past era where life was so much simpler.   On my visits to Monsey or Brooklyn, I can easily find this ingredient, much to Aaron’s delight.  And, when I prepare this simple and delicious dish, he doesn’t even need to leave the house to enjoy it!

INGREDIENTS

2 small bags heimeshe farfel
1-2 onions
garlic, minced (optional)

oil
1 teaspoon salt
dash of pepper

1 1/2- 2 cups of water

 
DIRECTIONS

Over medium-high heat, saute onions and garlic in oil, just until starting to brown.  Add  heimeshe farfel and toast for 1-2 minutes.  Add 1 1/2 cups of water and bring to a boil.  Reduce heat to low and stir occasionally for 15-20 minutes, making sure that farfel doesn’t stick to the bottom of the pan.  Add a bit more water in intervals, if necessary.  Farfel should be dry and soft when ready.

Perfect Strawberry Smoothie

perfect strawberry smoothie.png

INGREDIENTS

1 cup frozen strawberries
1 cup milk
2 tablespoons honey or strawberry daquiri mix
whipped cream (optional)

SUPPLIES

blender
straws

DIRECTIONS
Add strawberries, milk and honey to blender jar. Blend until smooth. Carefully pour into tall glass and garnish with whipped cream.  Add a thick straw.

Enjoy!

Please Note: This post contains affiliate links from Amazon, which means I earn a small commission if you click and make a purchase.


Sliders with Onion Slices and Frizzled Beets

slider with frizzled beets.jpg

Most of the time, we eat sliders without the bun.  And, most of the family enjoys their burgers and sliders very well-done.  That means that the burgers need some pretty exciting accessories to keep them moist and interesting.  This burger started out as an experiment and ended up with rave reviews.  It is a well-done burger that still has character and juiciness.
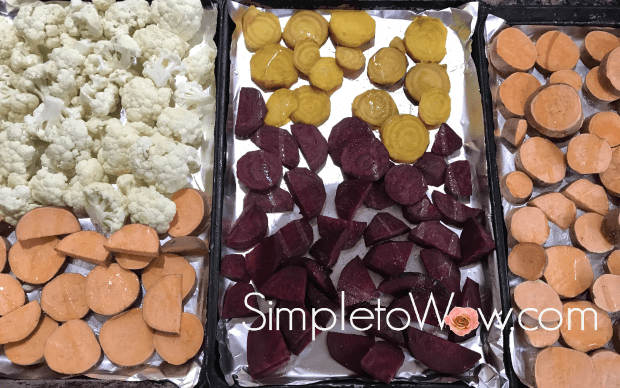
When thinking about how to dress up an ordinary burger, of course, onions came to mind.  After all, onions make just about everything exciting.  They are sweet and hearty, flavorful and versatile.

And, as you know,  I have become an unwitting ambassador for beets.  Beets are maligned and ignored, mostly because of the unfortunate texture that many people have encountered in their childhood.  Thankfully, beets are making a comeback, mostly because boiled beets are a very small part of the beet preparation pie-chart.  In reality, beets are beautiful and exciting with a variety of textures depending upon their preparation.  They are inexpensive, widely available and are best eaten raw or roasted.  Beets are truly are one of the most exciting vegetables available.

This recipe starts in a pan on the fire and ends in the oven.  It is forgiving and will wait for you.  The end product is a juicy well-done slider atop a soft, succulent onion slice with drizzled beets on the top.

Enjoy!


SUPPLIES

food processor

INGREDIENTS

1-2 beets, shredded
1-2 onions
all-beef sliders

DIRECTIONS

Preheat oven to 375 degrees F.

By hand or using the shredding blade on the food processor, shred or grate beets.

Slice the onions and place on the bottom of a baking dish.  Pour water to coat the bottom and halfway up the onion slices.  Place in hot oven.

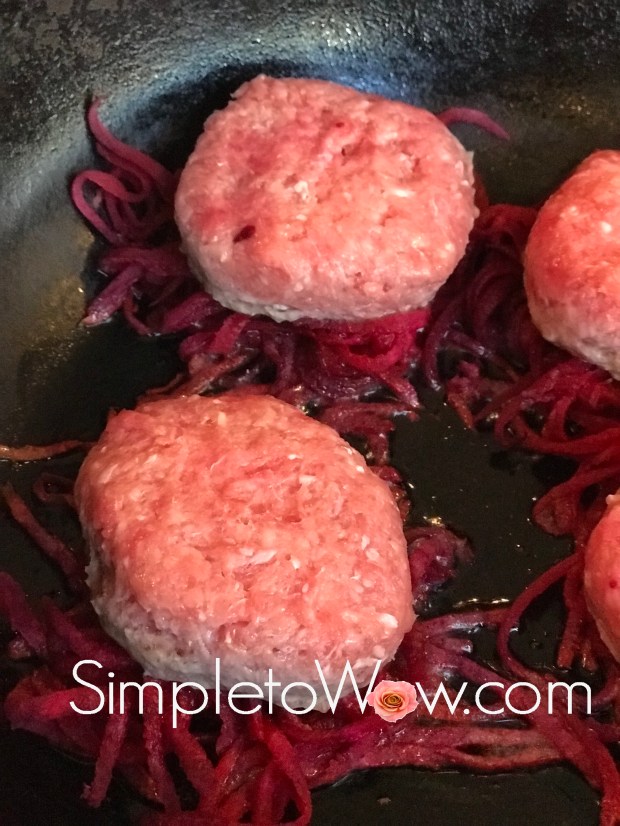
Heat sliders and shredded beets in fry pan.

sliders with frizzled beets in pan.jpg

Turn sliders until both sides are well-cooked.  Carefully place sliders, frizzled beets and some of the pan drippings on top of the onions in the baking dish and place bake in the oven.

Bake for 15 to 30 minutes in the preheated oven.

Roasted Vegetable Sliders

roasted vegetable sliders 2

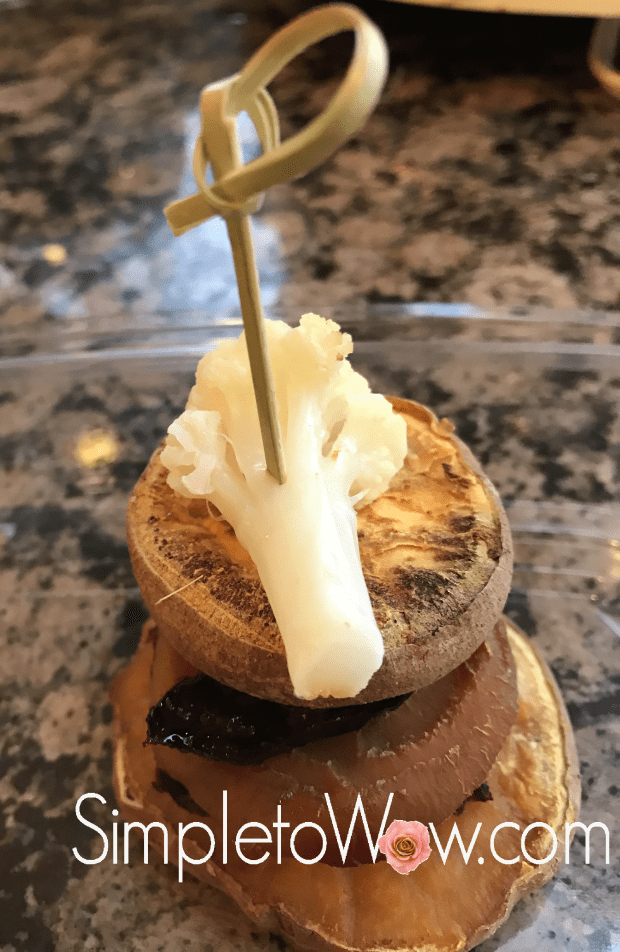
This appetizer is one of the most beautiful, delicious and versatile ones that I have up my sleeve.  It is simply a stack of roasted vegetables secured with an interesting pick.  As you already know, I roast vegetables almost every Erev Shabbos (Friday afternoon) in preparation for our Shabbos.  Everyone enjoys the vegetables before Shabbos and I try to make enough that we still have enough to enjoy at our Shabbos meals.

This appetizer can be dressed up with an herb garnish on top.  It can be served with a dollop of Jalapeño  Dip, or even topped with some melted cheese  for a dairy meal.

TIP

If roasting squashes or sweet potatoes, scrub peel and leave on before roasting.  This will help the roasted vegetable hold together so that it can be stacked.

roasted vegetables for sliders.pngroasted vegetable sliders

Onion-Smothered Salmon

salmon smothered with onions 2

I use salmon in a host of recipes.  I prepare it as a main dish for an easy weeknight dinner.  I prepare it or use in Shabbos appetizers like Individual Sushi Salads and others.  Salmon is versatile and popular.  Its distinctive taste makes it one of our family favorites.

Since I use salmon in so many different ways, I am always on the hunt for new preparations.   This past Shabbos, I made a Tex-Mex Shabbos appetizer.  The star of this appetizer was the onion-smothered salmon.   It was so delicious and yet, so simple.

While I normally roast salmon at a higher temperature, baking the fish at 350 degrees F yields a dish that is so delicious and so moist.   I normally saute a large batch of onions in advance of my marathon Shabbos or Yom Tov cooking.    I sometimes even freeze the leftover onions.  This dish is the perfect one to use these batch onions.


INGREDIENTS

salmon fillet
soy sauce
onions
oil
DIRECTIONS

Saute onions in oil or butter, just until soft and starting to brown.  Line a baking sheet with parchment paper or foil.  Lay salmon fillet on the lined sheet and brush with soy sauce.  Smother with sauteed onions.

Bake at 350 degrees F for 30-50 minutes, depending on size of the salmon fillet.  Salmon should be cooked through, thickly flaking and moist when ready.

salmon smothered with onions


5-Ingredient Cheesecake Brownie Bites

cheesecake brownie bites.jpg

Cheesecake and brownies.  Brownies and cheesecake.  Two delicious and decadent desserts that deserve each other.

This recipe is simple and oh, so delicious.  It is the perfect combination of these two classic dessert flavors.  The recipe begins with brownie mix and end up as the perfect combination of brownies and cheesecake, marbled to perfection.  It is forgiving and memorable.  The texture is decadent and fudgey.  It will wow you in its simplicity and it will wow you in its delicious taste and texture.

INGREDIENTS
1 brownie mix
8 ounces cream cheese
1 teaspoon vanilla sugar
1/4 cup sugar
1 egg

DIRECTIONS

Preheat oven to 350 degrees F.

Prepare brownie batter according to package instructions and pour into individual cupcake papers or ramekins.

Using a mixer or the s-blade of the food processor, mix together cream cheese, sugar, and vanilla. Add the egg and beat  until creamy and smooth.

Add a dollop of  cheesecake batter on top of each of the brownie batter ramekins. Use a skewer, small knife or chopstick to swirl the cheesecake and brownie batter.

Bake for 20-30 minutes until the top of the cheesecake is turning golden brown.  Test with a toothpick inserted into the center of one ramekin.  If a bit of the batter sticks to the toothpick, you will have a fudgier end-product.  If you wait until the toothpick comes out clean, you will have a more cake-like end-product.

cheesecake brownie bites