Lazy Weeknight Pulled Beef

I really am lazy about cooking during the week.  Just ask my family.

I have learned to take just about every shortcut to the dinner table and love to prepare weeknight dinners that require very few ingredients, very little time and a minimum of effort.

To justify my weekday laziness, I make sure that weeknight dinners are not fussy or complicated.  I still try to use fresh ingredients, but I really downgrade the effort.

I have a repertoire of tried and true simple and delicious weeknight dinner recipes.  All require very little prep time.  Some cook or roast quickly.  Others cook all day.

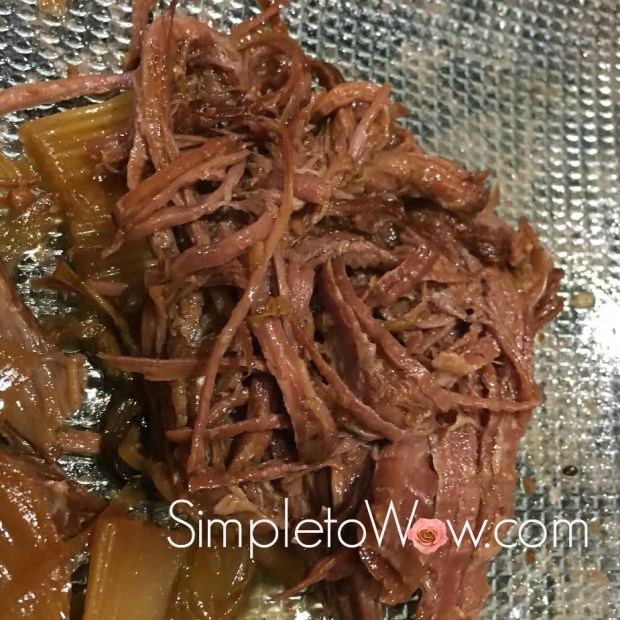
This one is prepared in the morning, just before I start my day.  It is made in the crockpot and once the ingredients are placed, it requires virtually no attention.  It cooks all day, so that it greets you at the end of the day with the wonderful aroma and taste of slow cooked pulled beef.

The pulled beef is best pulled or shredded an hour or two before eating and then returned to the sauce in the crockpot.  It can also be pulled or shredded and eaten right before serving, but will yield a slightly drier product.  It is up to your schedule and taste.

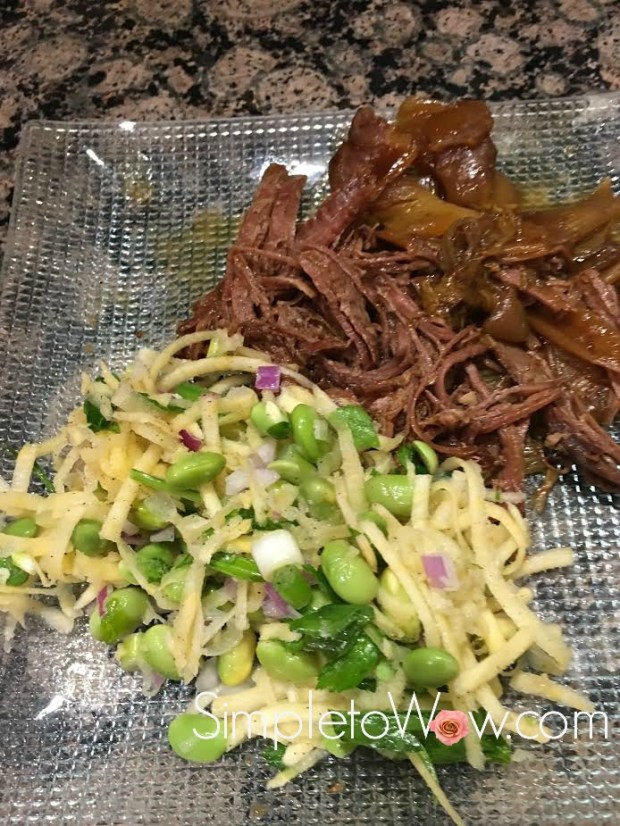
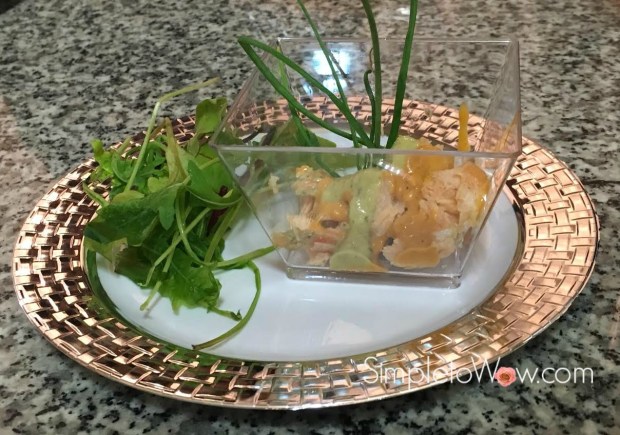
It can be served on a roll or over a bed of pasta or rice.  I like it best served alongside a shredded or spiralized salad.  Here I have served it with a side of rutabaga and edamame salad.

pulled-beef-in-crockpot-plated

This recipe has the elements of a lazy dinner, but the taste of a most delicious and decadent weeknight dinner.

It is simple…and it truly infuses the lazy with wow.

pulled-beef-in-crockpot-on-plate

pulled-beef-in-crockpot-ingredients

INGREDIENTS

small boneless roast to fit your crockpot (I use a london broil or small brisket)
2-3 onions and/or shallots, peeled and cut into wedges
4-5 cloves garlic (optional)
3-4 stalks celery, cut into 1-2 inch sections (optional)
1/2 cup water or broth
1/3 cup barbecue sauce
2-3 tablespoons brandy (optional)

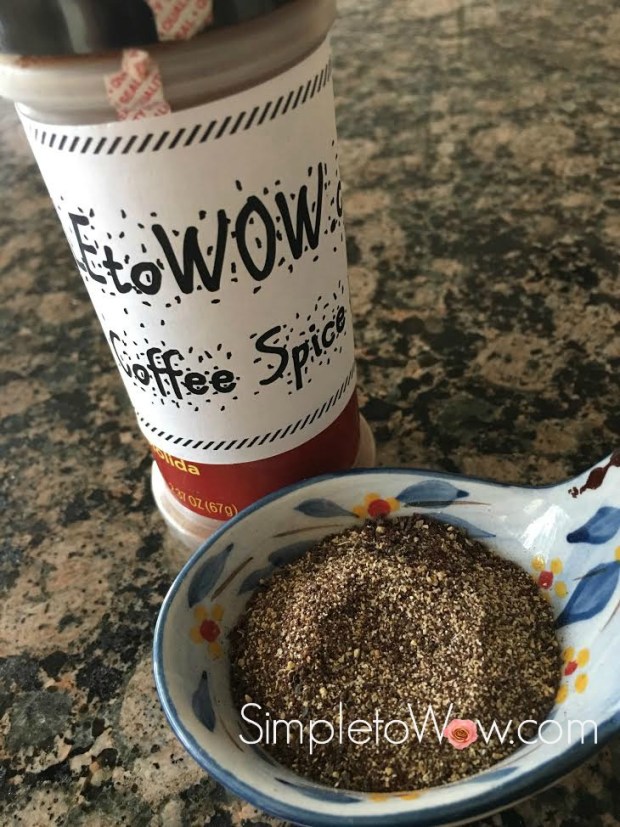
your favorite seasoning or rub (optional)

DIRECTIONS

Cut onions, shallots, celery and garlic and place on bottom of crockpot.  Place roast on top of vegetables.  If roast is larger than crockpot, just cut to fit and place in two layers, one on top of the other.  Dilute barbecue sauce with water or both.  Pour diluted barbecue sauce and brandy over roast.

pulled-beef-in-crockpot

Set crockpot to high or auto (see notes below) and cook for 6-8 hours.

pulled-beef-in-crockpot-before-shredding

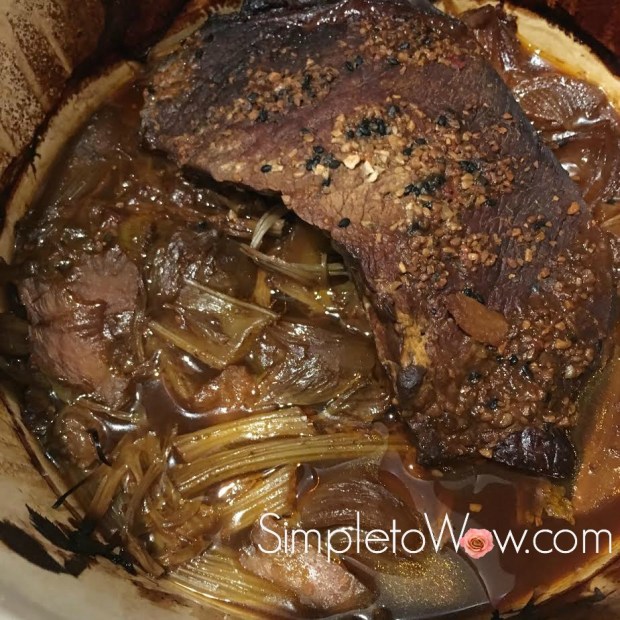
About an hour before serving, remove beef from crockpot.  Place two forks in the center of the roasts, tines against tines and pull toward edges of roast.  Keep pulling until the roast is shredded.  Return roast to crockpot, ladle some sauce over the shredded beef and set to low or auto until ready to serve.

pulled-beef-in-crockpot-cooked

NOTES

Know your crockpot and which settings to use.  I cook this recipe on the high setting of my six quart crockpot for 6-8 hours and only turn it down to low or auto once the beef has been pulled and the pulled beef has been returned to the sauce.  Your crockpot may need to be set to auto for the duration of the cooking. If you are not sure, start this recipe at high. Check on the recipe after 4 hours.  If it tastes ready, then turn it down to auto or low until serving. If not, cook for longer, checking every hour.

Simple Baked Potato Kugelatkes


kugelatkes-serving-suggestion

kugelatkes

Traditionally, we eat potato latkes (pancakes) on Chanukah.  We eat foods prepared with oil to commemorate the miracle of the oil in the Beis Hamikdash (Holy Temple) once the Jews were victorious over the Greeks.  After the miraculous war, the Jews entered the desecrated Temple and only found enough pure olive oil to light the Menorah (candelabra) for one day.  The tiny  bit of oil lasted for an entire eight days, enough time for the Jews to get new pure oil to light the Menorah in the Beis Hamikdash, so that the Menorah would be continuously lit.

While latkes are so traditionally linked to Chanukah, there are so many foods that contain olive oil that may just as well commemorate the oil miracle of the Temple.

Truth be told, I hate to fry latkes.

It just takes too much time, too much splatter and it is so hard to manage while entertaining a houseful of guests.

I usually make one batch of latkes just for the first night and find other make-in-advance olive oil alternatives when we entertain guests over Chanukah.

This year, I have adapted my favorite potato kugel recipe to make baked potato kugelatkes.  I made them in a bundt-shaped muffin tin, but they can easily be baked in a cupcake tin, as well.

They are simple to prepare, beautiful and delicious to behold, require no frying and can be prepared well in advance of the Chanukah meal.

(more…)

An arrangement of Single Roses: Simple, Upcycled and Breathtaking

roses-in-sequence

Last week, I hosted Sheva Brochos (one of seven wedding after-parties, each with seven blessings) for the children of my dear friends, Andrea and Michael.  The chosson (groom) and kallah (bride), Davidi and Efrat, are a gorgeous and young couple.

The Sheva Brochos was hosted together with five other couples, all close friends of Andrea and Michael.  Since this Sheva Brochos was toward the end of the week of partying, we created a theme and menu that would be lighthearted, interesting and youthful.

We decided to host the Sheva Brochos as a Spanish fiesta and it was wonderful!

We set up a taco bar with pulled beef, pulled chicken,  chili, an assortment of taco shells and rice choices.  There were lots of toppings and salad choices for the vegetarian and diet-conscious guests, too.  Over the next weeks, I will share recipes, menu and table setting inspirations from this wonderful Sheva Brochos.

As a backdrop to the Sheva Brochos fiesta, I challenged myself to create centerpieces to reflect the youth and glamour of this couple and the fun inspired by the fiesta theme.

Since we had not allocated much of a budget for centerpieces, I created centerpieces that were inexpensive but sensational.  I set up long rectangular tables and round tables.  For each long table, its  centerpiece spanned four feet in length, six inches in width and amazingly, only required six flowers that I had upcycled from last week’s floral bouquet.  For each round table, its centerpiece spanned two feet in length, six inches in width and amazingly, only required three flowers that I had upcycled from last week’s floral bouquet.

For the floral arrangements, I selected the straightest two  inch by six inch by eight foot lumber beams from my local Home Depot.  Since I was using both long and round tables, I purchased two eight foot length beams and had the lumber cutter at Home Depot cut them.  I cut one beam into two four-foot beams and the other into one four-foot beam and two two-foot beams.

I now had three four-foot beams and two two-foot beams.  On an outside table, I sanded the wood with my hand sander, paying particular attention to the area that had been cut at Home Depot. The sanding took only a few moments per beam, but really smoothed the beams, removing all splinters and jagged edges.

I then sprayed the top and the sides of each beam with metallic gold spray paint and let it dry for several hours.

Finally, I lined up 6 clear 4″ square glass vases at equal intervals along the beam.  I placed a floral blossom in each vase with just an inch of clear water pearls

Voila!

roses-in-series-on-sequin-tablecloth

SUPPLIES

6 large open-blossoms
four foot section of 2″x6″ wood beam
metallic gold spray paint
6 clear 4″ square glass vases
clear water pearls (optional) or water

TOOLS

hand sander

INSTRUCTIONS

Sand rough edges of beam.

Spray paint the top and all sides of the beams in your favorite color.  I used metallic gold spray paint

wilted-roses

Cut  blossoms off of stem.

Set up glass vases at equal intervals along beam, aligning first and last vases with the edges of the beam.

Add one inch of water or  clear water pearls to each vase.

Carefully place each blossom in each vase.

roses-in-series-on-sequin-tablecloth
Please Note:  This post contains affiliate links from Amazon,
which means I earn a small commission if you click and make a purchase.

Simple Coffee Spice Rub

simple-coffee-rub


I am not a coffee drinker.  I just never developed a taste for coffee.  To me, it tastes bitter and unpleasant.  Thankfully, I wake up with enough energy that I don’t need the boost that coffee provides.

Interestingly, though, I love the aroma of coffee.  While the taste does not please me, the aroma of coffee is something I really enjoy.

There isn’t another member of my extended family that shares my distaste for coffee.  In fact, it is rare that I meet someone else who does not start their day with a cup of coffee.

Despite my not drinking coffee, we stock quite a varied supply of coffee in our home to satisfy the different but obligatory morning coffees of our family.  Some like dark roast, others light roast; some enjoy favored coffees and we have some visitors that actually prefer instant coffee.

Since we do not brew coffee on Shabbos (our Saturday Sabbath), our coffee drinkers either brew it in advance, buy cold brew coffee or use instant coffee for their Shabbos java.

I find that I have lots of leftover instant coffee, not fresh enough for the morning brew, but with enough aroma and flavor for a spice rub.  I store this instant coffee in the freezer until I am ready to use it.  Once I make the spice rub, I store the coffee rub in a spice container or ziploc bag in the freezer, as well.

The aroma and texture of this rub really adds that special wow to a roast. This spice rub imparts an amazing quality and flavor, even to my coffee-impaired taste buds.

If you are concerned about the caffeine in the coffee rub, feel free to use decaf coffee, instead.

INGREDIENTS

4 tablespoons ground coffee, regular or decaf
1 teaspoon kosher salt
2 tablespoons granulated garlic
1 heaping teaspoon black pepper
1/2 teaspoon cinnamon
1/2 teaspoon ground ginger

DIRECTIONS

Combine by shaking in container or ziploc bag.  Cover tightly and store leftovers in freezer

london-broil-spice-rub


A Homemade Warm Compress

I woke up earlier this week with a stiff neck that just seems to get achier.  Today, the pain radiated to my shoulder and down my arm. It seems like I may have pinched a nerve.

The pain and stiffness really needs some warm relief.  My husband, Don, suggested that I design a microwavable compress to ease the pain.

I did some internet research and found that it is quite simple to fashion a compress filled with uncooked rice, beans, oatmeal, barley or flaxseed.   The filler is placed into a cotton (non-synthetic) sack and tied, velcroed or sewn closed.

I looked around the house and found that I had plenty of raw beans, a brand new oven mitt and a variety of cotton socks.

With just a few moments of prep time, I was sitting at my desk writing this blog post with a warm compress soothing my neck and shoulder.


SUPPLIES

Cotton sock or oven mitt

Beans, uncooked rice or barley

Naturally dried herbs, essential oils, contents of an aromatic tea bags or spices for fragrance (optional)


DIRECTIONS

Fill a sock or oven mitt at least halfway with beans, rice or barley.  I found that it was easiest to use a stack of coffee filters to move the beans into my compress.

homemade-hot-compress-beans-in-coffee-filters

For a pleasant aroma, you can add a bit of dried herbs, fragrant powder or oils to your compress.

Seal the compress by tying a knot, placing a resealable velcro strip or sewing the ends shut.  For a firm compress, seal it with very little empty space.  For a looser compress, leave empty space before closing your compress.  A looser compress will allow for draping it around your neck and moving the beans to conform to your painful area.

Heat compress in microwave for about one minute, keeping an eye on the microwave during heating just in case the filler or compress starts to smoke.

Before applying compress, check that it is not too hot.  If it feels too hot, shake it and wait until it is just the right temperature for your aches and pains.


NOTES

Be careful!  Check that the compress is not too hot before applying it.  It is hard to tell how hot the microwaved compress will get, so please check before applying to your skin.

For extra safety against burns, place a layer of cloth (like a towel or t-shirt) between your skin and the compress.

Do not use heat therapy for acute injuries or if you are pregnant or have diabetes, poor circulation, high blood pressure or heart disease.   If you are not sure, consult with a doctor before using a warm compress to ease muscle or joint pain.

Simple Baked Sweet Potato Cubes

sweet-potato-cubes

When I was a young girl, my Aba (father) would tell me that sweet potatoes were nature’s candy. He would also tell me that sweet potatoes are best when cooked right in their skin. I couldn’t imagine how anyone could compare a root vegetable to candy and why anyone would be interested in preparing sweet potatoes in their ruddy skin.

Now, I finally get it.  Aba is right.  Sweet potatoes are nature’s candy.  And, there are real health benefits to preparing sweet potatoes, especially without peeling them frst.

Sweet potatoes are high in Beta Carotene and contain significant levels of potassium, iron, vitamin B-6 as well as vitamins E and C.   They are a good source of fiber when eaten unpeeled.   They are delicious and nutritious.

This is a very simple and delicious recipe, perfect for a weeknight side dish.

INGREDIENTS

3-4 sweet potatoes, scrubbed
salt
garlic powder
cinnamon
1 teaspoon oil

DIRECTIONS

Preheat oven to 275 degrees F

Cube sweet potatoes.  Line a baking sheet with foil or parchment paper. Drizzle with oil and sprinkle lightly with salt, garlic and cinnamon.  Bake uncovered in center of oven for 60 to 90 minutes.  Sweet potato cubes should be firm and a bit chewy on the outside and soft on the inside.


Enjoy!

Simple Rutabaga and Celery Saute

sauted-shredded-rutabaga

For me, one of the most exciting things about this blog is the introduction of new ingredients to myself and my readers.

It is really about extending one’s comfort zone and affording new ingredients a chance to shine.

For some, it is about exploring new ingredients.  For others, it is about using old-hat ingredients in new and creative ways.  When I meet one of my blog followers, I am often told that through simpletowow.com, they have tried something new that has now become one of their favorites.  That makes my heart swell.

For one of my readers in Chicago, Simply the best salad…ever! has helped her discover so many new tomato varieties. She had always been a one-variety round red tomato consumer. Through the blog, her eyes were opened up to a rainbow of tomato shapes, colors and flavors.

Another one of my readers had never thought to use raw beets in the past.  His experience with beets had only been limited to cooked beets.  Balsamic Beet Slaw: Easy, Fresh and Delicious introduced him to raw beets as a delicious salad ingredient.

Then, there are the ingredients that people love to hate.

Rutabagas falls into that category so easily.

This fall, I have been seeing waxed turnips in the produce market.  Waxed turnips are also called rutabagas or swedes and have a very unique flavor and texture.   They are an excellent source of potassium, vitamin C and manganese, and are a great source of fiber, thiamin, vitamin B6, calcium, magnesium, and phosphorus.

rutabaga-half-peeled

The taste of a rutabaga is difficult to describe.  It has a sweet earthy bitterness that I find to be delicious and most interesting.  Technically, rutabaga is a cross between cabbage and turnip.  Rutabagas are usually waxed, hence they are also known as waxed turnips. Using a sharp paring knife, it is important to remove the peel of the rutabaga along with the wax coating before using it as an ingredient.

Rutabaga is one of our family’s new favorite ingredients.  I hope that you will learn to love it, too.

This quick saute is one of our simplest and most favorite rutabaga preparations.

(more…)

Baked French Fried Onion Fish

Last night, as I was preparing dinner, I thought: If everyone likes french fried onion chicken, why not use the same technique for baked fried fish?  It is such a simple and delicious way to prepare a main dish.

I had bought some fresh haddock and was in the mood of experimenting with a new recipe.  I brushed the fish with a light coating of mayonnaise and then french fried onions.

I baked it in a 375 degree F oven to 25 minutes.

It was a winner!

4 thin white fresh fish fillets (try flounder, tilapia, haddock or cod)


INGREDIENTS

1 cup French Fried Onions

mayonnaise

4-6 white fish fillets


DIRECTIONS

Preheat oven to 375 degrees F.

Brush each fish fillet with a light coating of mayonnaise.
onion crusted cod with mayo.jpg
Dip each mayo-coated fish fillet into french fried onion crumbs.
onion-crusted-cod-before-cooking
Place onion-coated fillets onto parchment or foil-lined baking sheet.  Press extra onions on top.
Bake for about 25 minutes or until fish is fully cooked.
onion-crusted-cod

Enjoy!

NOTES

I did not crush the onions and they produced a more sparsely battered fish fillet.  If you like a thickly battered fish fillet, I would suggest crushing the onions in a ziploc bag first.

Rockstar Roasted Cauliflower

Last week, I roasted cauliflower as a weekday side dish.  It is one of our favorite sides and it is the perfect accompaniment for most any main dish.  I have served it with all types of fish, poultry and meat.  It is always a star side dish, so well received at my table.

But, at last week’s dinner table, the roasted cauliflower was a rockstar.

rockstar-roasted-cauliflower

Each cauliflower floret was soft and velvety on the inside and crunchy and toasty on the outside.  Everyone around the table commented that it was a whole new level for roasted cauliflower.

And, I scratched my head to try and figure out just what made it so delicious.

I replayed the dinnertime meal preparation in my head.

It had been one of those hectic weeknights.  I had been working in my home office and instead of roasting the cauliflower on high heat from the beginning, I placed it in the oven on medium heat to cook alongside the Baked French Fried Onion Chicken until the chicken was ready.  Once the timer for the baked chicken sounded, I removed the chicken from the oven and increased the heat for the cauliflower to my normal 450 degrees F roasting temperature.

That seemed to be the magic.  I had started the cauliflower off at medium heat and had increased the heat after 25 minutes until it was finished.

I was determined to recreate the superstar cauliflower the next night.  And, I did!


INGREDIENTS 

1-2 heads cauliflower, separated into florets and cleaned (see kosher notes)
Oil
Kosher Salt
Granulated or fresh minced garlic (optional)


DIRECTIONS

Preheat oven to 375 degrees F.  Line baking sheets with parchment paper or greased foil.

Spread cauliflower in a single layer on baking sheet(s).  Drizzle with oil and lightly sprinkle with kosher salt and garlic.

Cook for 25 minutes and then increase temperature to 450 degrees F for 20-25 minutes more, checking that vegetables are soft and browned before removing from oven.


KOSHER NOTES

Kosher laws disallow the eating of  any whole insects and therefore  cauliflower require a process of soaking, rinsing and in some cases, pureeing.   Kashrut authorities differ on the proper checking of  cauliflower and some disallow its use altogether.  This blog was not designed to be your  kosher authority, so please consult your local rabbinic authority regarding using and preparing cauliflower.

Lazy CrockPot Chicken with Dumplings


Now that the weather has started to get colder, my crockpot is busy most days.  I have been making soup, stews and all in one dinners in the crockpot.  Crockpot cooking is simple and requires very little attention during the cooking process. The only thing different about crockpot cooking is getting all the ingredients into the crock early in the day, so that they will have enough lazy time to cook and be ready in time for dinner.

This recipe for chicken with dumplings is one of those comfort dishes that never fails to impress.  It warms the soul on those cold, dark wintry evenings.  It is simple, but really packs a satisfying bite. The chicken can be cooked with the vegetables and served without the dumplings. The dumplings soak up much of the liquid and make this dish extra hearty.


INGREDIENTS

1-2 pounds boneless skinless chicken breasts, uncooked
2-3 cups chicken broth or water
1 onion
carrots
3-4 cloves garlic or garlic powder
4 stalks celery
mushrooms
1/2 teaspoon kosher salt
4 teaspoon fresh ground black pepper

Dumplings

1 eggs
1 tablespoon oil
1 teaspoon salt
1/4 teaspoon black pepper
1/2 cups water
1 cup all-purpose flour


DIRECTIONS

Combine all ingredients in the crockpot and gently stir to combine.  Cover and cook on high for 5-6 hours.

chicken-and-dumplings

One to two hours before serving, prepare dumplings:
In a medium bowl, stir water, egg, oil, salt, and pepper. Gradually add flour, and stir until thick. Drop dumplings into the crockpot using a spoon or a fork. Do not stir until ready to serve. Gently ladle out portions.

chicken-and-dumplings-on-plate

NOTES
Know your crockpot and which settings to use. I cook my soup on the high setting of my six quart crockpot for about 6 hours and only turn it down to low or auto once the soup has been completed. Your crockpot may need to be set to auto for the duration of the cooking. If you are not sure, start your soup at high. Check on the soup after 3 hours. If it tastes ready, then turn it down to auto or low until serving. If not, cook the soup for longer, checking every hour.

This recipe can easily be made with bone-in chicken and can be adapted to incorporate your favorite vegetables.

TIPS

When I anticipate preparing something in the crockpot, but know that my morning will be hectic,  I prepare the ingredients (including seasonings and liquid) in the crock the night before.  I store the crock filled with ingredients in the refrigerator overnight.  To be safe, I usually keep the poultry ingredients separate until ready to cook.  Then, all I have to do is place the crock into the pot and plug in the next morning.  It eliminates the stressful morning rush and offers me a hearty cooked dinner several hours later. This recipe will require you to prepare the dumplings 1-2 hours before serving. The dumpling dough is very forgiving and can be prepared the night before and just added to the crock 1-2 hours before serving.

Burlap and Roses: Simple Yet Wow!

Burlap was never one of my favorite textures.  A few years ago, it seemed that everyone was decorating with burlap.  There were burlap tablecloths and table runners, burlap lampshades, burlap accents and flowers.  I was just burlapped out.

Although I love the idea of upcycling and using everyday objects in extraordinary ways, burlap just never made it to my list of favorites.

Until now.

This season, burlap has reappeared.  This time, I have seen it used sparingly and well-paired with other textures.  So, I thought, I would give it a try.

I purchased some burlap mesh on clearance and considered some ways to use it.

Here is the first.  I love the pairing of rough and tough, unsophisticated burlap and elegant, delicate roses.  I love the interplay between the textures of the different flowers, the recycled glass vase and the coarse burlap.  And, burlap kind of fits my decorating style. It works well with the earth tones in my home and matches the ecclectic nature of my decorating taste.  Yes, I have actually decided to embrace burlap.

burlap-arrangement-supplies

SUPPLIES

large square glass vase
three bunches of flowers in coordinating colors and differing textures
burlap mesh
wire,  pipe cleaner or floral tape
straight stick, skewer or chopstick
water


TOOLS

pruning shears or strong scissors Fiskars pruning shears

DIRECTIONS

Trim each of the bunches of flowers to a different height, leaving the fullest flowers to be the shortest and the sparsest flowers to be the tallest.  To keep flowers fresh, strip away all leaves that would be submerged in the water.

Arrange each bunch of flowers in the vase, setting each into a different corner of the square vase.

burlap arrangement-flowers only.jpg

Fill with water.

Cut a 6-8″ piece of the burlap mesh and roll.  Gather the center of the roll and tightly secure with wire, floral tape or pipe cleaner.  Secure to stick and place in the center of the arrangement.


Voila!


That Turkey! Baked Apple

turkey-baked-apple-on-glass-plate


I love warm baked apples.  There is something simple about the flavor and preparation, yet it is one of those recipes that never seems to get old.

For Thanksgiving, I decided to dress up my Simply Delicious Baked Apples and create a Thanksgiving-inspired baked apple turkey.

It really was simple.  Oh, and whimsical.  And, of course, delicious! (more…)

Thanksgiving Quinoa Salad

Thanksgiving celebrates the bounty of the harvest.  Giving thanks is central to Judaism and offering thanks for agricultural success (Bekurim: First Fruits from Hollister) is an important Jewish theme.  Traditionally, foods like cranberry, almonds and corn are included in the American Thanksgiving celebration.  This salad celebrates the breadth of so many delicious salad ingredients, some old, some new and some recreated.  The addition of pumpkin pie spice to the toasting of the seeds and nuts adds a familiar Thanksgiving taste and aroma to this salad. (more…)

Baked Cranberry Salami Slinky

Baked salami is a real treat in our house.  It is one of those simple recipes that I prepare to serve in the afternoon before a festive meal.  It is a treat for Erev Shabbos (Friday afternoon)  and Erev Yom Tov (afternoon before a Jewish holiday).

I reasoned: why not dress the recipe up for Thanksgiving and serve it Erev Thanksgiving (Thanksgiving eve), too? (more…)

Homemade Pumpkin Pie Spice

 pumpkin-pie-spice

Pumpkin Pie Spice is synonymous with the flavor of autumn and is a taste so well associated with Thanksgiving.  It imparts that special favor and aroma to pies, soups, stews, roasts and salad toppings.  Most recipes call for just a bit of this spice and it is comprised of spices that you probably have in your spice cabinet, anyways.  So, why buy a new bottle if you can easily make just what you need?

This recipe can be used to prepare your own homemade pumpkin pie spice.  It is a simple blend of cinnamon, nutmeg, ginger and ground cloves or allspice that can be easily adjusted to your taste and recipe.

pumpkin-pie-spice

INGREDIENTS

1/4 cup ground cinnamon

1 tablespoon nutmeg
2 tablespoons ginger
2 teaspoons allspice or ground cloves

DIRECTIONS

Add the spices to a spice container or glass baby food jar.   Shake to combine.

NOTES

Play with the proportions to suit your own taste.

Add a unique label to your pumpkin pie spice jar.  Using glue stick, I adhered a custom simpletowow.com  label to an empty spice jar.  If you would like to print your own simpletowow spice jar label, feel free print  out this pumpkin-pie-spice-label   The paper label also allows you to jot down the date when you prepared the mix so that you can keep your pantry fresh and organized.

It’s All About Plating: Simple Baked Apple Dressed Up

I love simple things done right.

Delicious and beautiful does not need to go hand in hand with complicated and time-consuming.  It can certainly be something simple just presented in a unique way.

I love plated appetizers and desserts.  It dresses up the meal and makes each guest feel pampered.  It also allows for the simple combination of colors, flavors, temperatures and textures that  create a wow to the palate and a wow to the eye.

I have found that good plating needs white space in order to properly appreciate the elements on the plate.  Very often, I will use  three different elements on a plate and will opt for a larger plate so that each plate element will be able to be appreciated without being crowded.

Here is a plated dessert where the Simply Baked Apple is served warm, the chocolate sorbet is frozen and the star fruit and whipped cream dress up the plate.

I have used a large square appetizer plate as the canvas.  I placed a small plastic square plate under the apple and a taster spoon under the chocolate sorbet.  Placing the frozen sorbet in a taster spoon or small bowl allows me to portion out the sorbet in advance.  This saves me time and effort during the meal.  I added whipped cream to the center of the apple right before serving and placed a candy gummy ring to the top of the apple.  I finished the plate with a few slices of starfruit.

baked-apple-dessert

Roasted Rainbow Skewers

Rainbow vegetables are a side dish staple in our home.  I prepare several trays of roasted vegetables just about every Friday.  I leave some trays of roasted vegetables on the counter for an Erev Shabbos (Friday afternoon) treat and save the rest for the Shabbos meal.  Most of the roasted vegetables are enjoyed before Shabbos even begins.

I usually choose vegetables that are in season and easy to clean.  My favorites are peppers, zucchini, beets and sweet potato.  My recipe for Simple Rainbow Roasted Vegetables is simple and yields beautiful and deliciously caramelized vegetables.  My kids have grown up with this “vegetable candy” as part of their Erev Shabbos (Shabbos eve) experience.

Recently, I have been preparing cabbage in different ways.  I saute cabbage (Colorful Confetti Cabbage), prepare it in kugels (Simple Cabbage Kugel and Kale and Cabbage Kugel: a Pareve Souffle) and use it in a myriad of salad combinations (Colorful Red Cabbage Quinoa Salad, no oil necessary and Asian Red Cabbage Salad…Simple and Wow).

Cabbage has many health benefits.  It is low in calories and carbs and high in fiber and vitamins. Cabbage is low in saturated fat and boasts high levels of vitamin C and vitamin K.  Best of all, it is inexpensive and available year-round.

For this recipe, I skewer wedges of red and green cabbage as well as zucchini. Once skewered, I drizzle olive oil and sprinkle garlic and kosher salt before roasting.  The skewers are simple and just delicious!

rainbow-skewers-on-plate


rainbow skewers ingredients.jpg

INGREDIENTS and SUPPLIES

1/2 head red cabbage, cleaned and cut into small wedges
1/2 head green cabbage, cleaned and cut into small wedges
2 zucchini, scrubbed and sliced

heavy skewers

SEASONINGS

Extra Virgin Olive Oil

Granulated or fresh minced garlic
Kosher Salt

DIRECTIONS

Preheat oven to 425 degrees F.  Line baking sheets with parchment paper or greased foil.

Skewer cabbage wedges and zucchini.  Spread skewers in a single layer on baking sheet(s).  Drizzle with olive oil and lightly sprinkle with kosher salt and garlic.

rainbow-skewer

Roast for 40-45 minutes, checking that vegetables are soft and browned before removing from oven.

rainbow-skewers

VARIATIONS

Lightly drizzle balsamic vinegar in addition to olive oil and kosher salt for a zesty alternative.

Purple Cupcakes for Avigail

Avigail’s favorite color is purple.

Well, most of the time Avigail’s favorite color is purple.  Except when she changes her mind and decides that her favorite color is pink.

In Avigail’s family, a favorite color is very important.  Her Bubby’s favorite color is blue. Aunt Sarina’s favorite color is purple, too.

I had a hard time admitting to Avigail that I don’t really have a favorite color.  My dining room is orange.  My bedroom is yellow.  My family room is terra cotta.  I wear a lot of black.

So, I explained to Avigail that I like all the colors that Hashem (G-d) created, each in its own way.  Thankfully, Avigail understood.  Whoow!

Avigail just turned three years old and we were in Israel during her birthday.  So, when she visited us last, I decided to make a batch of cupcakes for her.

I took a deep breath and hoped that she would not change her favorite color for that day.

She didn’t.

Avigail informed me that she still loves the color purple.

Except, she also emphatically reminded me,   “It is not my birthday.  My birthday was last week!”

At least, we don’t have to go over the favorite color thing.

These are the cupcakes.  Enjoy all the purple, Avigail and Sarina!

purple-cupcakes-by-the-dozen

INGREDIENTS

one dozen cupcakes, baked and cooled

2 cups of purple frosting.  I used Pillsbury purple frosting

one recipe of Colorful Chocolate Bark using purple chocolate melts.  I used  Gefen pareve purple melts and the sprinkles from the Pillsbury purple frosting and craisins

DIRECTIONS

Bake a dozen of your favorite cupcakes and allow to cool.

Prepare a batch of Colorful chocolate bark using Gefen pareve purple melts and purple sprinkles or candies.  Allow to cool and break into shards.

Fill a large piping bag with purple icing.  To do this most easily, I place piping bag with tip inside a tall cup or glass and fold the excess bag over the edge.

I then fill the piping bag with purple icing.

Squeeze frosting toward the bottom of the bag and begin piping, starting from outside of cupcake and piping toward center.

purple-cupcakes-before-garnishing

Garnish each cupcake with a shard of decorated purple bark.

Voila!

purple-cupcakes-side-view

Simply Reliable One Pan Roast Chicken Dinner

Everyone has their go-to favorite roast chicken recipe.  It is that hearty meal that is simple, reliable and oh, so comforting.  This recipe is practically one of our favorite and certainly one of our most undemanding Shabbos guests.  Despite its simple preparation, it yields a delicious chicken dish with spicy flavored potato wedges on the side.

simply-reliable-chicken-on-platter

In our house, this is the roast chicken recipe that I prepare most every Erev Shabbos (Sabbath eve).  I prepare it in a  large oblong Pyrex baking dish using whole chicken or bone-in chicken parts.  It makes the house smell inviting and warm and lets everyone know that Shabbos is on its way.  I have prepared this chicken simply and reliably for nearly the past thirty years.  It is one of the few things in our home that needs no extra attention on Friday.

It is so reliable that I prepare it in the morning and place it in the oven on a two-hour automatic timer.  It is so forgiving that it does not require a preheated oven, but can be cooked in a preheated oven if it is following another recipe.  No matter what my Friday brings: heavy work, surprises or extra cleaning, it is ready and delicious just two hours later with no special attention.

Now, if only the rest of my Erev Shabbos was that simple and forgiving…

simply-reliable-chicken

INGREDIENTS (more…)

Simple Crockpot Broccoli Soup

We returned home from our trip to Israel and found that Autumn has arrived in New Jersey.  Gone are the eighty-degree sunny Fall days in Israel.  Instead, we returned to crisp Fall days in the Northeast.

These cold mornings have me preparing crockpot soups.  This soup is so simple to prepare and makes for a delicious and hearty lunchtime broccoli soup.  It is flavorful, nutritious and low-carb.

broccoli soup unblended.jpgAfter lunch, I puree what is left in the crockpot for a smooth and filling dinner soup-two divine soups from one recipe with minimal effort.

broccoli-soup-in-purple-bowl

INGREDIENTS
2 pounds broccoli, fresh or frozen (see kosher notes)
1 onion or shallot, cut into chunks
4-6 cups water or  vegetable broth
1 tablespoon salt
4 cloves garlic or 1 tablespoons granulated garlic
1 1/2 teaspoons coarse ground pepper

DIRECTIONS

Fill crockpot with broccoli, onion and/or shallot and seasonings. Fill crockpot 3/4 to top with water and/or stock.  Cook on high for at least 4 hours. For a smooth texture, blend with a stick blender before serving.

VARIATIONS
Replace broccoli with cauliflower for another flavor alternative.

Saute onion or shallot before adding for more depth of flavor.

KOSHER NOTES

Kosher laws disallow the eating of  any whole insects and therefore broccoli and cauliflower require a process of soaking, rinsing and in some cases, pureeing.   Kashrut authorities differ on the proper checking of  broccoli and cauliflower and some disallow the use of these altogether.  This blog was not designed to be your  kosher authority, so please consult your local rabbinic authority regarding using and preparing broccoli and cauliflower.

DIY Felt Hair Bows for Avigail

felt-bows

My 3 year old granddaughter, Avigail, has wispy blonde hair.  My husband, her “Papa”, has been threatening to cut her bangs for as long as I can remember, because he just cannot tolerate seeing her hair in her eyes..  Avigail will wear bows as long as they meet her fashion criteria and are lightweight

avigail with felt bow_edited

 When she was much younger, we purchased small bows at Gap and Gymboree.  To keep up with Avigail’s ever-evolving fashion criteria, we tried finding new bows at the local accessory boutique.  These hair bows are expensive and ordinary and many of them no longer pass Avigail’s fashion and comfort test.  We decided that it was time to make some lightweight and fashionable bows of our own.

 We purchased some felt squares (29 cents each at Walmart!) and created a template for making these bows.  They are simple to make, beautiful to wear, lightweight and best of all, Avigail loves them!


Bring ends of Piece A together overlapping slightly at the center (dotted line on template).  Sew the ends firmly together at the center.


Surround sewn piece A with piece B, making sure to pull piece B tightly around piece A.  This will create a loop around Piece A and pleat Piece A slightly.  Secure ends of loop by sewing together.


 Sew piece B to back of sewn piece A through the back layer only.  Sew securely to reinforce bow.


Center and sew Piece C to the back of the bow.


Center and glue hair clip to back of the bow securely using a glue gun.

Voila!  You now have a lightweight and gorgeous hair bow.


Mango, Pecan and Pomegranate Salad

Occasionally, I like to prepare a sweet and leafy salad.  I usually use romaine lettuce or baby bok choy, since these greens are assertive enough to stand up to the sweet juiciness of the fruit and nuts.  I choose whatever fruit is abundant and perfectly ripe.

Over Sukkos in Israel, pomegranates and mangoes were exactly that: abundant and perfectly ripe.  I bought candied pecans in the Machane Yehuda Shuk (Jerusalem market) and added those, too.

Davida prepared this salad and is was both beautiful and delcious.  I loved the interplay between the soft bitterness of the chopped greens, the sweet juiciness of the pomegranate seeds, the tropical flavor of the mango and the heartiness of glazed pecans.


The dressing for this salad is best made by sprinkling the spices and drizzling the liquid ingredients directly on the vegetables right before serving. That way, the salad remains light, fresh and not weighed down by the dressing.

mango-pomegranate-romaine-salad-up-close


INGREDIENTS

2-4 cups of chopped romaine or baby bok choy (see kosher notes)

1 mango, cut into small cubes
1 pomegranate, seeded

1/4 cup candied pecans, chopped small

DRESSING

1/2 teaspoon kosher salt, sprinkled
Coarse black pepper, just a pinch to taste
juice of half a lemon, lightly drizzled
Olive or canola oil, lightly drizzled (optional)

light drizzle of agave syrup, honey or sugar


DIRECTIONS

Make sure that the lettuce or bok choy is dry.  Place mango, pomegranate and pecans right on top of greens.  Right before serving, sprinkle salt and pepper on top of vegetables. Lightly drizzle with lemon, oil and syrup, honey or sugar. Toss all salad ingredients together. Enjoy!

KOSHER NOTES

Kosher laws disallow the eating of any whole insects and therefore most greens require a process of soaking, rinsing and in some cases, pureeing. Kashrut authorities differ somewhat on the proper checking of leafy vegetables. This blog was not designed to be your kosher authority, so please consult your local rabbinic authority regarding using greens such as romaine lettuce or baby bok choy.

VARIATIONS

Substitute star fruit or granny smith apples for mango


Enjoy!

Salmon Terrarium Appetizer

salmon-appetizer-plating-in-glass-bowl

We were fortunate to have spend the past Sukkos (Fall Jewish Holiday celebrated in temporary huts covered in natural materials) in Israel.  We always marvel at how our  Jerusalem sukka is so much larger than our doll-size apartment living space.  Our sukka is tucked into one of those beautiful, dusty and wonderful corners of Jerusalem.  It is surrounded by gorgeous Jerusalem stone walls and is just beneath a main street with people strolling by on their way to the kotel (Western Wall) via  Sha’ar Yafo (Jaffa Gate).

jerusalem-sukkah

On sukkos, our sukka was home to many guests.  Our guests over Yom Tov are our friends, our family, our neighbors, Aaron and Davida’s friends and their friends’ friends.   Over the past Sukkos holiday, I served lots of food to many, many guests.  I try to keep the food simple, so that I can enjoy the spirit of the Yom Tov (holiday).  To keep things interesting, I try different table settings and plating techniques.

One of my appetizer mainstays is salmon.  I usually prepare a side of Perfect Salmon with Roasted Vegetables.  For the first meal, I usually serve the salmon as is.  It is beautiful just as is.

As an alternative, I often plate the salmon differently for the next Yom Tov meal.  This time, I flaked it in small pieces and served it in a clear square bowl with some Simple and Perfect Spicy Mayo and dill sauce drizzled on top and garnished with a few chive sprigs.  I just placed a few fancy lettuce leaves on the side for garnish.

salmon-terrarium-plating

Simple to Wow!


A Nightstand Castoff: Simply Upgraded and Gilded


gilded-nightstand
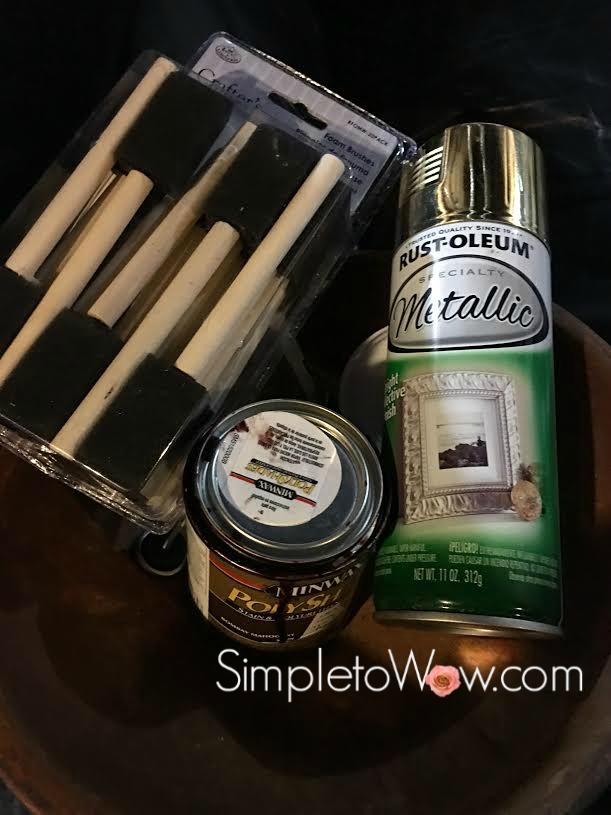
Kaitlyn has been wanting to find a new nightstand for quite a while.  Everything that she has found has just been too short and too ordinary for her height and taste.  She has been looking for something that has a retro feel with some originality in color and design.

A while back, she brought me an old maple nightstand that she had found on someone’s curb.  It had good bones in that it was in pretty good shape and had lovely wood details. The drawer had some damage, but had a built-in metal drawer pull.  The piece was a bit rickety and was a few inches too short to match the height of the beds in the bedroom.

This is basically what the nightstand looked like without the drawer:

nightstand sanded

I had purchased a hand sander last summer when I refinished two armoires for Michelle and Leah’s bedrooms.   It cost about $20 and is one of those indispensable tools for furniture refinishing. For this project, I also purchased foam brushes, metallic gold paint and I used a small can of mahogany stain that I had left from refinishing my sewing machine cabinet a few summers ago.

nightstand redo-materials

I spent about twenty minutes sanding all the surfaces with a hand sander.  I then wiped the sanded surfaces with a damp towel and let the surface dry.

With  1″ and 3″ foam brushes, I carefully applied Minwax mahogany stain to all the surfaces of the nightstand.  I used a small paintbrush to thin the paint out in the thin decorative recesses of the nightstand.  I applied about 3 coats of stain.

I covered the metallic drawer pull with painters tape and spray painted the drawer with metallic gold paint .

nightstand redo- drawer

I found some unfinished screw-in finials at Lowes to add height and interest to the bottom of the square legs of the nightstand:

nightstand redo-finials

I spray painted the tops and bottoms of the finials with metallic gold paint , being careful to keep the screws from getting painted.

Aaron drilled a hole in the bottom of each leg and then screwed the painted finials into them.

Voila!

nightstand redo-finished

Please Note: This post contains affiliate links from Amazon, which means I earn a small commission if you click and make a purchase.

Simple Baked Gefilte Fish Terrine

Gefilte fish is a traditional Jewish food served on Shabbos and the Jewish holidays. It is a loaf created with various types of ground fish and is usually boiled and served cold with sliced carrot and horseradish. There are a number of gefilte fish companies that prepare a frozen gefilte fish loaf ready for cooking.

Of course, I have experimented with different ways of preparing gefilte fish. This is one of he simplest. It is delicious and beautiful, too.

It will take a traditional gefilte fish and transform it into a wow appetizer.

INGREDIENTS
2 loaves of gefilte fish, partially defrosted
fresh or frozen spinach, soaked, rinsed, and dried
cooked carrot slices
cooking spray

SUPPLIES
loaf pan
parchment paper
silicone or rubber spatula

DIRECTIONS
Preheat oven to 350 degrees F.

Partially defrost 2 loaves of gefilte fish. I defrost the fish overnight in my refrigerator.

Line loaf pan with parchment paper, leaving enough on sides to fold over gefilte fish loaf.

Remove first loaf of gefilte fish from wrapping and press into parchment-lined loaf pan using spatula to spread the gefilte fish evenly and smoothly.

Place dry spinach leaves or a very thin layer of dry chopped spinach on top of gefilte fish.

Place a single layer of thinly sliced carrots on top of spinach.

gefilte-fish-terrine

Remove second loaf of gefilte fish from wrapping and layer right over the carrot layer, pressing to make sure that the second layer of gefilte fish closes any gaps created by the spinach and/or carrots. Spread evenly and smooth top.

Spray top of gefilte fish with oil spray and fold parchment paper over the top of the gefilte fish terrine, making sure that the fish is well covered. Cover top of parchment paper with foil if the fish is not completely covered by parchment.

Bake for 90 minutes. Allow to reach room temperature before refrigerating terrine in the loaf pan .

To serve, wait until the terrine is completely cold. Carefully, remove terrine from the loaf pan. Unfold parchment paper top and sides, leaving parchment on the bottom. Cut the terrine in slices and serve cold.

Enjoy!