Author: SimpletoWow

I hope that you enjoy this blog dedicated to recipes, designs and inspirations that are simple, yet add that special "wow" to your table, your family and your life. I grew up in Cleveland, OH and currently live in Teaneck NJ. I would love to hear from you as you find those special simple things that create a "wow" for you.

Oil in Squirt Bottles with Free Printable Labels

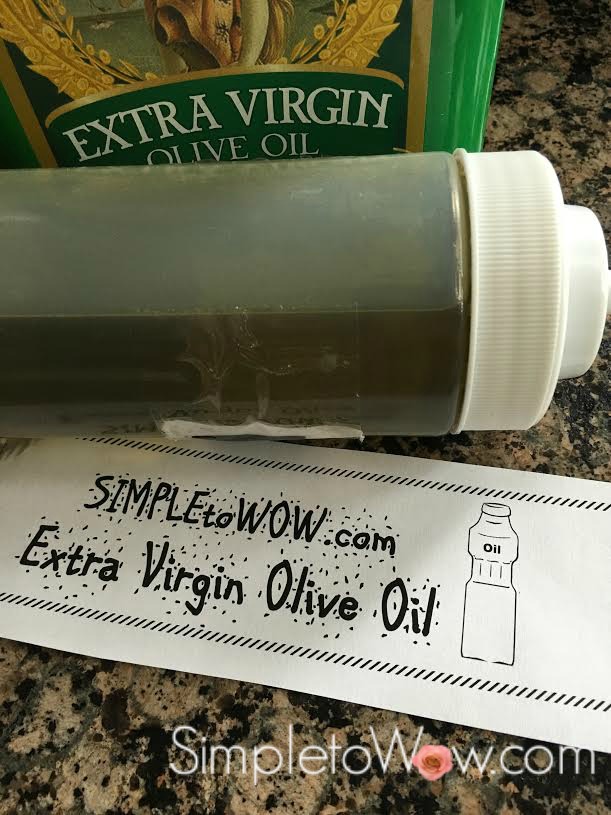
For most recipes, I use one of two types of oil: extra virgin olive oil and/or canola oil.  I like to buy these oils in large quantities and the containers tends to be large and unwieldy with a way-too-large pouring spout.  I find it easiest to decant the oil into a small squirt bottle for easy drizzling and squirting. I just refill the squirt bottle when necessary.

oil squirt bottles with label

I use oil for so many things and for most of them, I just need a bit of oil squirted in just the right amount in just the right place.  This counts for frying my morning omelet, dressing salads, sprinkling on roasted vegetables, starting a saute and most everything else.

For decades, my parents have been repurposing a dishwashing detergent bottle with a squirt top for this use.  You can easily use this type of bottle or a sport-top water bottle, washed and dried well, of course.

I prefer the thin, longer nozzle of a purchased squirt bottle.  I have so many of these type of bottles, so I am always happy to use two of them for decanting my olive oil and my canola oil.  So that I don’t get them mixed up, I just label the oil bottles with my SimpletoWow customized squirt bottle label.

I leave the heavy oil bottles on the shelf for use only for recipes that called for measured oil or for refilling my oil squirt bottles.  I keep the smaller squirt bottles of oil with my spices.  The thin nozzle on these squirt bottles is perfect for drizzling and squirting and the bottle fits perfectly in my spice drawer.

To prepare each oil squirt bottle, all I do is decant the oil carefully and apply the squirt bottle label with packing tape or glue stick.

This has been a great tool for me and I hope that it is for you, too.


.

Grilled Salami Slices: Netanel’s Simple and Humble Delicacy

A few weeks ago, my son, Aaron went fishing with his uncle, his cousins and two of his cousins’ friends.  Aaron loves to fish and wherever we go on vacation, Aaron usually schedules a fishing trip.  As a mother, I have learned that a fishing outing is so exhilarating when the fish are biting and so disappointing when the fishing crew comes home empty-handed.  More importantly, I have discovered that our fishermen love to catch fish, but are not as exuberant about preparing and eating the fish that were caught. Luckily, our fishermen did not come empty-handed and even more luckily, the fish that were caught were being saved for a future feast in Manhattan.

Now, I was under no obligation to prepare the fish and better yet, under no pressure to force them to eat the fish.  So, I offered to make an impromptu barbecue for the hungry fishermen.  I checked the refrigerator and I had some beef sliders, but no hot dogs.

I did have a couple rolls of salami.  My nephew’s friend, thirteen-year old Netanel, offered me his own recipe for grilled salami.  I was going to grill the salami whole, but Netanel insisted that we cut it into thick slices.

grilled salami sliced

I took Netanel’s lead and we slathered the salami slices with barbecue sauce.

The barbecued salami slices came off the grill caramelized and just perfect.  It was delicious served up with different types of mustard and dips.  It was such a hit that I told Netanel that I would now incorporate grilled salami as a part of our standard barbecue.

Tonight, I prepared this delicacy and dressed it up for its blog debut.  It did not disappoint.

grilled salami on grill


INGREDIENTS

grilled salami ingredients

Salami, cut into thick slices
Sauce: barbecue, pesto, spicy mayo, mustard and/or horseradish sauce
Sesame seeds or your favorite spices (optional)


DIRECTIONS

Cut salami into thick slices.  Coat with your favorite sauce and your favorite toppings.

Heat on grill for a few minutes, flipping over when golden brown and carmelized.

Serve immediately with your favorite topping and/or condiment.

grilled salami on platter


Simple Kiwi Flower Garnish

kiwi garnish with single golden kiwi 2

A simple, yet beautiful garnish adds elegance and whimsy.  This one is so simple and only takes 30 seconds to prepare.  It uses the whole kiwi with no waste and needs only a small paring knife as a kitchen tool.

It would make a gorgeous centerpiece for a fruit platter, fruit pie or as a kiwi garnish accompaniment to a plated dessert.  With green and golden kiwis available right now, this garnish can be easily prepared in either color.  Just take care to use kiwis that are firm .

This kiwi garnish resembles a water lily lotus flower.  It would look gorgeous on an edible leaf like a lemon leaf with just a few chocolate truffles as an accompaniment. (more…)

Roses and Lanterns: A Simple and Stunning Centerpiece

It all started with It’s all about the arrangement (psst….even with last week’s roses), my first blog post.  This original blog post was one of those ideas born out of an upcycling strategy and week-old roses.  The idea was to take last week’s open but slightly wilted roses and enjoy the blossoms in another arrangement, floating the wilting blossom heads to straighten them out and enjoy them in another way.

Don buys roses just about every Erev Shabbos (Sabbath eve) and I try to create original arrangements for the Shabbos table from these roses.   These roses  are sold right in front of our synagogue by a member of our community.  These roses have thick stems and  high quality blossoms and come in a variety of colors.  They really last a full week and with these upcycled arrangements, I can get at least one more week and sometimes two weeks of added enjoyment from each rose bouquet.

This week, I was setting the table for a weekday dinner and still had some lanterns on the kitchen table from a goodbye barbecue that we had hosted for one of Leah’s friends last week.   Sitting next to the lanterns, were the variegated roses from last Shabbos.  Most of the blossoms were still gorgeous,  but the stems were already starting to droop, making the flowers appear wilted.

wilting roses in silver vase

I cut the roses off their stems, cutting them right below each blossom.  I placed a single rose blossom in each of six square glass vases and bowls.  I interspersed the lanterns with the roses and stood back to admire the newest upcycled arrangement.

Here it is:

lanterns and variagated roses


Leah’s Simple Pasta Saute

Leah prepared the most heavenly pasta dish last night.  It is one of those dishes that can be made pareve or with additional melted cheese for a dairy dinner.  It uses simple ingredients and creates a heavenly combination of pasta, onions, garlic and vegetables.

Leah prefers whole wheat pasta, but it can be made with any shape or type of pasta-your choice.  This recipe is simple and delicious.

Enjoy!

leah's pasta saute

INGREDIENTS

1 pound of pasta

1 onion, thinly sliced or diced

2-3 garlic cloves or granulated garlic

1 pint of small grape tomatoes, rinsed and cut in half

salt and pepper to taste

fresh herbs (optional)

1/2 cup shredded mozzarella cheese (optional)


DIRECTIONS

Prepare the pasta according to package directions and drain.

Over medium heat, saute onion and garlic until soft.  Add tomatoes and seasonings, stirring gently to combine.  Cook for several minutes.  Add pasta and combine all flavors. Saute for 1-2 minutes more.

Shut heat and add mozzarella cheese.  Cover until cheese is melted.

Garnish with fresh herbs.


RECIPE COURTESY OF LEAH RESPLER


A Summer Version of Simply the Best Chicken Soup

Many of my friends stop making chicken soup for their Friday night Shabbos (the Jewish sabbath) meal when the weather gets too hot.  Not me.

My children would tell me that it doesn’t feel like Shabbos without the chicken soup.  So, chicken soup graces our Shabbos table, rain or shine, winter or summer.  Somehow, our Shabbos table is so much like the chicken soup itself.

summer chicken soup.jpg

(more…)

Simply the Best Marinade: A Science Lesson

simply the best marinade

My friend, Lori, is known for her delicious chicken cutlets.  She marinates boneless chicken breasts overnight and then grills them to perfection.  Lori’s marinade is legendary.  As with most great recipes, Lori’s marinade recipe did not start or end with Lori.  Lori received the recipe from her friend, Marcia, and Lori shared this awesome marinade recipe with me and so the sharing of recipes continues…

I have found uses for this marinade way beyond grilled chicken cutlets.  I have since added pepper, ginger, wine and mustard, some of my favorite flavors, to the recipe.  The ginger, wine and mustard also add some marinating science to this recipe, as you will see. I have prepared this delicious marinade for roast chicken, london broil, steaks, roasts and tofu, too.  When I use this for a thick roast or steak, I pierce or score the meat slightly to allow the marinade to penetrate.

Many times, I prepare a double or triple batch of the marinade and then use it to marinate all the chicken and meat that I plan to use for Shabbos or for a barbecue.  To keep things interesting, I’ll add jalapeno, lime juice, Montreal Steak seasoning or whatever seems to strike my fancy to some or all of the marinade.  This is a versatile and delicious marinade that is a winner every time.

And, now for the science of marination: Marinades tenderize food by adding ingredients that flavor and soften the protein.  Most marinades are comprised of oil, seasonings and an acid and/or enzymatic component.  Raw lean meat tends to be tough because of the collagen and elastin fiber content of the connective tissues.    Marinating meat before cooking is an excellent way to pre-tenderize meat by breaking down the connective tissue in the meat. and to prevent moisture loss when heat is applied.  It is important to watch the amount of time that proteins marinate, because if a marinade is left for too long, it can completely digest the meat.

Acids, such as lemon juice or vinegar, denature proteins through disruption of hydrogen bonds in the collagen fibrils. Alcohol, like beer and wine,  help the acid components of the marinade penetrate since fats in the meat are soluble in alcohol  Certain enzymes work to  attack the protein networks of tough meat. Protease, found in ginger, helps to break down muscle fiber protein and Bromelain, found in pineapple,  break down collagen and elastin in meat.  Oils are used in marinades to impart and  release the flavors of the seasonings.  Mustard is an excellent emulsifier, helping to keep ingredients together with minimum separation.

INGREDIENTS

 1/2 cup oil
2 tablespoons soy sauce
2 tablespoons wine
3-4 tablespoons lemon or lime juice
generous squirt of ketchup
generous squirt of mustard
2 tablespoons Worcestershire sauce (see kosher notes)
2 minced garlic cloves or garlic powder
1 tablespoons fresh minced ginger or ginger powder

dash of black pepper, red pepper flakes or cayenne pepper

DIRECTIONS

Whisk, shake or combine all ingredients together in a bowl, plastic container, mason jar or food processor.
In a covered dish or ziploc bag, marinate chicken, meat or tofu in this marinade for at least one hour and no longer than overnight.  Pierce thicker cuts of meat to allow marinade to penetrate. Prepare according to recipe.

KOSHER NOTES

Most Worcestershire sauces contain anchovies and kosher dietary laws do not allow mixing of meat and fish. Those with anchovies are often marked with the rabbinic certification followed by the word “fish”. There are a few brands that impart the Worcestershire flavor without the fish content and would be appropriate to use for this type of recipe. Make sure to check before using or skip the Worcestershire sauce entirely.

VARIATIONS

Add fresh jalapeno, herbs or your favorite spice combination for a flavor alternative.
Substitute cider vinegar for citrus juice for a more pungent flavor.

Cowboy Caviar: Fashioned from Barbecue Leftovers

I recently posted a wonderful recipe for Cowboy Caviar: A Simple and Hearty Salad with Attitude.  It has become one of my favorite  go-to salads when I have a limited assortment of vegetables in my refrigerator.  It really is a simple and hearty salad that can be fashioned from pantry staples, yet with enough fresh ingredients to make it a respectable salad.  Today, cowboy caviar has earned a whole new level of respect in my mind.

Because….I fashioned a delicious and colorful cowboy caviar from last-night’s barbecue leftovers.

barbecue leftovers

No one would have guessed that the key ingredients of corn and baked beans were from last night’s barbecue.  Leah even remarked that she loved the smoky flavor of the grilled corn.  For an extra measure of flexibility, I served the cowboy caviar two ways.

I filled one bowl of vegetarian cowboy caviar.

cowboy caviar from leftovers-vegetarian

I filled another bowl with the cowboy caviar mixed with cubes of leftover grilled hot dogs.

cowboy caviar from leftovers

From now on, I may have to plan a barbecue so as to create a leftover cowboy caviar for the next day.

Yes, it was that good!


INGREDIENTS

1 can baked beans
1 can black beans
1 red pepper, diced
6 ears of grilled corn kernels
1 bunch thinly sliced scallions or 1 diced medium onion
2-3 stalks thinly sliced celery
1/2 cup chopped fresh cilantro and/or fresh parsley (see kosher notes)
6 hot dogs, grilled and cubed (optional)
2 tablespoons cider vinegar
1 tablespoon dijon mustard
1 teaspoons hot sauce or sriracha
1 tablespoon salt
1 clove garlic, minced or garlic powder
dash pepper

DIRECTIONS

Cut kernels off of grilled corn and mix in beans. Dice and slice all vegetables and herbs.  Drizzle and sprinkle seasonings right on top of salad and toss gently to combine.


KOSHER NOTES

Kosher laws disallow the eating of any whole insects and therefore most greens and herbs require a process of soaking and rinsing. Kashrut authorities differ somewhat on the proper checking of leafy vegetables and herbs. This blog was not designed to be your kosher authority, so please consult your local rabbinic authority regarding using herbs such as parsley and cilantro.


Farro: A Simple, Ancient and Fabulous Grain

I walk most days with my friend, Linda.  Linda is a wealth of information and I always learn so much from her on our walks.  We often share recipes, tips and plating ideas.  A few weeks ago, Linda asked if I ever prepared farro. As I never had prepared farro, she offered to drop off a bag of farro for me to try.

Farro is an ancient grain with high protein, plenty of fiber and many health benefits. Although it contains gluten, its gluten levels are lower than wheat and farro is often tolerated better than wheat by those who are sensitive to gluten.  Its nutty flavor is similar to brown rice and its puffy texture is similar to barley. Farro reminds me of wheat berries as it is has a visible bran and a light brown color.

farro up close

Here are the nutrition facts for whole grain farro:

farro nutrition facts

I tried farro a couple of weeks ago for the first time and we were hooked.  It was so simple to prepare and so delicious in taste and texture.  It can be served warm, cold or room temperature.  I have tried it again and again and it never disappoints.

The package directions recommend soaking and/or rinsing the farro before preparing. This will help neutralize the phytic acid in the farro grains, making the grains easier to digest and helping to break down the gluten. I usually skip this step as we do not seem to have a sensitivity to the farro grains.

As my new favorite grain, I have begun trying farro in salads and other recipes and I have found it to be very versatile.  Over the next weeks and months, I will be posting additional recipes using farro.

INGREDIENTS

2 tablespoons oil
1 onion
2-3 cloves of garlic
1 cup farro
3 cups water
salt and pepper to taste

DIRECTIONS

In a saute or fry pan, saute 1 onion and 2 cloves or garlic in oil, until soft and just turning brown.  Using a rubber spatula, scrape onions, garlic and oil into a rice cooker.
sauteed onions and garlic

Add farro, water and seasonings to rice cooker. gently stir to combine.  Cook until ready, about 45 minutes. All the water should be absorbed and the farro will be soft and golden-brown when ready.

farro with onions and garlic

VARIATIONS

Farro can be prepared on the cooktop, as well. After sauteing onions and garlic, add farro, water and seasoning to pan.  Over high heat, bring uncovered mixture to a rolling boil. Reduce heat to low, cover and simmer for 25-30 minutes, until the water has been absorbed and the farro is soft.

Magic Tip: Keeping the Lid on a Pot of Chicken Soup

Leah decided to spend Shabbos at Kaitlyn’s.  Avigail was barely able to contain her excitement, telling everyone that “Tante Reah” was coming to visit her and would be sleeping in the bed right next to hers.  Don and I were empty-nesters for Shabbos.

Although it is not the first time this summer that Don and I are home alone for Shabbos,  I still haven’t figured out how to cook for two people.

My batch of Simply the Best Challah Recipe…ever!is enough for 6 challahs, my Simply the best chicken soup…ever!still feeds 8-10, Perfect Salmon with Roasted Vegetables is enough for 10 and Cowboy Caviar: A Simple and Hearty Salad with Attitude is enough for a large family.

That left me with a great idea.  I could cook an entire batch of our Shabbos favorites and send most of it for Kaitlyn, Aaron, Leah and the kids to enjoy.  That way, I need not alter any of my recipes and two households will enjoy the Shabbos delicacies with only one cooking spree.

There left only one question: How do we transport the chicken soup in its pot?

That was easy.

I found some long and strong rubber bands that fit over the pot. I secured each band under one pot handle.  I stretched each rubber band over the lid and secured the other end under the second pot handle.  I did that three times so that in case one or two rubber bands snapped, the lid was still secure.

chicken soup with rubber bands

Perfect.  Now all that’s left to do is to teach Avigail to call Leah, “Tante Leah”.


Fruit Salad: It’s All About that Boat

I recently sent over fruit salad for a refreshing summer dessert in honor of our friends’ simcha (happy occasion).  The fruit salad was so simple to prepare.  I just sliced the pineapple, using an  all-metal pineapple corer and slicer and I used a melon baller to create uniform spheres of watermelon, cantaloupe and honeydew.

For a contemporary twist, I often opt to serve festive food on long and narrow platters that are lightweight and unique.  For fruit, I usually opt for a serving dish that has some depth to catch any dripping juices.  I found just the right serving dish.

It was a hammered bronze metal elongated bowl with a jagged edge, just big enough to make a statement and just small enough to fit in my friend’s refrigerator until time to serve.

I added a few interesting 4″ bamboo toothpicks and voila!

fruit salad in metal bowl


Colorful Farm to Table Confetti Salad

shredded salad


This week, we visited a wonderful U-pick farm in Fishkill, New York.

It was a glorious day, the sun was shining and the fields were lush and overflowing with produce.  Don and I really enjoyed picking vegetables directly from the fields and the produce was extraordinary.  We picked all types of summer squash, yellow tomatoes, green peppers and cucumbers.

tomato in gardens

We arrived home just in time for dinner and I threw together a quick salad from the produce that we had collected.  I soaked and rinsed the tomatoes and then scrubbed and rinsed everything else before shredding the vegetables in the food processor.  I added some shredded fresh beets and herbs that I already had in the refrigerator.

The salad was perfect.  It was delightfully colorful.  It was fresh from the farm delicious.

Here is the recipe:


INGREDIENTS

cherry or grape tomatoes, whole or halved
3 zucchini or summer squash, scrubbed
3 small cucumbers, scrubbed
2 peppers, scrubbed with centers removed
2 small beets, peeled (optional)
parsley, chives or cilantro (optional)

salt and pepper, to taste
a splash of balsamic vinegar
a light drizzle of olive oil (optional)


DIRECTIONS

Soak, scrub and rinse vegetables.

Place tomatoes in salad bowl.  Add all vegetables to food processor fitted with shredding blade. Shred vegetables and add to salad.  Sprinkle, splash and drizzle seasoning right over vegetables.

Toss.

Enjoy!

Simple and Perfect Spicy Mayo

I love the spicy mayo that comes with sushi rolls.  It adds that delicious spicy flavor, smooth texture and appealing drizzle to sushi, sandwiches, fish, grilled chicken and meat. It is expensive to purchase ready-made and oh, so simple to prepare yourself.

I was determined to discover a recipe for spicy mayo.  It was simpler than I had ever imagined.  It has three simple ingredients and allows for adjusting the heat of the finished product by adding more or less of the sriracha or hot sauce.

It has become our favorite dip and I try to always have a squirt bottle filled with spicy mayo in the refrigerator.  It will become your favorite accompaniment to salmon, grilled chicken and sandwiches, too.

spicy mayo in food processor
(more…)

Low-Carb Summer Squash/Zucchini Kugel

The McCarthys just delivered another enormous batch of home-grown produce (see A Salad of Bounty and Inspiration), among which were some beautiful yellow and green squash.

mccarthy produce with squash

Dorothy sent me an Ina Garten recipe for zucchini pancakes, which looked delicious, but a bit too labor-intensive for my carefree summer frame of mind.

Instead, I just used the squash to make a simple and delicious zucchini kugel.  A kugel is a classic Jewish souffle made from sweet or savory ingredients.  This was so simple to prepare, so colorful and oh, so tasty.

I would suggest making this in an oven-to-table pan (like a Pyre pie plate or ceramic souffe dish).  Since squash has a very high water content, this kugel is crisp on top but rather mushy on bottom.  Therefore, it is best served directly in the crock in which it was baked.

zucchini kugel-ingredients


(more…)

When Pancakes Meet Sprinkles…

When Avigail and JuJu (the grandchildren) come to visit Bobby (that’s me), they  look forward to breakfast. Usually, I bring them downstairs and serve breakfast before Kaitlyn wakes up.  Avigail likes to watch the birds at the bird feeders eating “birdie food”.  JuJu just barks at the birds.

Both grandchildren’s favorite breakfast is pancakes.  When time is short, I just buy frozen pancakes, microwave them and then serve them with whipped cream and sprinkles.   When Davida is around, she makes delicious, fluffy pancakes from scratch.  She adds chocolate chips and sprinkles to make them sweet, colorful and irresistible.

Here is Davida’s recipe:

INGREDIENTS

1 1/2 cups flour
dash salt
2 tablespoons sugar
1 tablespoon baking powder

1 1/2 cups milk
2 eggs

a few tablespoons chocolate chips, chocolate chunks and/or sprinkles

3 tablespoons butter or oil

DIRECTIONS

Pour flour, sugar, salt, sugar and baking powder in bowl and use a dry whisk to combine well.  Add milk and eggs until just combined, using a wooden spoon or heavy rubber spatula.  Do not overmix.  Gently stir in chocolate chips, chunks and/or sprinkles.

Heat butter or oil in large fry pan or spray griddle with cooking spray and preheat.  Reduce heat to medium and carefully ladle out pancake batter onto pan in small circles, leaving some room between pancakes.  Flip each pancake over when bubbles start to form.  Remove each pancake batch when both sides of the pancakes are golden-brown.

If making many batches, you may have to carefully wipe out the fry pan and refresh the butter/oil, so that the butter/oil does not burn.


VARIATIONS

You can substitute a ripe banana for some of the milk .  Just mash the banana well and use 3/4 cup of milk together with the banana in place of the full 1 1/2 cups of milk.

pancakes with sprinkles 2

A Trio of Magenta Flowers in Vintage Silver Vases

magenta flowers tri up close

My local supermarket had some beautiful magenta peonies for sale. I thought that the vintage quality of these fluffy peonies would look gorgeous in series with some other magenta flowers arranged in different types of silver vases.

magenta flowers in silver.jpg

I used the same inspiration that I described in Three’s a Crowd? A Trio of Floral Arrangements by arranging three types of flowers of the same color in separate vases. This time I used peonies, Alstroemeria and a gorgeous magenta filler. Here is what is looks like:

magenta flowers tri on table


Growing Lettuce in TopSoil Bags

When Aaron was a little boy, he loved to join me in shopping for our summer annuals and vegetable plants. We would peruse the aisles of the local garden center, looking for unusual plants and interesting planting combinations and techniques.

We discovered that our local nursery started some of their lettuce and leafy vegetables right inside topsoil bags. We couldn’t wait to try this technique ourselves. We tried it and it worked beautifully, producing vibrant plants with minimal care. Best of all, once we harvested the leafy plants, we would reuse the topsoil for our vegetable garden. It seemed like a win-win.

We have been using this technique for spring gardening for the past many years.

topsoil planters for lettuce  supplies upside down


SUPPLIES
bag of top soil, potting soil or mixed soil
a knife or box cutter
seeds

DIRECTIONS

Place bag of topsoil in a sunny area.  Using the box cutter or knife, cut x’s in 12-15 inch intervals.  Pour one or two seeds into each hole created by the x.

topsoil planters for lettuce with xs cut

Make sure that the soil bag is damp, but not wet.  Seeds should sprout within a week or 10 days.

lettuce in soil bags
.

Simple Corn Grilled in the Husk

There are certain things that are best cooked in their natural packaging.  Corn on the cob falls into that category.  The perfect natural packaging for corn on the cob takes my breath away.  I find it miraculous that corn grows so perfectly in the husk with a protective layer of corn silk to cushion the tender kernels of corn.  If you look closely, it is so easy to see the daily miracles in nature.  Corn in the husk reminds me of the divine miracles that are so easy to miss in everyday life.

corn on the cob

For the best ears of corn, choose ears that are medium to large in size.   As you gently press on the husk, the kernels should feel thick and plump with no gaps.  Look for tassels of corn silk sticking out of the top that are brown and slightly sticky, not black and dry.

The simplest and best way to grill corn is right in the husk.  This method simplifies the preparation as you do not need to shuck the corn before cooking.  The natural silk and husk leaves protect the corn as it barbecues.  Once the husk chars, the corn is perfectly cooked inside.  Just peel back the leaves to reveal shiny and deliciously sweet ears of corn.

corn in husk on grill

This way of preparing corn is best for eating outside because the charred bits of husk and silk tend to make a bit of a mess.

This is simple.  This is delicious.  This is divine.

(more…)

Patriotic Chocolate Bark: Simple and Pareve

Chocolate bark is one of the easiest dessert creations.  It takes moments to prepare, is a canvas for creativity and can be served in a myriad of different ways.  This one is perfect for a patriotic July 4th celebration.

It is a combination of chocolate, nuts, sprinkles and colorful fruit.  It can be served whole to resemble a brushed version of the American flag.  It can be cut into squares or can be broken into chards to garnish desserts.  Either way, this simple dessert will delight you  with the red, white and blue colors that are so patriotic and oh, so sweet!

INGREDIENTS

1 bag of chocolate chips or chocolate pieces

blueberries or black grapes sliced in half, carefully soaked and rinsed or confectionery stars
strawberries, carefully soaked and rinsed (see kosher notes), freeze-dried strawberries or craisins
almonds, candied ginger or white marshmallows, mini or  cut into strips

patriotic chocolate bark 2

DIRECTIONS

Melt chocolate in microwave or over a double boiler until smooth.   I used the microwave to melt chocolate  on a flat microwave-proof plate for 6-8 minutes on the timed defrost cycle.

Pour chocolate over a parchment paper-lined baking sheet or wax paper, spreading with a rubber or silicone spatula to about 1/8 or 1/4-inch thick.  I like to spread the chocolate as thin as possible without being translucent.

While still hot, decorate the chocolate with the fruit and nuts for a creative rendition of the American flag.  Place blueberries, grapes or stars in a grid fashion on the left corner of the chocolate to represent the stars.   Create rows of sliced strawberries or craisins and almonds, ginger or marshmallows to create the stripes of the flag . Carefully set each piece of fruit and nut into place by gently pushing into the warm chocolate.

Allow bark to cool on counter or in refrigerator, until chocolate hardens.

If serving in squares, score with a knife before chocolate hardens,  If breaking into chards, wait until chocolate has cooled and hardened.

patriotic chards

Store in ziploc bag or wrap individual pieces in plastic bags.

patriotic chocolate bark with blue white stars

KOSHER NOTES

Kosher laws disallow the eating of any whole insects and therefore strawberries require a process of soaking, rinsing and in some cases, pureeing. Kashrut authorities differ somewhat on the proper checking of strawberries and some disallow the eating of strawberries, altogether. This blog was not designed to be your kosher authority, so please consult your local rabbinic authority regarding the use of strawberries.


SERVING SUGGESTIONS

Place chards or squares atop cheesecake,  brownies or ice cream.

patriotic chard over brownie

A Simple Fluffy Arrangement of Peonies and Hyndrangea

For Shavuos, Davida’s friend, Chava, brought us a gorgeous new vase.  It is rectangular with a narrow opening, perfect for arranging so many different types of flowers.  It is unique in its narrow but long shape, and it is stunning with a floral motif designed into the glass.  Since Shavuos, I have tried so many types of floral arrangements in this vase and they all work.

But, this is my favorite, so far.

My niece, Michal, hosted an event at her home last night and she sent a bouquet of hydrangea and peonies from the event to us.  I rearranged these flowers using a large structural leaf that I already had.  I placed everything in Chava’s vase and I love the soft and delicate floral arrangement.


hydrangea and peony arrangement with orange background

(more…)

Cauliflower Personal Pizza: Simple and Low-Carb

Davida has been my lunch-time cook and she made this delicious cauliflower pizza for me today for lunch.  She used cauliflower couscous to create the crust and then just layered sauce and cheese atop the crust.

cauliflower personal white pizza.jpg

It was relatively simple to prepare and delicious to eat.  Thanks, Davida!


INGREDIENTS

1/2 head of cauliflower, grated to couscous consistency (see kosher notes)
1 egg
1/2 cup grated or shredded cheese
1 clove garlic, minced or garlic powder
1/2 teaspoon kosher salt
Freshly ground black pepper

1 cup shredded cheese
1/2 cup marinara sauce (optional)


DIRECTIONS

Preheat oven to 450 degrees F.

Pulse the cauliflower in food processor or blender until grated to the consistency of couscous.

Microwave cauliflower on high for 4 minutes.  In a large bowl, combine microwaved cauliflower couscous, egg, cheese, and seasonings.

Line a baking sheet with parchment paper or spray generously with oil spray. Using a rubber spatula, spread the cauliflower mixture to personal size..

Bake until the cauliflower crust is golden and darker at the edges, about 20 minutes.

Remove the crust from the oven, drizzle with optional sauce and then sprinkle with shredded cheese. Bake for about 10 minutes more.

Allow to cool for several minutes before slicing or eating.


VARIATIONS

Replace cauliflower with broccoli for another flavor alternative.

Add toppings on top of cheese.  Suggested toppings include strips of peppers, diced onions or scallions, chives or basil.


KOSHER NOTES

Kosher laws disallow the eating of  any whole insects and therefore  cauliflower require a process of soaking, rinsing and in some cases, pureeing.   Kashrut authorities differ on the proper checking of  cauliflower and some disallow its use altogether.  This blog was not designed to be your  kosher authority, so please consult your local rabbinic authority regarding using and preparing cauliflower.

(more…)

A Gallery Wall of Playgroup Art

Kaitlyn created a gallery wall for Avigail’s art.  Two-year old Avigail is a budding artist with so many art projects and pictures to display.   The gallery wall allows Kaitlyn a way to rotate all the different playgroup art that Avigail brings home from playgroup.

Kaitlyn used empty old frames and sprayed them all the same color blue to create a cohesive collection.  To each frame, she attached a thick string with a clothespin or two so that she can easily add and remove art as needed.

This gallery wall transformed the study area in their apartment and is the perfect spot for Avigail to display her art.

Here it is:

blue gallery wall for avigail's art

SUPPLIES

old frames

spray paint

Thick string or twine

small wooden clothespins

Assorted Command Strips for Picture Hanging

DIRECTIONS

Spray paint frames in well-ventilated area.  Allow to dry. Attach a length of twine using staple gun to backs of wood frames.

Use Command strips to attach frames to gallery wall, following directions on package. Attach clothespins to string.  Hang pictures using clothespins.

Voila!


A Salad of Bounty and Inspiration

vegetables from the mccarthys


There are friends who transform your  life.  They may not be the friends you see regularly.  They may not be the friends that are your neighbors or even part of your community .  They are people who have entered your orbit and make you see the world differently.  They are people who live their life and transform others with the enormity of who they are.  Our friends, Dorothy, Patrick and Aimee McCarthy are precisely those type of friends.

Dorothy and Patrick are parents like no one else.  They have met life’s challenges with great courage, tenacity and good humor.  They have raised Aimee, their daughter, with the greatest spirit of empowerment and positive energy.  Although Aimee has faced so many medical hurdles, she is one of the most inspirational women we have met.  Aimee is a young woman who embodies optimism, strength and spirit and someone who leads others by example.

Dorothy and Patrick have shown us how  to show appreciation to those who have impacted their lives.  Dorothy and Patrick have gone above and beyond the call of duty to celebrate life’s joys and sadnesses with us.  At Aimee’s twenty-first birthday party, Dorothy and Patrick invited us and ordered catered glatt kosher food for us and their other kosher guests.  When my mother-in-law passed away, the McCarthys planted a gorgeous lilac tree on our property in Mom’s memory.  Over the years, these wonderful friends have made generous donations to the Yad Eliezer soup kitchen in Tzfat, Israel in memory of my in-laws.  They are so appreciative of  the small measure of friendship that we have shown them and are friends that we admire so immensely.

Yesterday, Patrick dropped off an enormous box of vegetables and herbs from their garden.  The idea of sharing the bounty of one’s hard work in planting and tending to a garden is divinely inspired.  It is reminiscent of the bekurim (first fruits) that were dedicated to G-d and given to the Cohanim (Priests) in the Beis Hamikdash (Holy Temple).at Shavuos (Jewish Holiday celebrated 7 weeks after Passover) : Bekurim: First Fruits from Hollister.

This bounty speaks to the munificent spirit of  these wonderful friends and the enormity of appreciation that defines them.

With the generous selection of vegetables and herbs shared with us by the McCarthy family, I decided to make a fresh and delicious salad.  Here it is:

vegetable bounty  from the mccarthys

Ingredients

2 small heads of lettuce, torn or cut into small bits
mixed peppers, cut into thin sticks
2 zucchini, scrubbed and shredded or spiralized

new onions or scallions, thinly sliced
heirloom tomatoes, cut in half

1-2 cloves garlic, minced
parsley, soaked and rinsed (see kosher notes)

Simple, Creamy and Perfect Homemade Balsamic Vinaigrette


Directions

Prepare all of the vegetables and the dressing.  Drizzle some balsamic vinaigrette on top. Toss right before serving.  Enjoy!

mccarthy salad.jpg

Serving Suggestion

Toss sliced tofu and zucchini with olive oil and kosher salt and roast in a 450 degree F oven for 40 minutes.  Serve on top of the salad.

mccarthy salad with roasted zucchini and tofu

Kosher Notes

Kosher laws disallow the eating of any whole insects and therefore most herbs require a process of soaking and rinsing. Kashrut authorities differ somewhat on the proper checking of herbs. This blog was not designed to be your kosher authority, so please consult your local rabbinic authority regarding using herbs such as parsley.


Cowboy Caviar: A Simple and Hearty Salad with Attitude

Cowboy caviar is one of those salads that is prepared mostly with items that you already have on hand in the pantry.  It is a hearty bean salad that really packs a spicy bite.  It is the perfect salad to serve at a barbecue because it stands up well and pairs so beautifully with grilled food.

Cowboy caviar is an audacious Tex-Mex salsa that dares to call itself caviar.   It is simple to prepare.  It is memorable.  And, it has chutzpah, in a good way.

This salad can be served as a side dish or as an appetizer with tortilla chips or lettuce.  It is versatile and can be prepared several hours in advance and refrigerated until  ready to serve  You can experiment with different types of legumes like chick peas and assorted beans.  For less attitude, you can skip the sriracha sauce altogether.

cowboy caviar in jalapeno pepper bowl-side view

Ingredients

1 can black-eyed peas
1 can black beans
2 ears of grilled corn or 1 can of corn kernels
3-4 diced medium tomatoes

1 diced firm ripe avocado

1 bunch thinly sliced scallions or 1 diced medium onion
2-3 stalks thinly sliced celery or bok choy (see kosher notes)
1/2 cup chopped fresh cilantro and/or fresh parsley (see kosher notes)
2 tablespoons cider vinegar
1 tablespoon dijon mustard
1 teaspoons hot sauce or sriracha
1 tablespoon salt
1 teaspoon oil
1 clove garlic, minced or garlic powder
dash pepper

(more…)

Simple Tips to Enjoy Kosher Zurich in a Day

Don and I traveled to Israel recently. On the way from Newark to Tel Aviv, we worked in a 14 hour layover in Zurich, Switzerland. Over the past many years, we have toured a number of cities in Europe this way. We have found that this is an excellent way to tour a city without the expense and hassle of booking an overnight stay in a hotel.

We did some cursory research before traveling and discovered that Zurich would be a very easy city to navigate using public transportation. We checked the weather forecast in advance only to find that it would be raining the whole day, so we packed umbrellas and rain slickers.  We discovered that there are lockers in the Zurich airport and museums for luggage.  Our airline allowed us to check our bags all the way through to Israel so that we had only to deal with hand luggage on our layover.

We arrived in the early hours of the morning and easily took the train directly from/to the airport. In the span of our layover, we managed to walk Zurich’s City Center and Old Town, tour two museums, take a boat ride around Lake Zurich, enjoy a kosher meat dinner and return in plenty of time for our short flight from Zurich to Tel Aviv.

zurich-in the rain by trolley

Although Zurich is one of the most expensive cities in Europe, we found that the transportation and entertainment costs were very affordable. The Swiss locals that we encountered were friendly and helpful.  We discovered that we were able to easily communicate in  Zurich using English.

Here are some tips and highlights from our day in Zurich:

1. Buy the ZurichCARD in the airport for savings on transportation and museums
We bought the ZurichCARD in the airport. The ZurichCARD cost around $20 per person for 24 hours of unlimited transportation by train, trolley and boat in and around Zurich. We activated the card right in the airport train station and took a train straight to the City Center, a mere 10-minute ride. From there, we walked to two excellent museums and used the ZurichCARD as museum admission. Public transportation in Zurich runs like clockwork, just as one would expect in Switzerland.

(more…)